【2023年版】GitHubでウェブサイトを作る方法(コマンド不要)
GitHub はソースコードを管理するサービスですが、静的なウェブサイト(HTML, CSS, JavaScriptで作るサイト)を公開することもできます。
また GitHub を使うためにはコマンド操作やソフトウェアを用意する必要があると思われる方もいるかもしれませんが、今回はウェブ上だけで操作を行います。
難しいコマンドや面倒な準備も必要ないので、お気軽にお試しください!
この記事では2つのページを持つウェブサイトを作成してみます。サンプルサイトはこちら
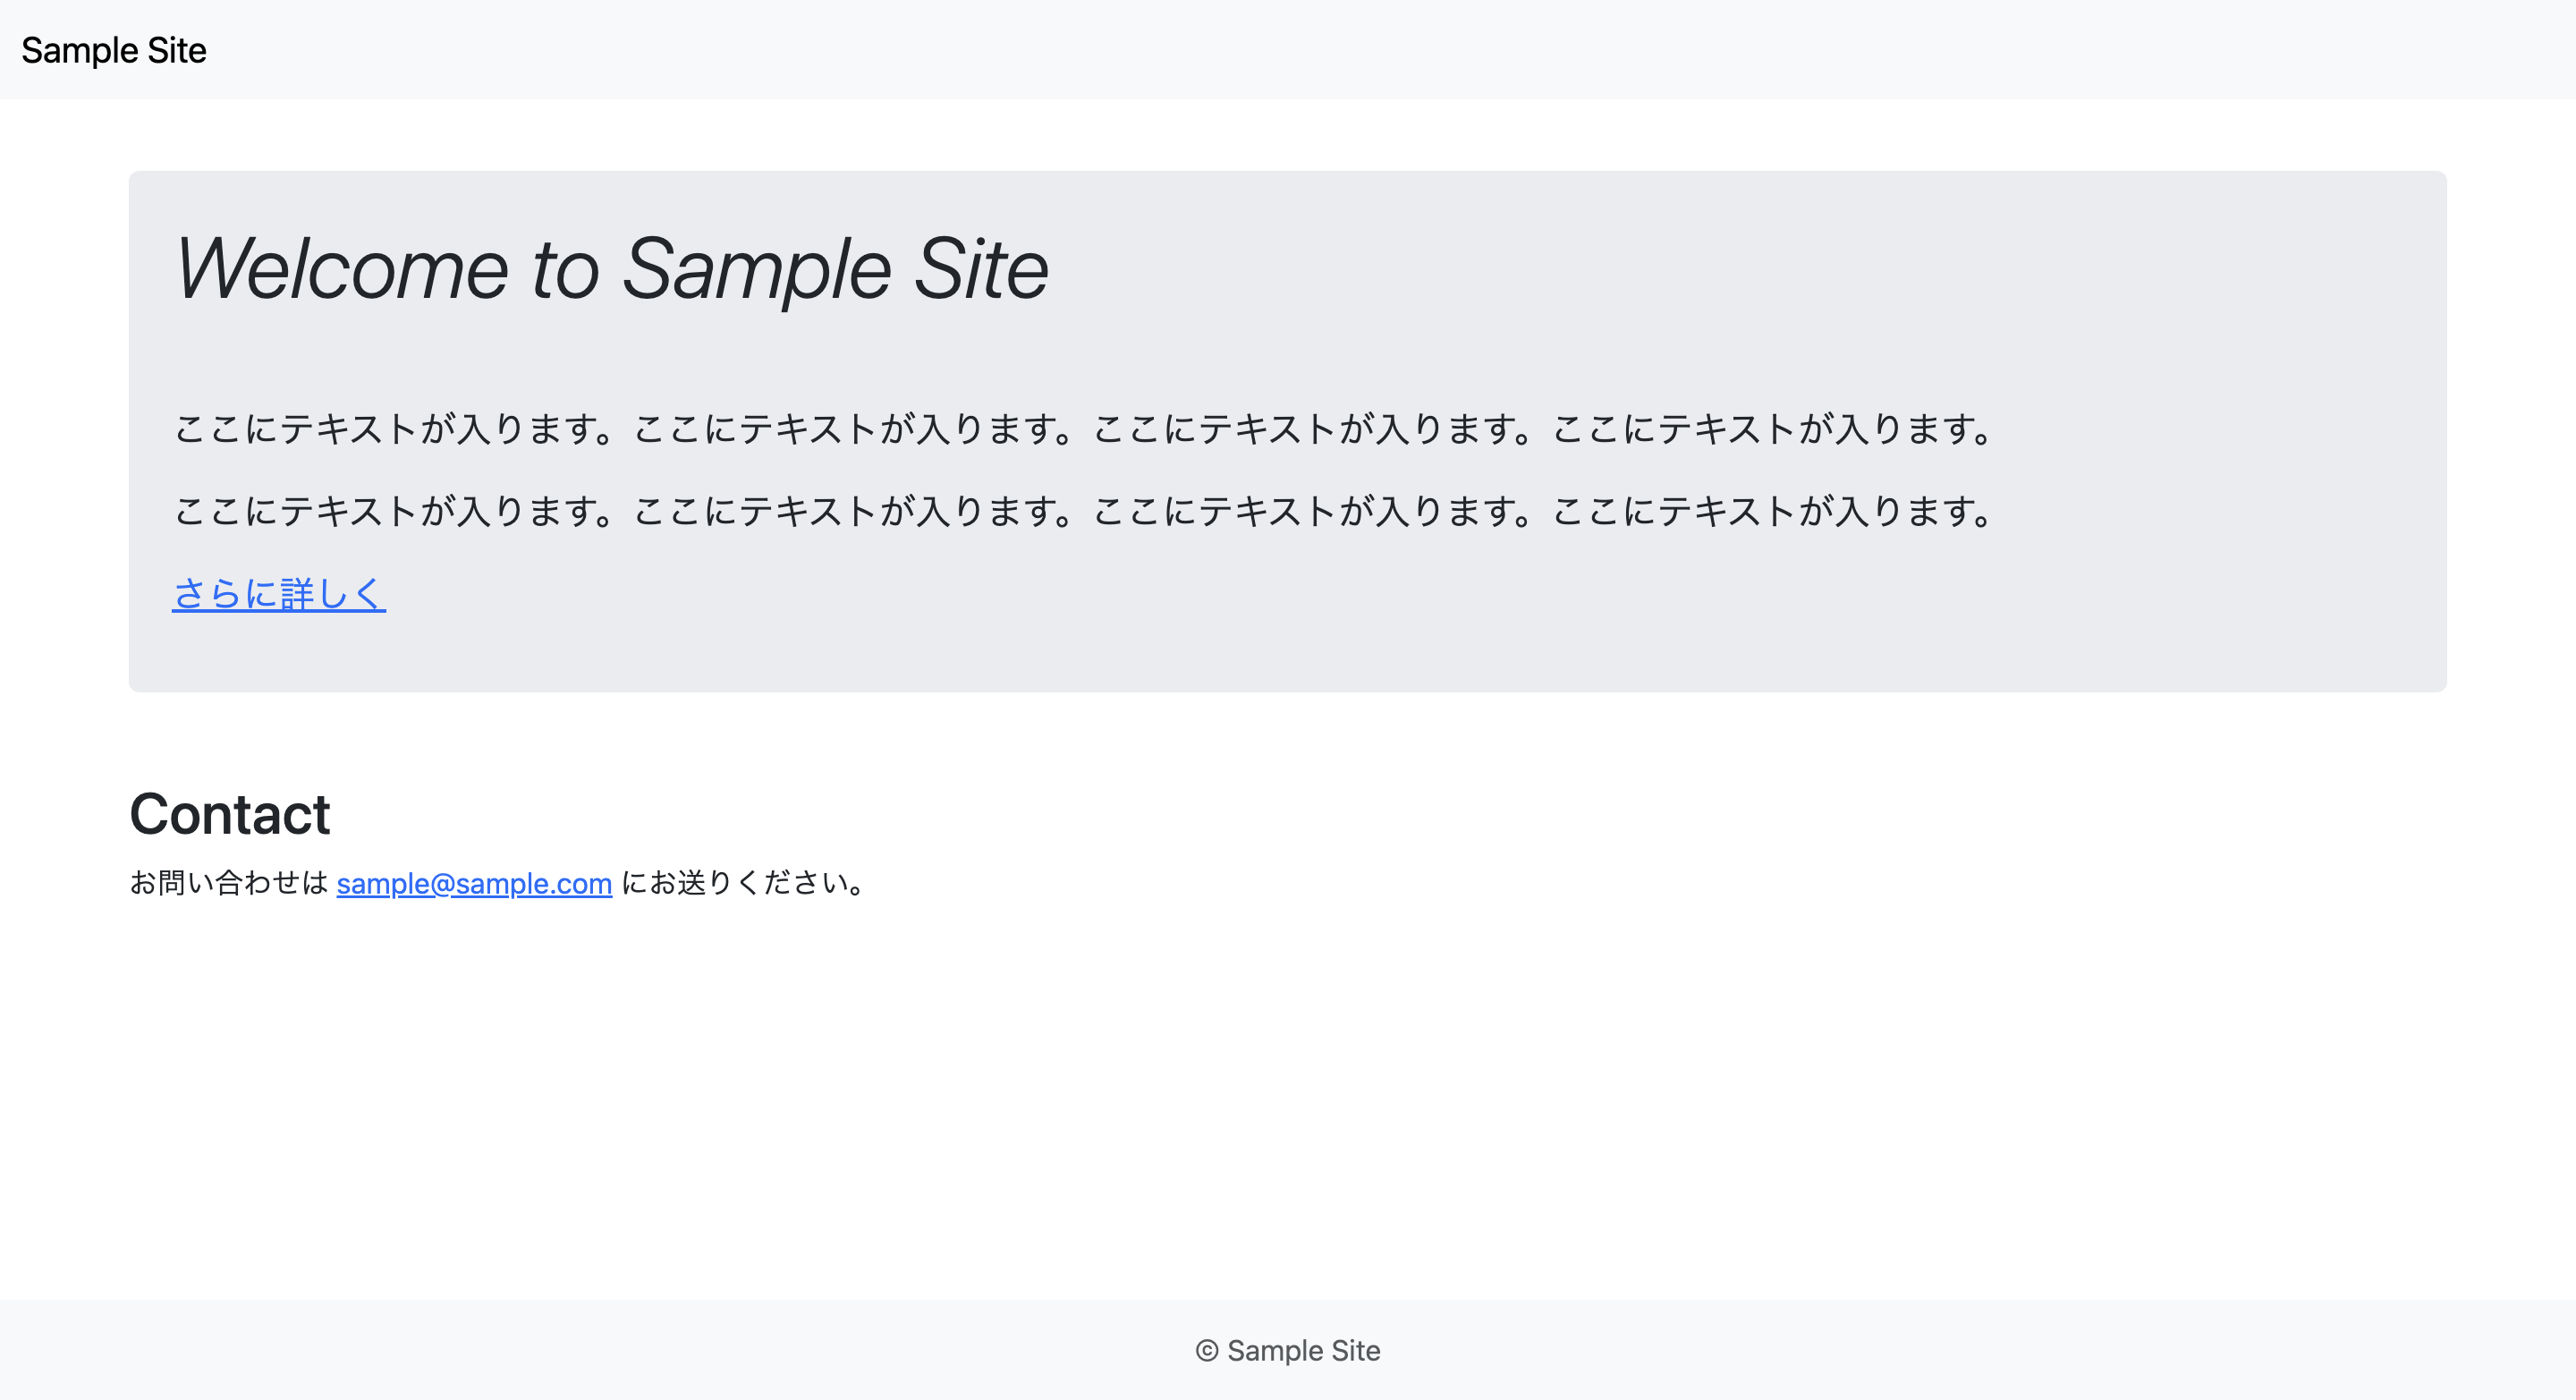
index.html
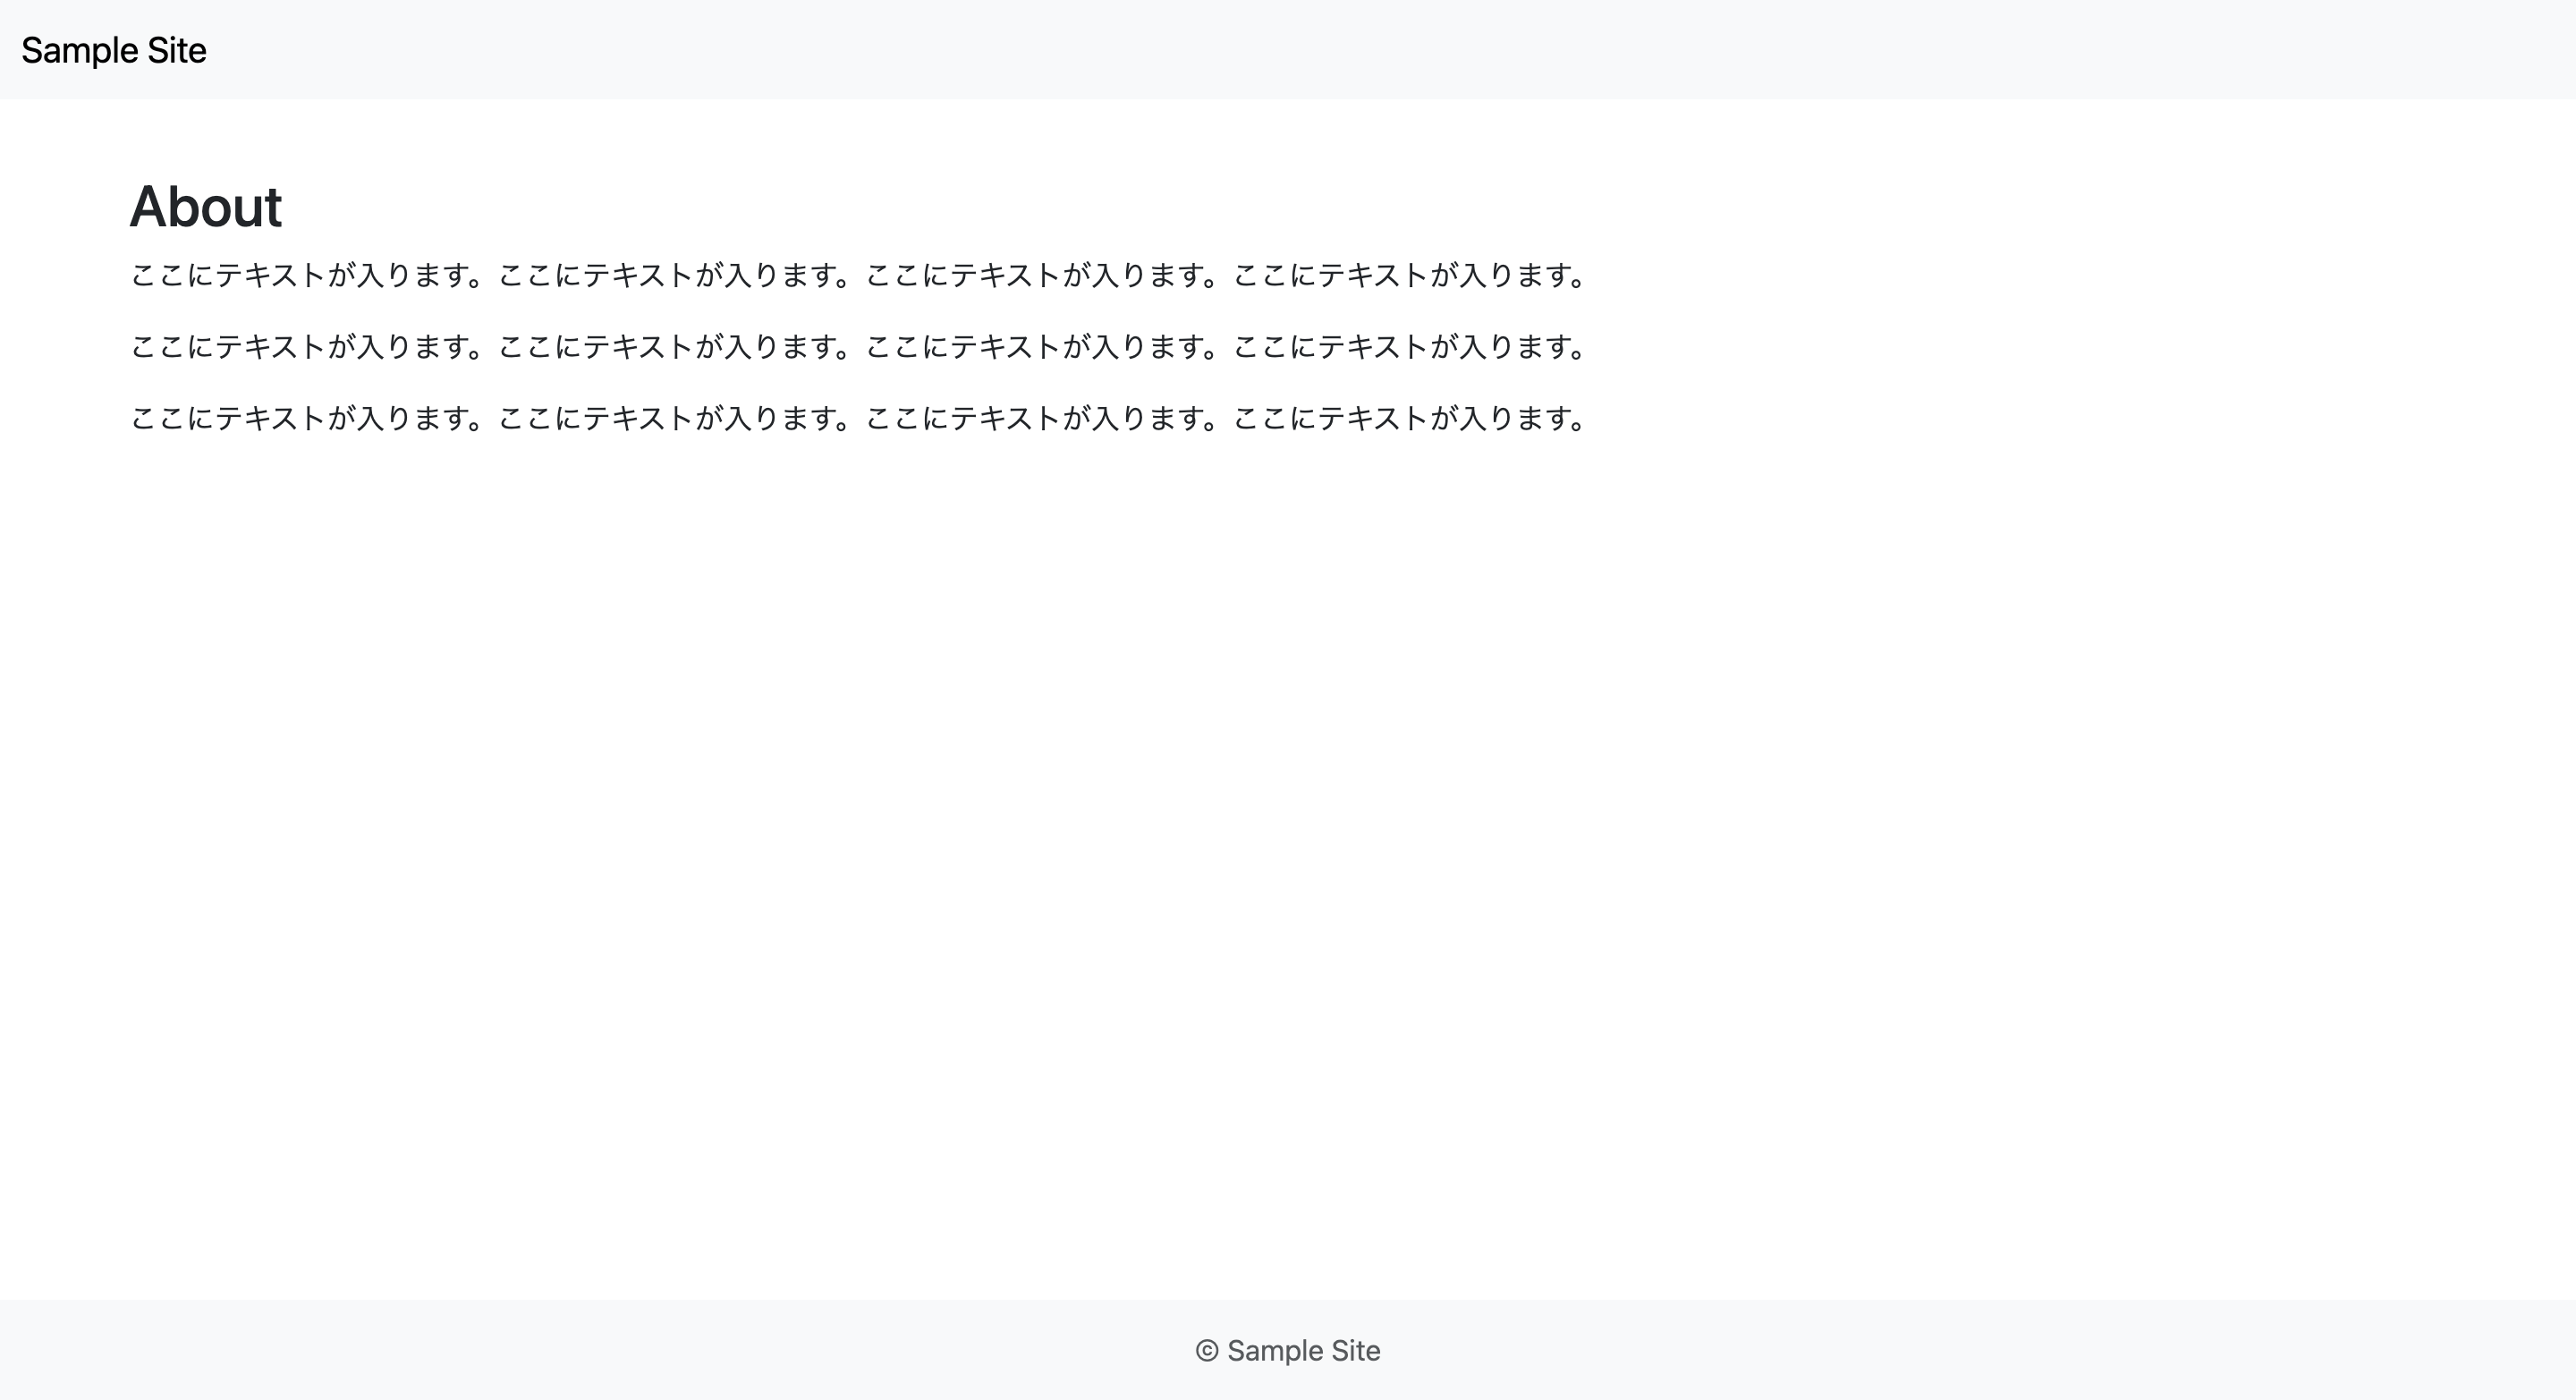
about.html
主な注意点は2つです。
- eコマースサイトや商用サービスの運営等使うことはできないこと
- サーバーサイドの言語(PHP, Ruby, Python など)は使用できないこと
あくまで練習用や簡易的なウェブサイトとして使用するようにしましょう。
GitHubアカウント(無料)をお持ちでない方は、まずはアカウントを作成してください。
ウェブサイトの種類
GitHub で作成できるウェブサイトは「サイト・プロジェクトサイト」の2種類あります。
| 種類 | URL | 制限 |
|---|---|---|
| サイト | https://ユーザー名.github.io/ | 1つだけ作成できる |
| プロジェクトサイト | https://ユーザー名.github.io/リポジトリ名/ | 複数作成できる |
* リポジトリとは「保管場所」という意味でフォルダのようなものです。プロジェクトごとにリポジトリ(フォルダ)を作成してコードを管理することができます。
どちらを使っても良いですし、併用することも可能です。
サイト → プロジェクトサイトの順番で作成方法を紹介するので、どちらでもお試しください。
① サイトを作成する
まずは「サイト」形式のウェブページを作成します。
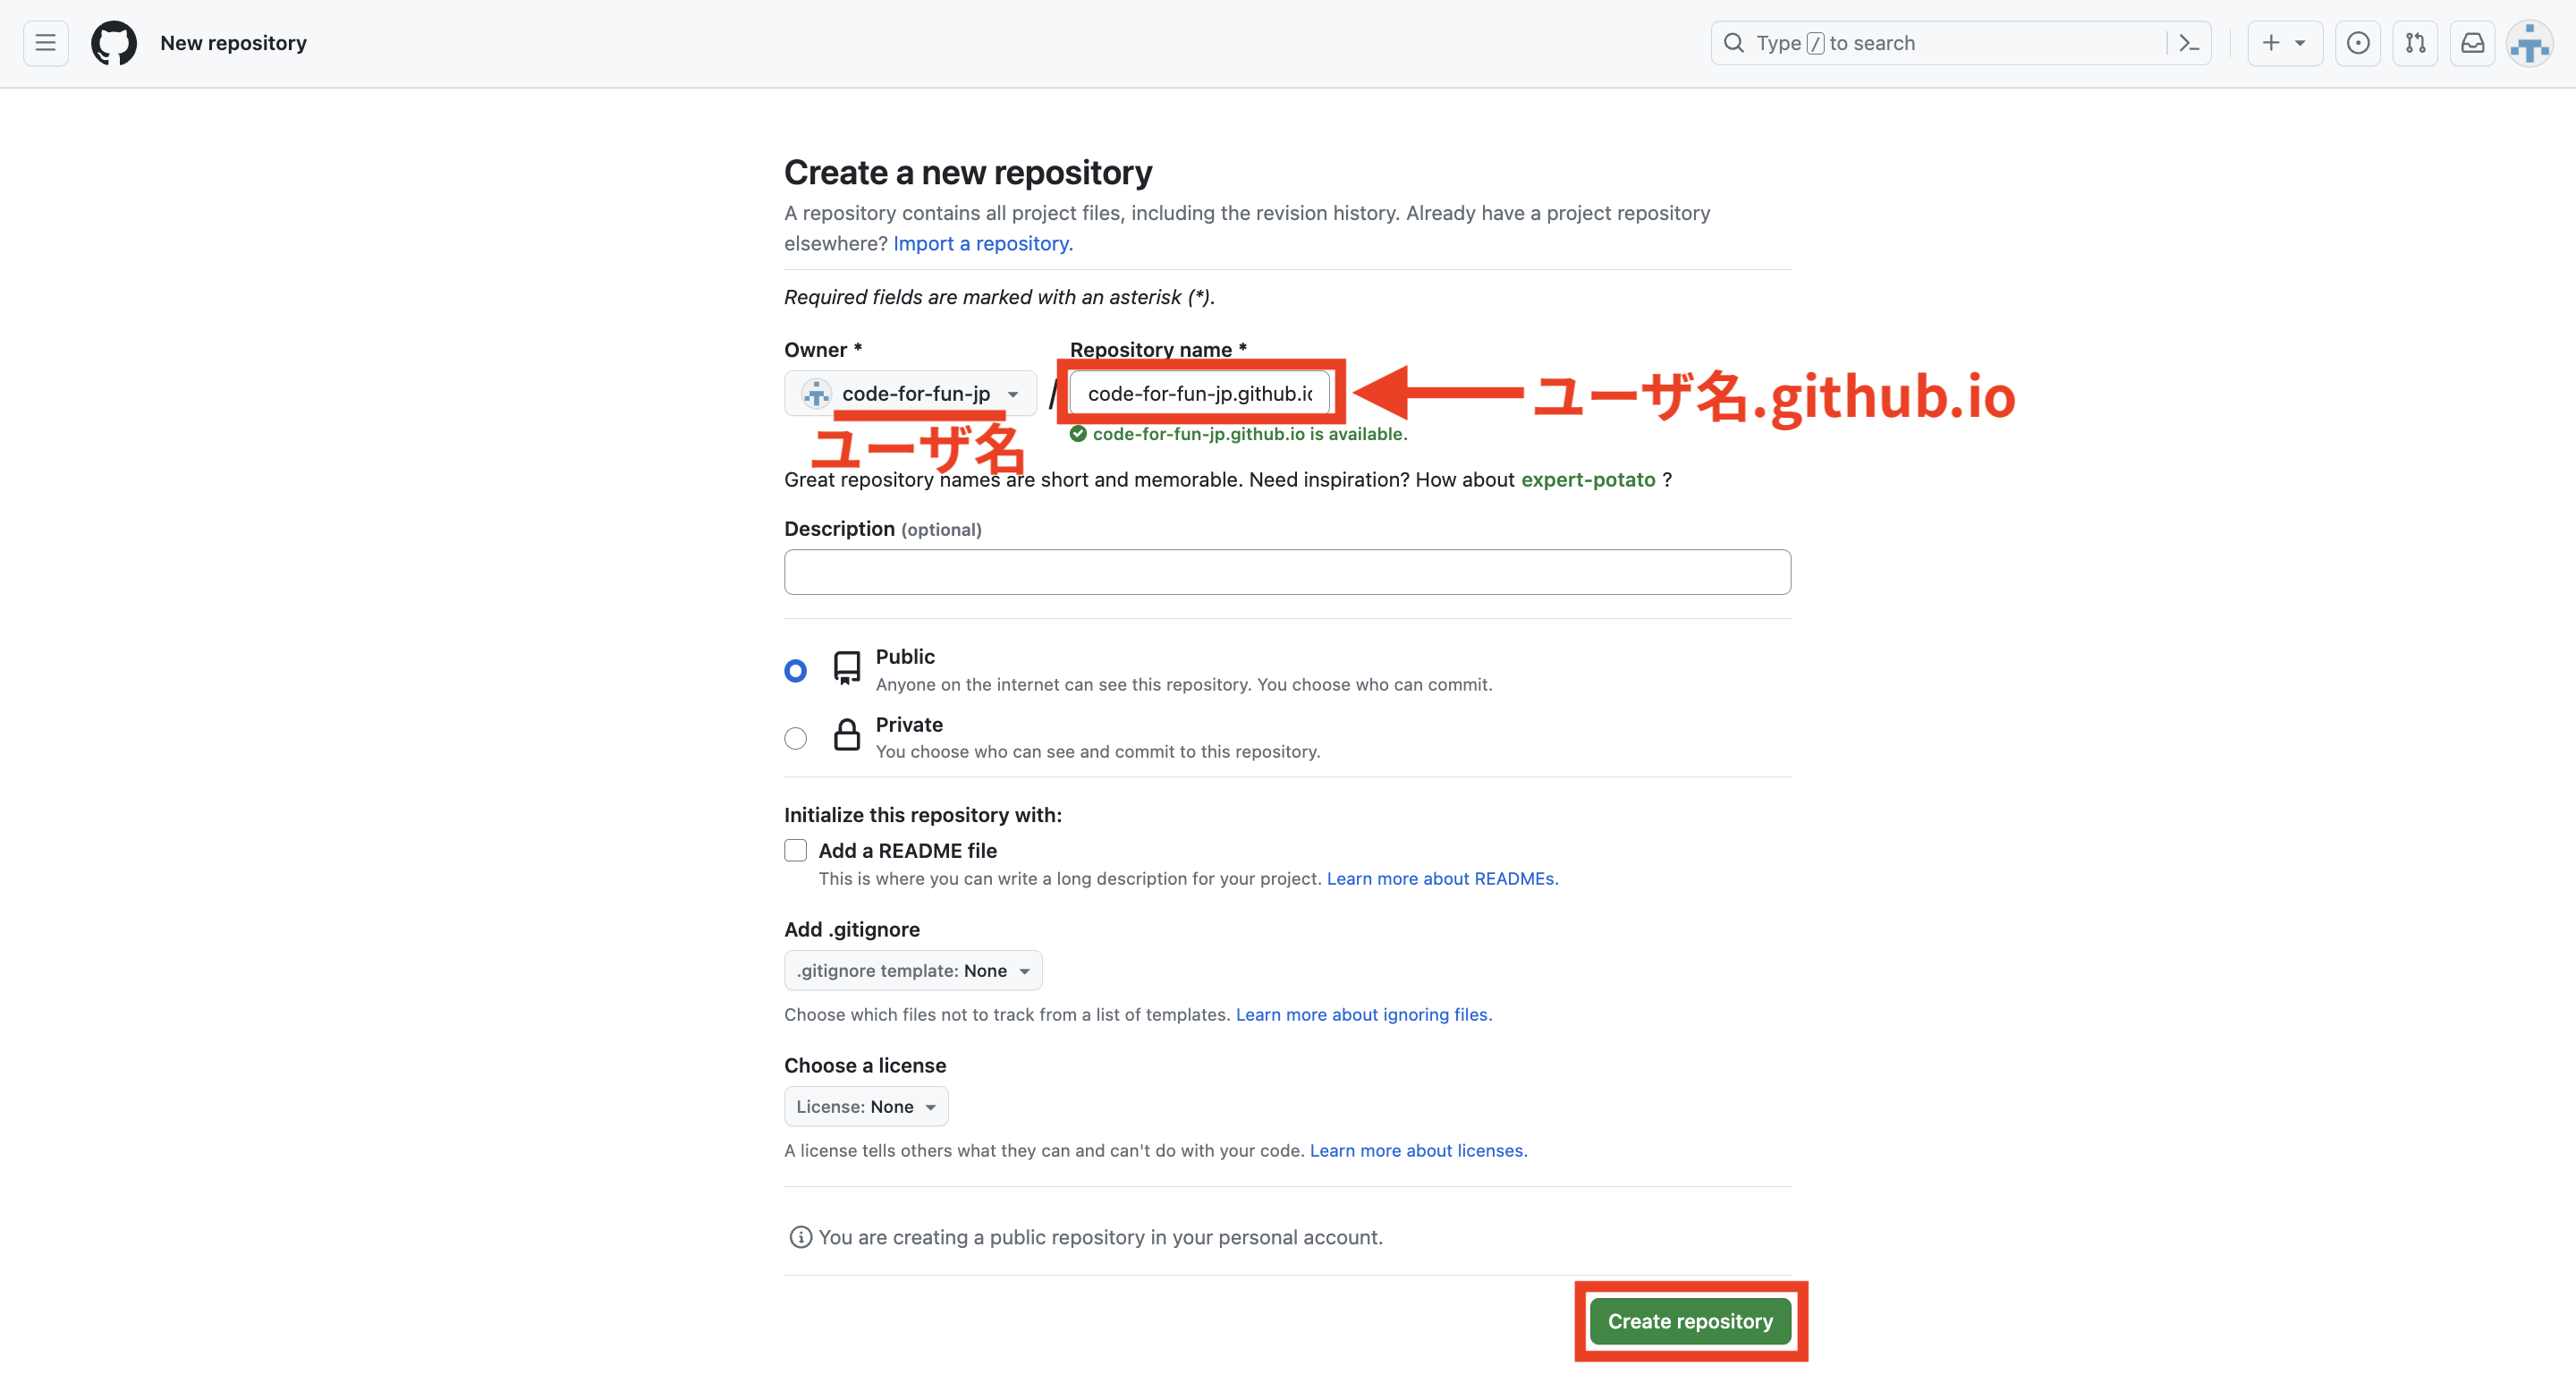
サイトの URL は https://ユーザー名.github.io/ にする決まりで、1つしか作成できない点にご注意ください。
以下2つのページを作成していきます。
- https://ユーザー名.github.io/index.html
- https://ユーザー名.github.io/about.html
1. リポジトリを作成する
新しいリポジトリを作成します。
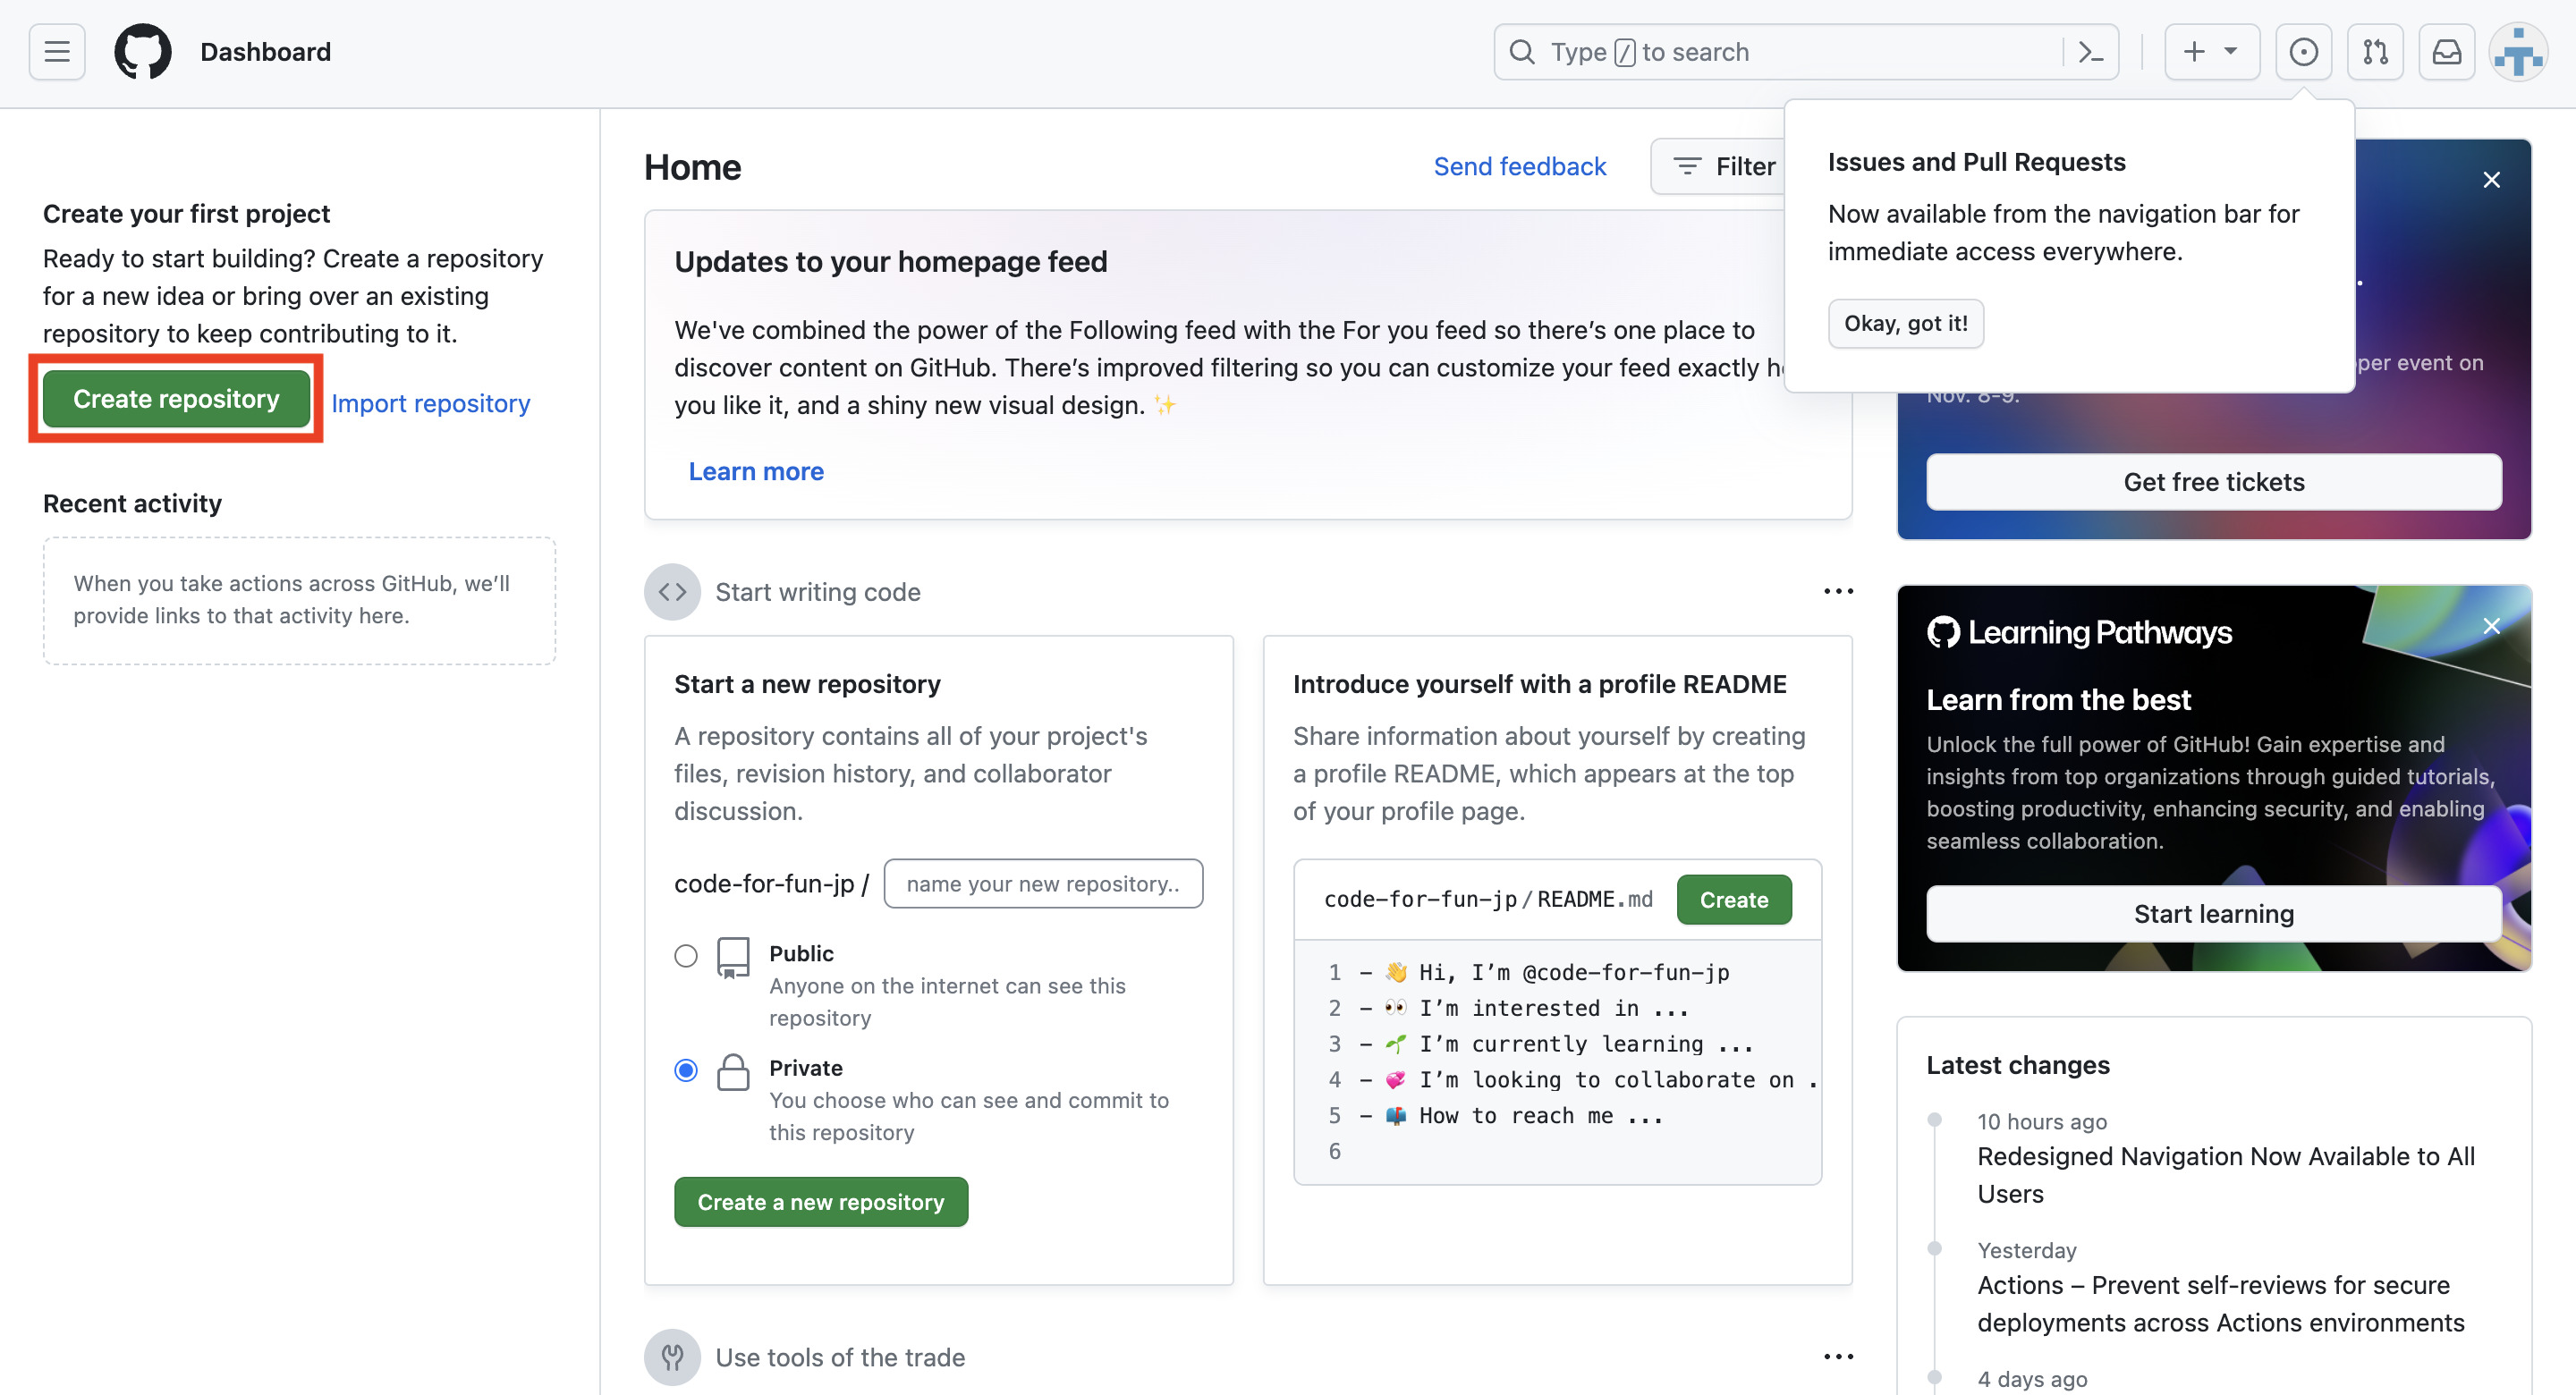
Repository name に ユーザ名.github.io と入力して、右下にある Create repository をクリックします。
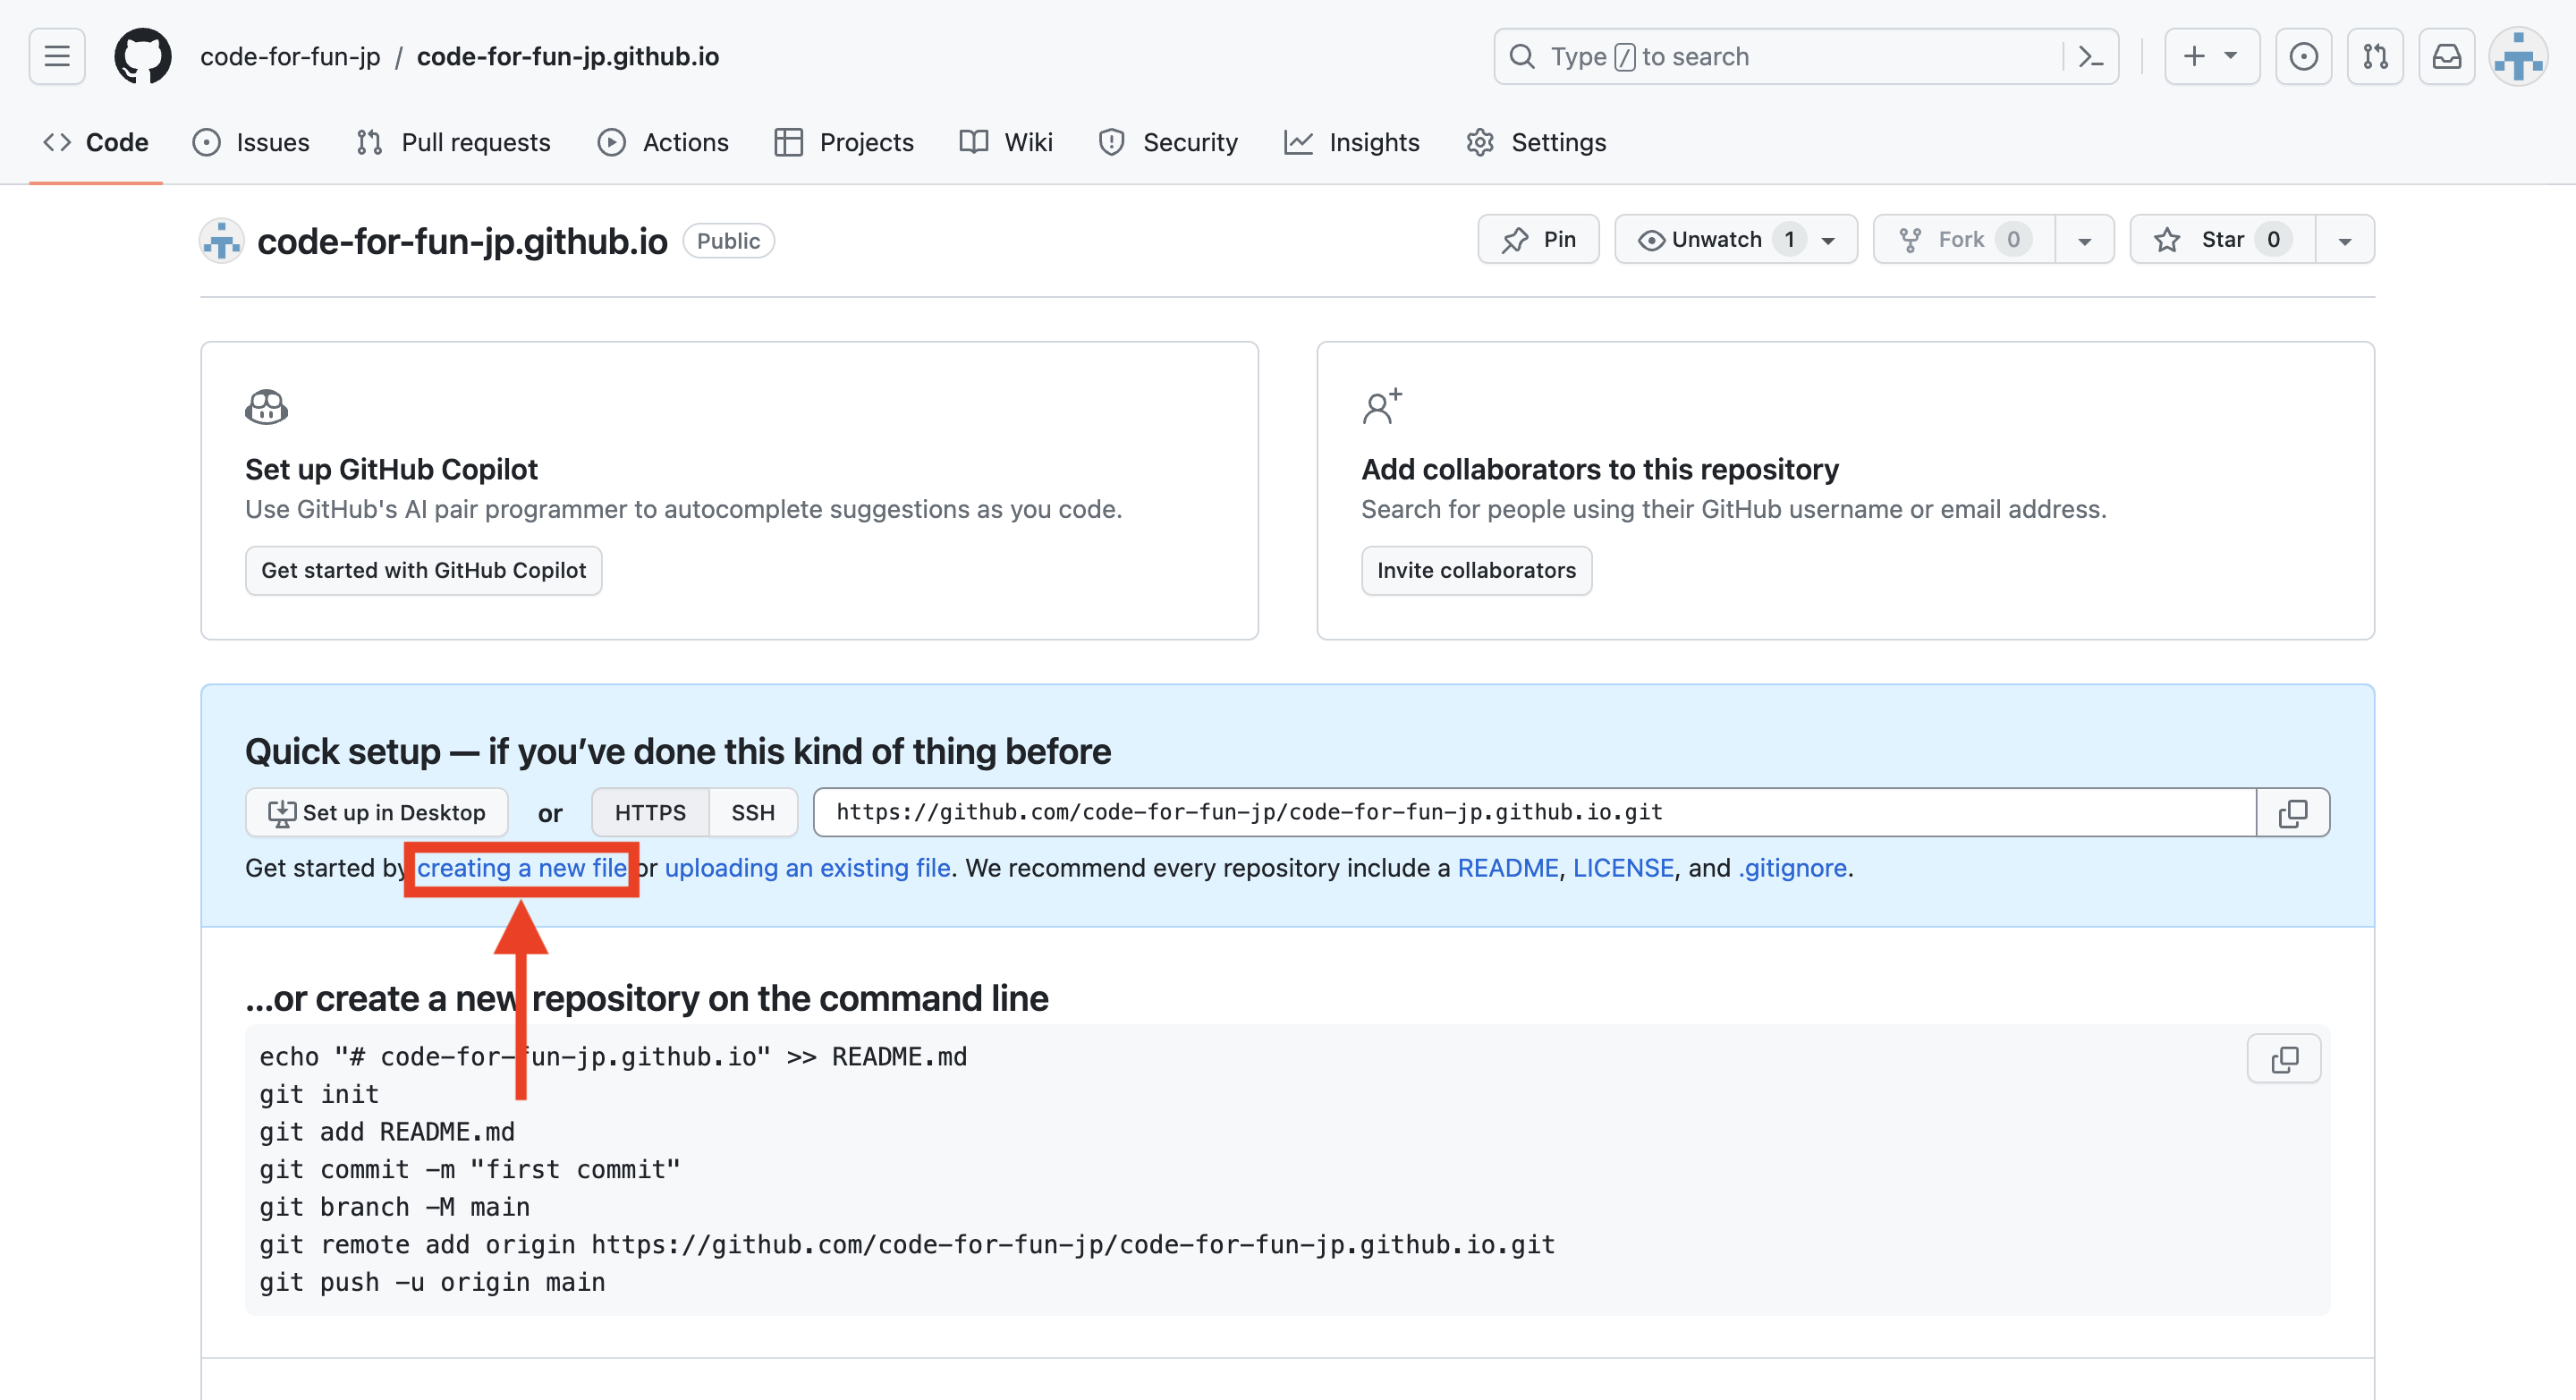
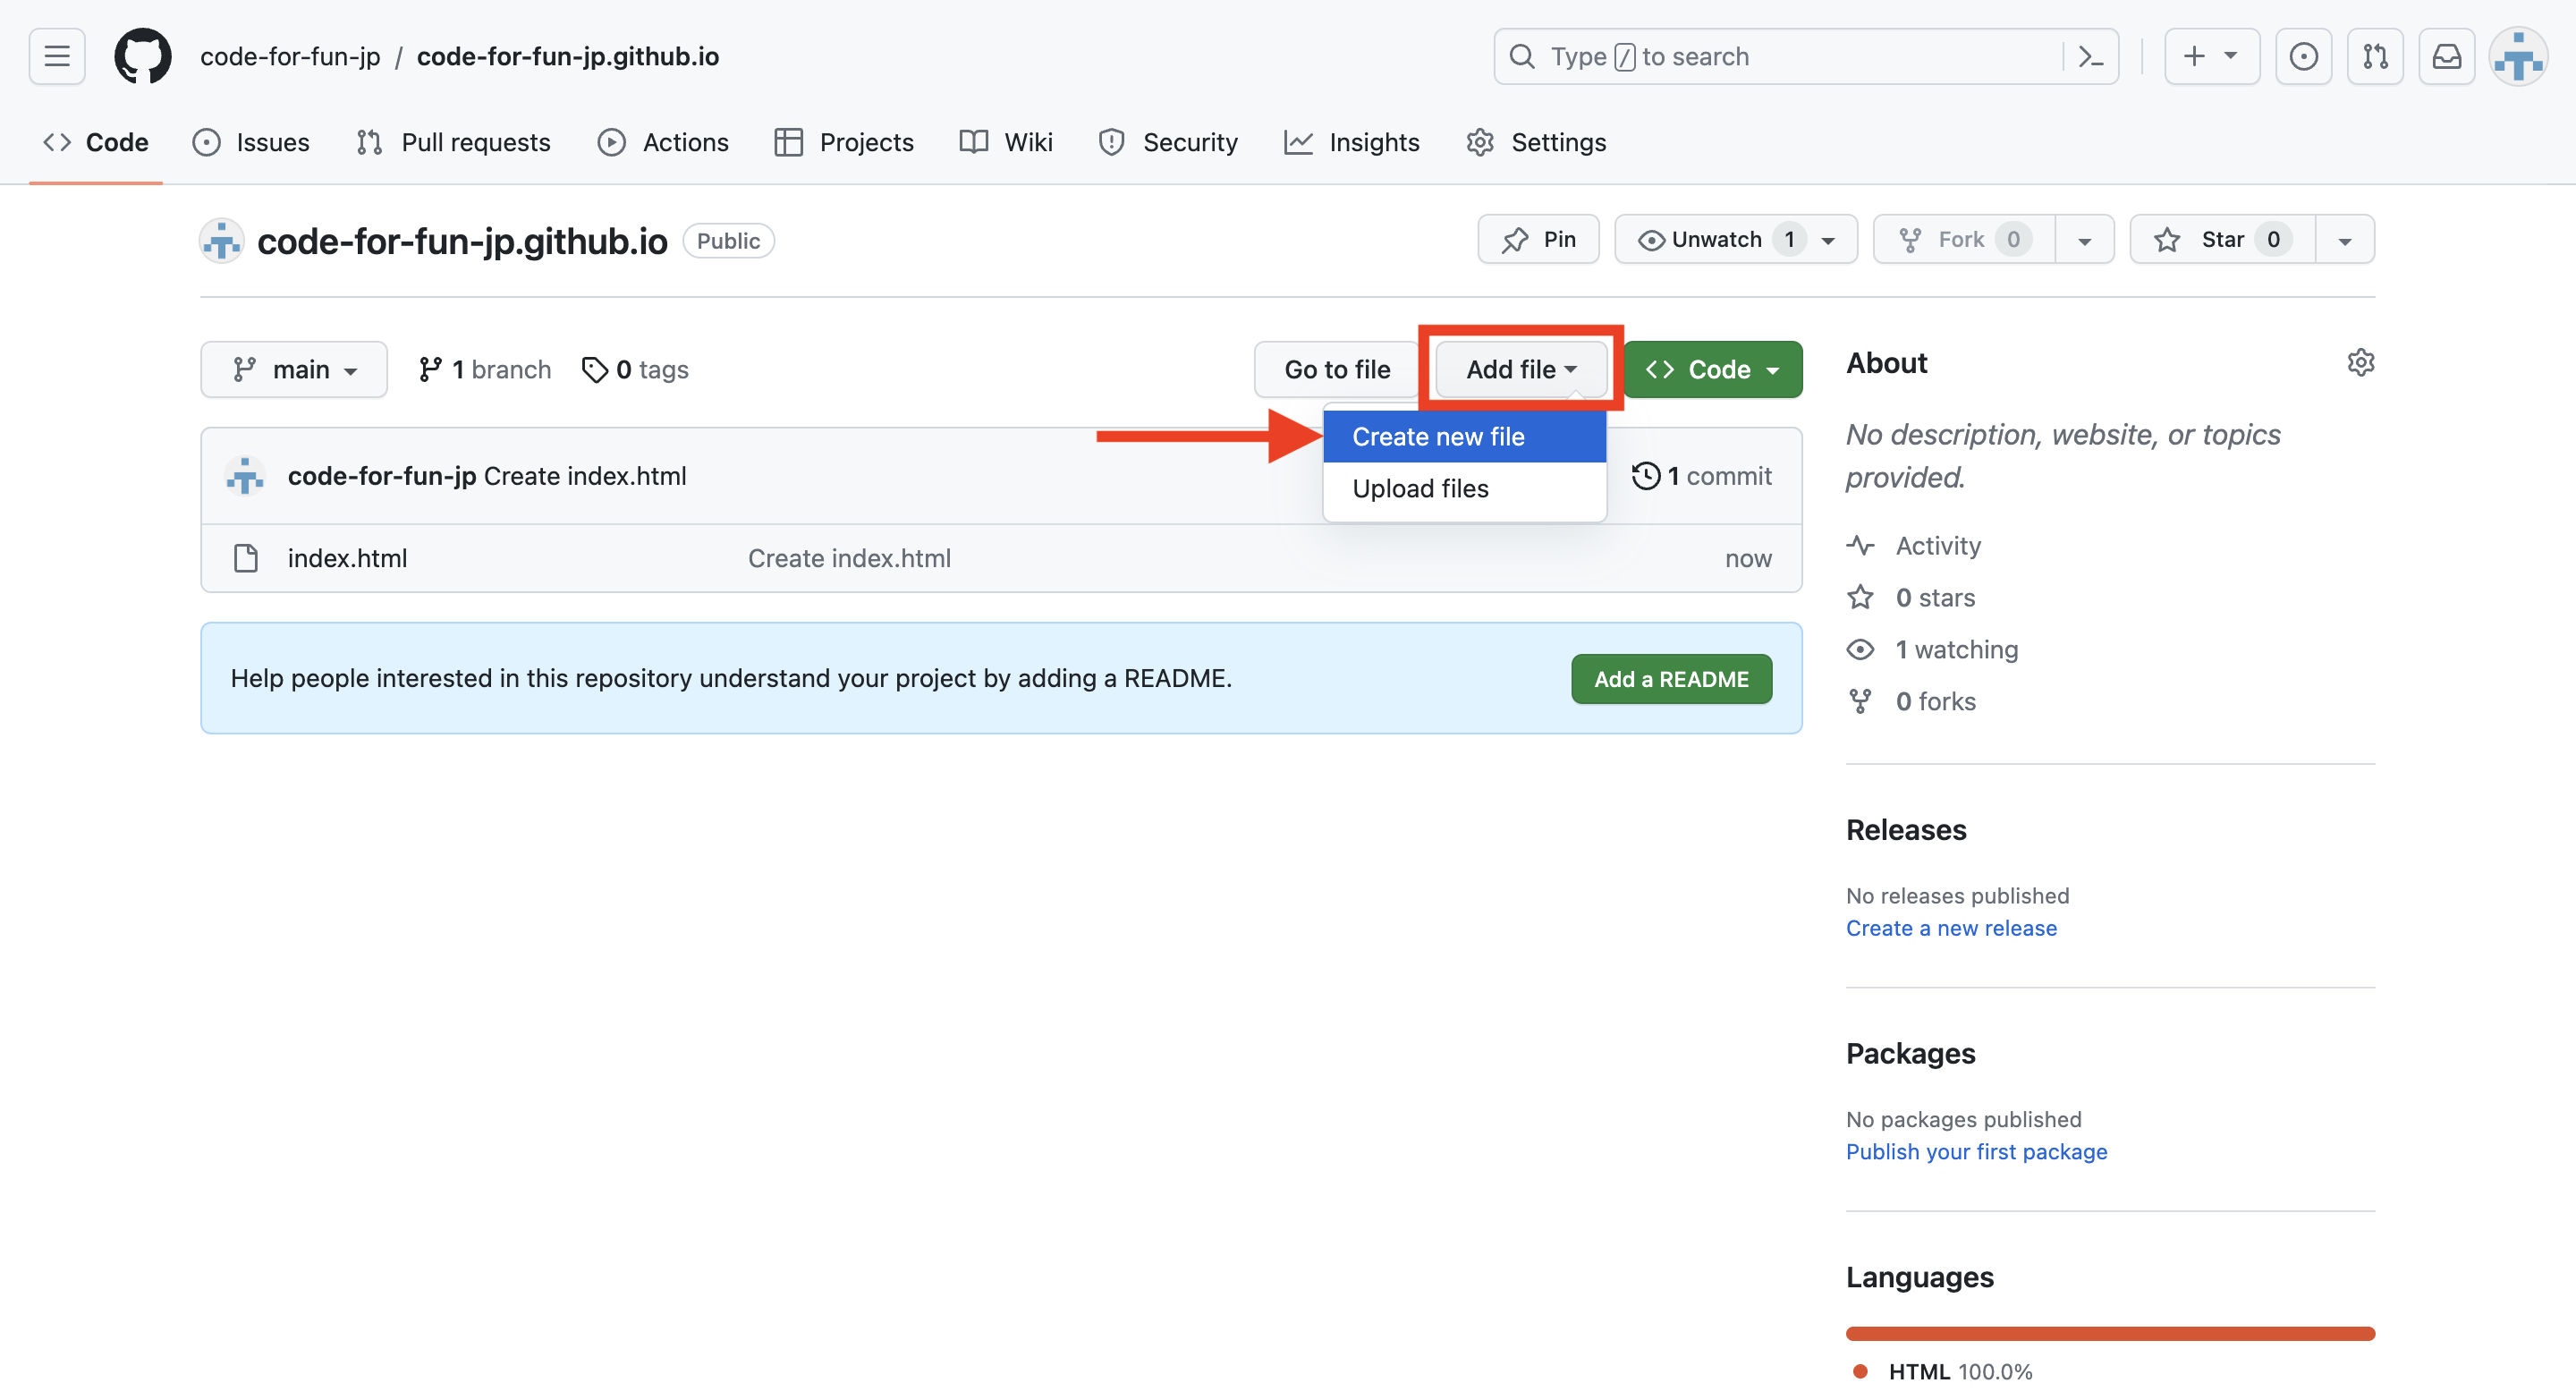
2. ファイルを作成する
新しいファイルを追加していきます。
画面中央あたりにある creating a new file をクリックします。
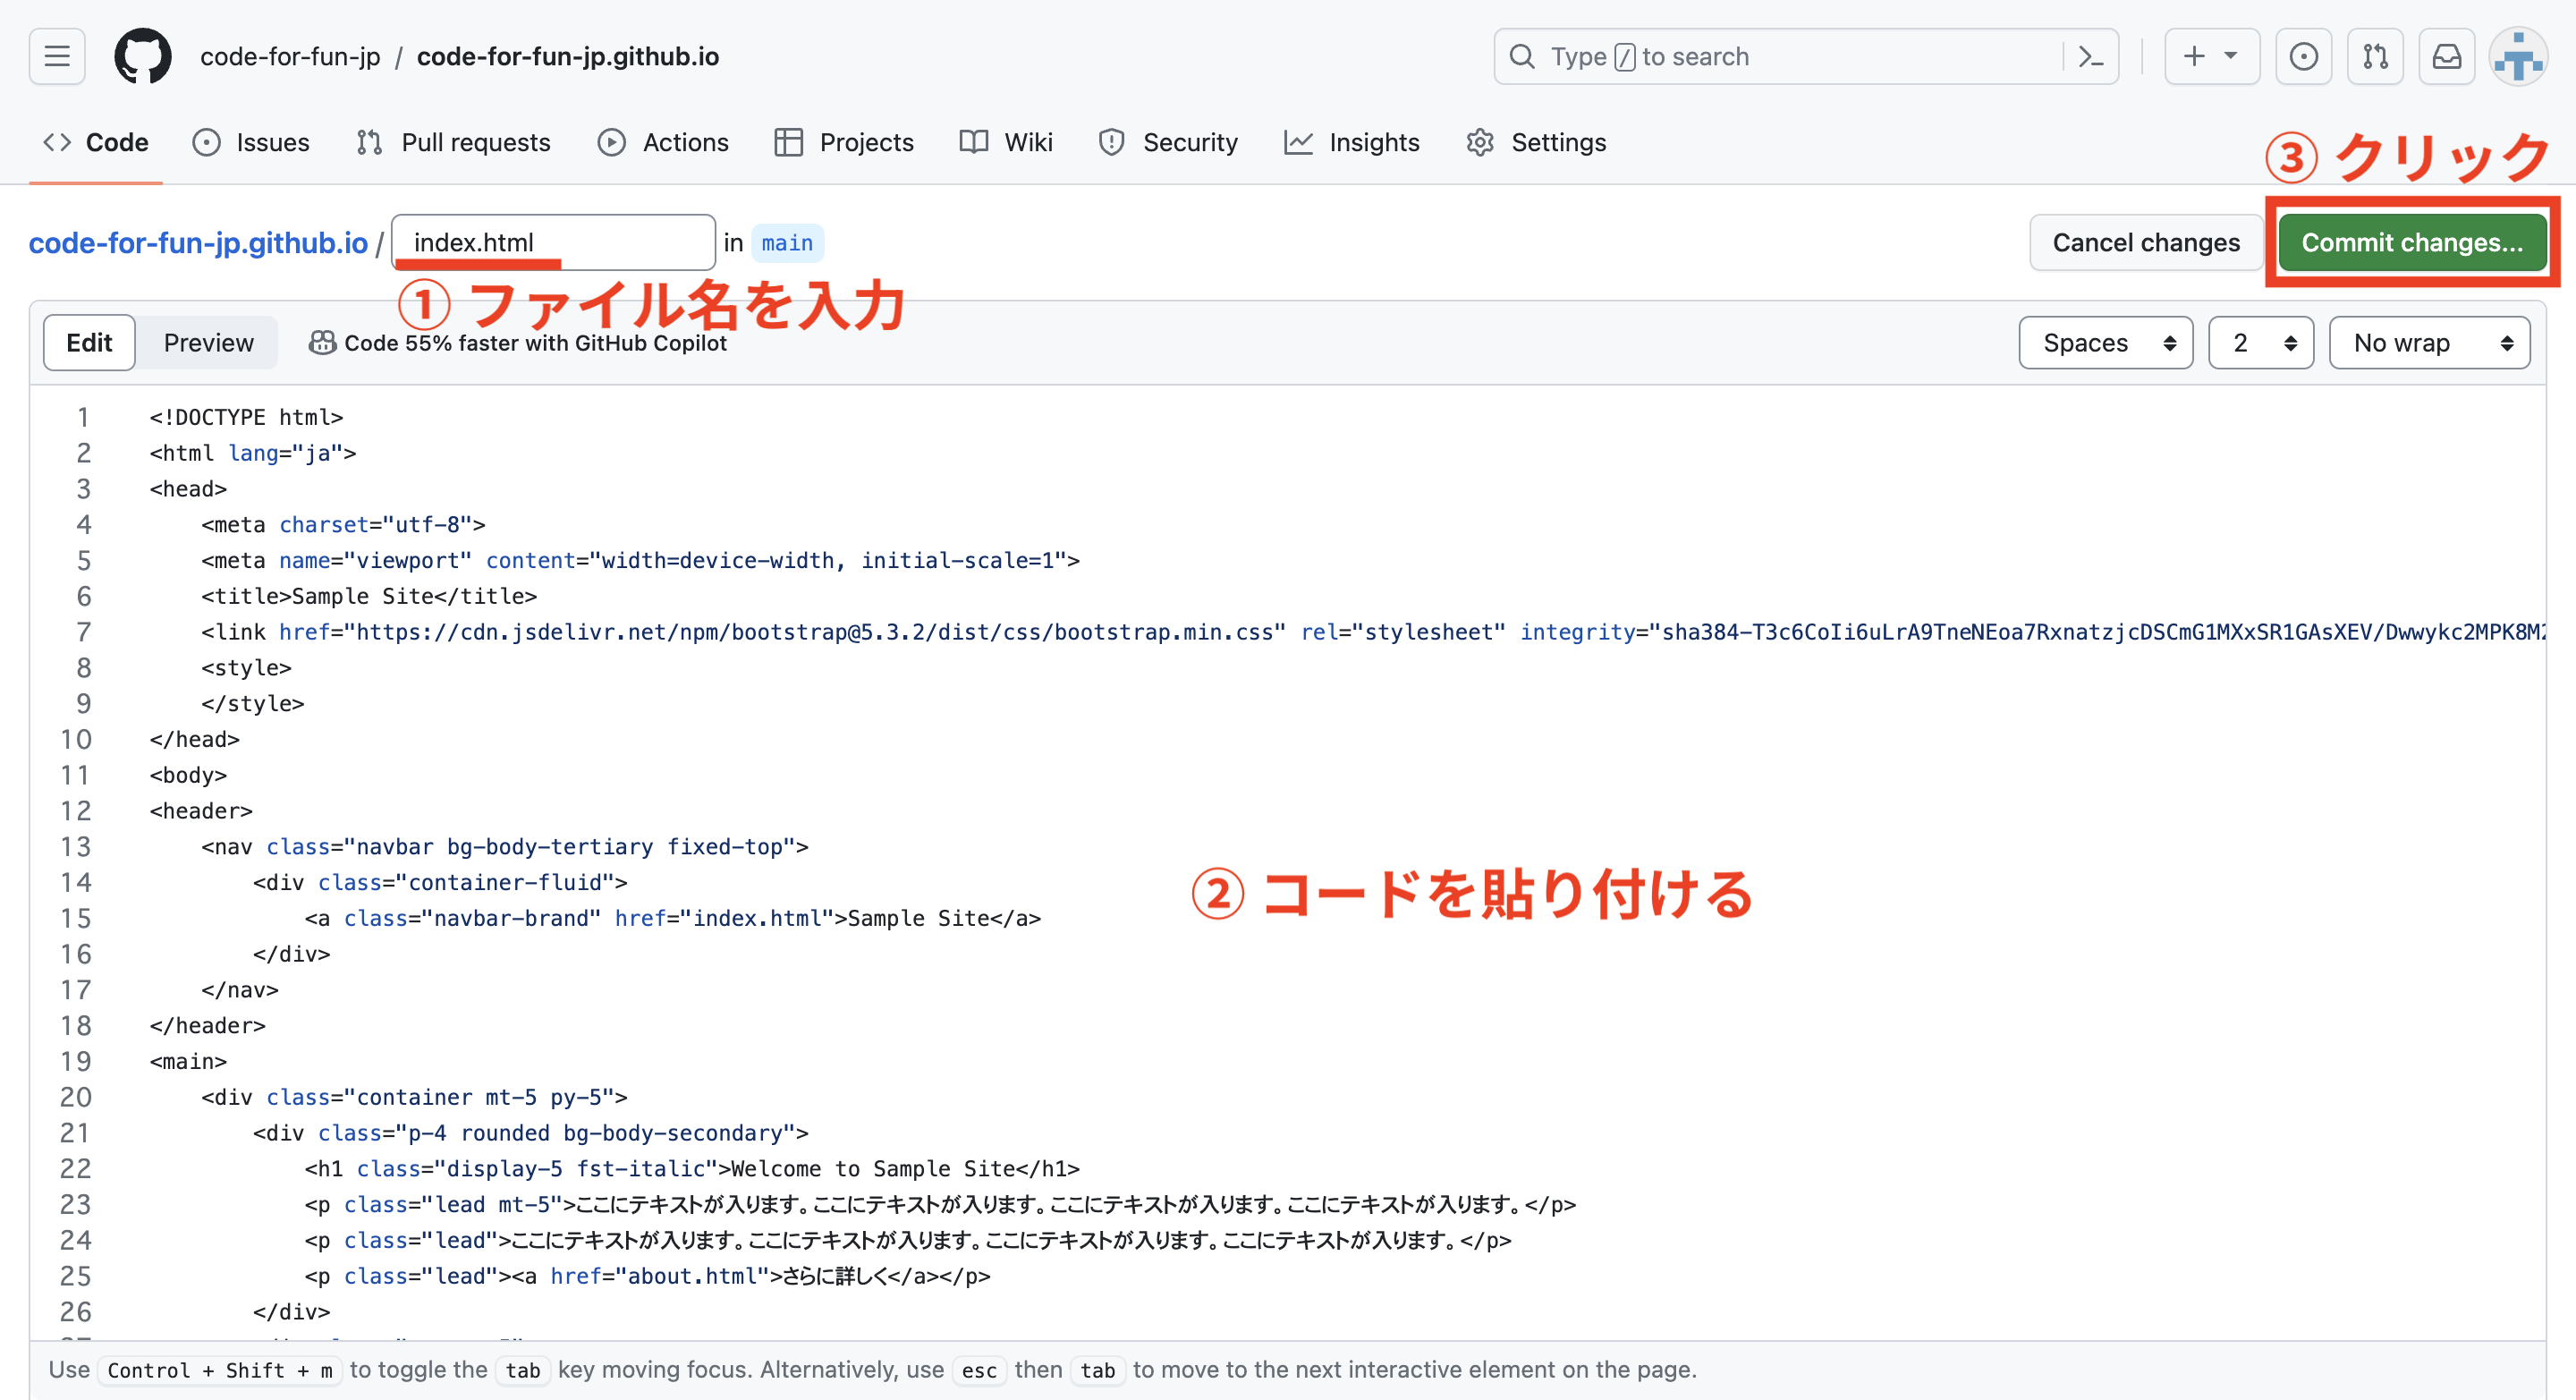
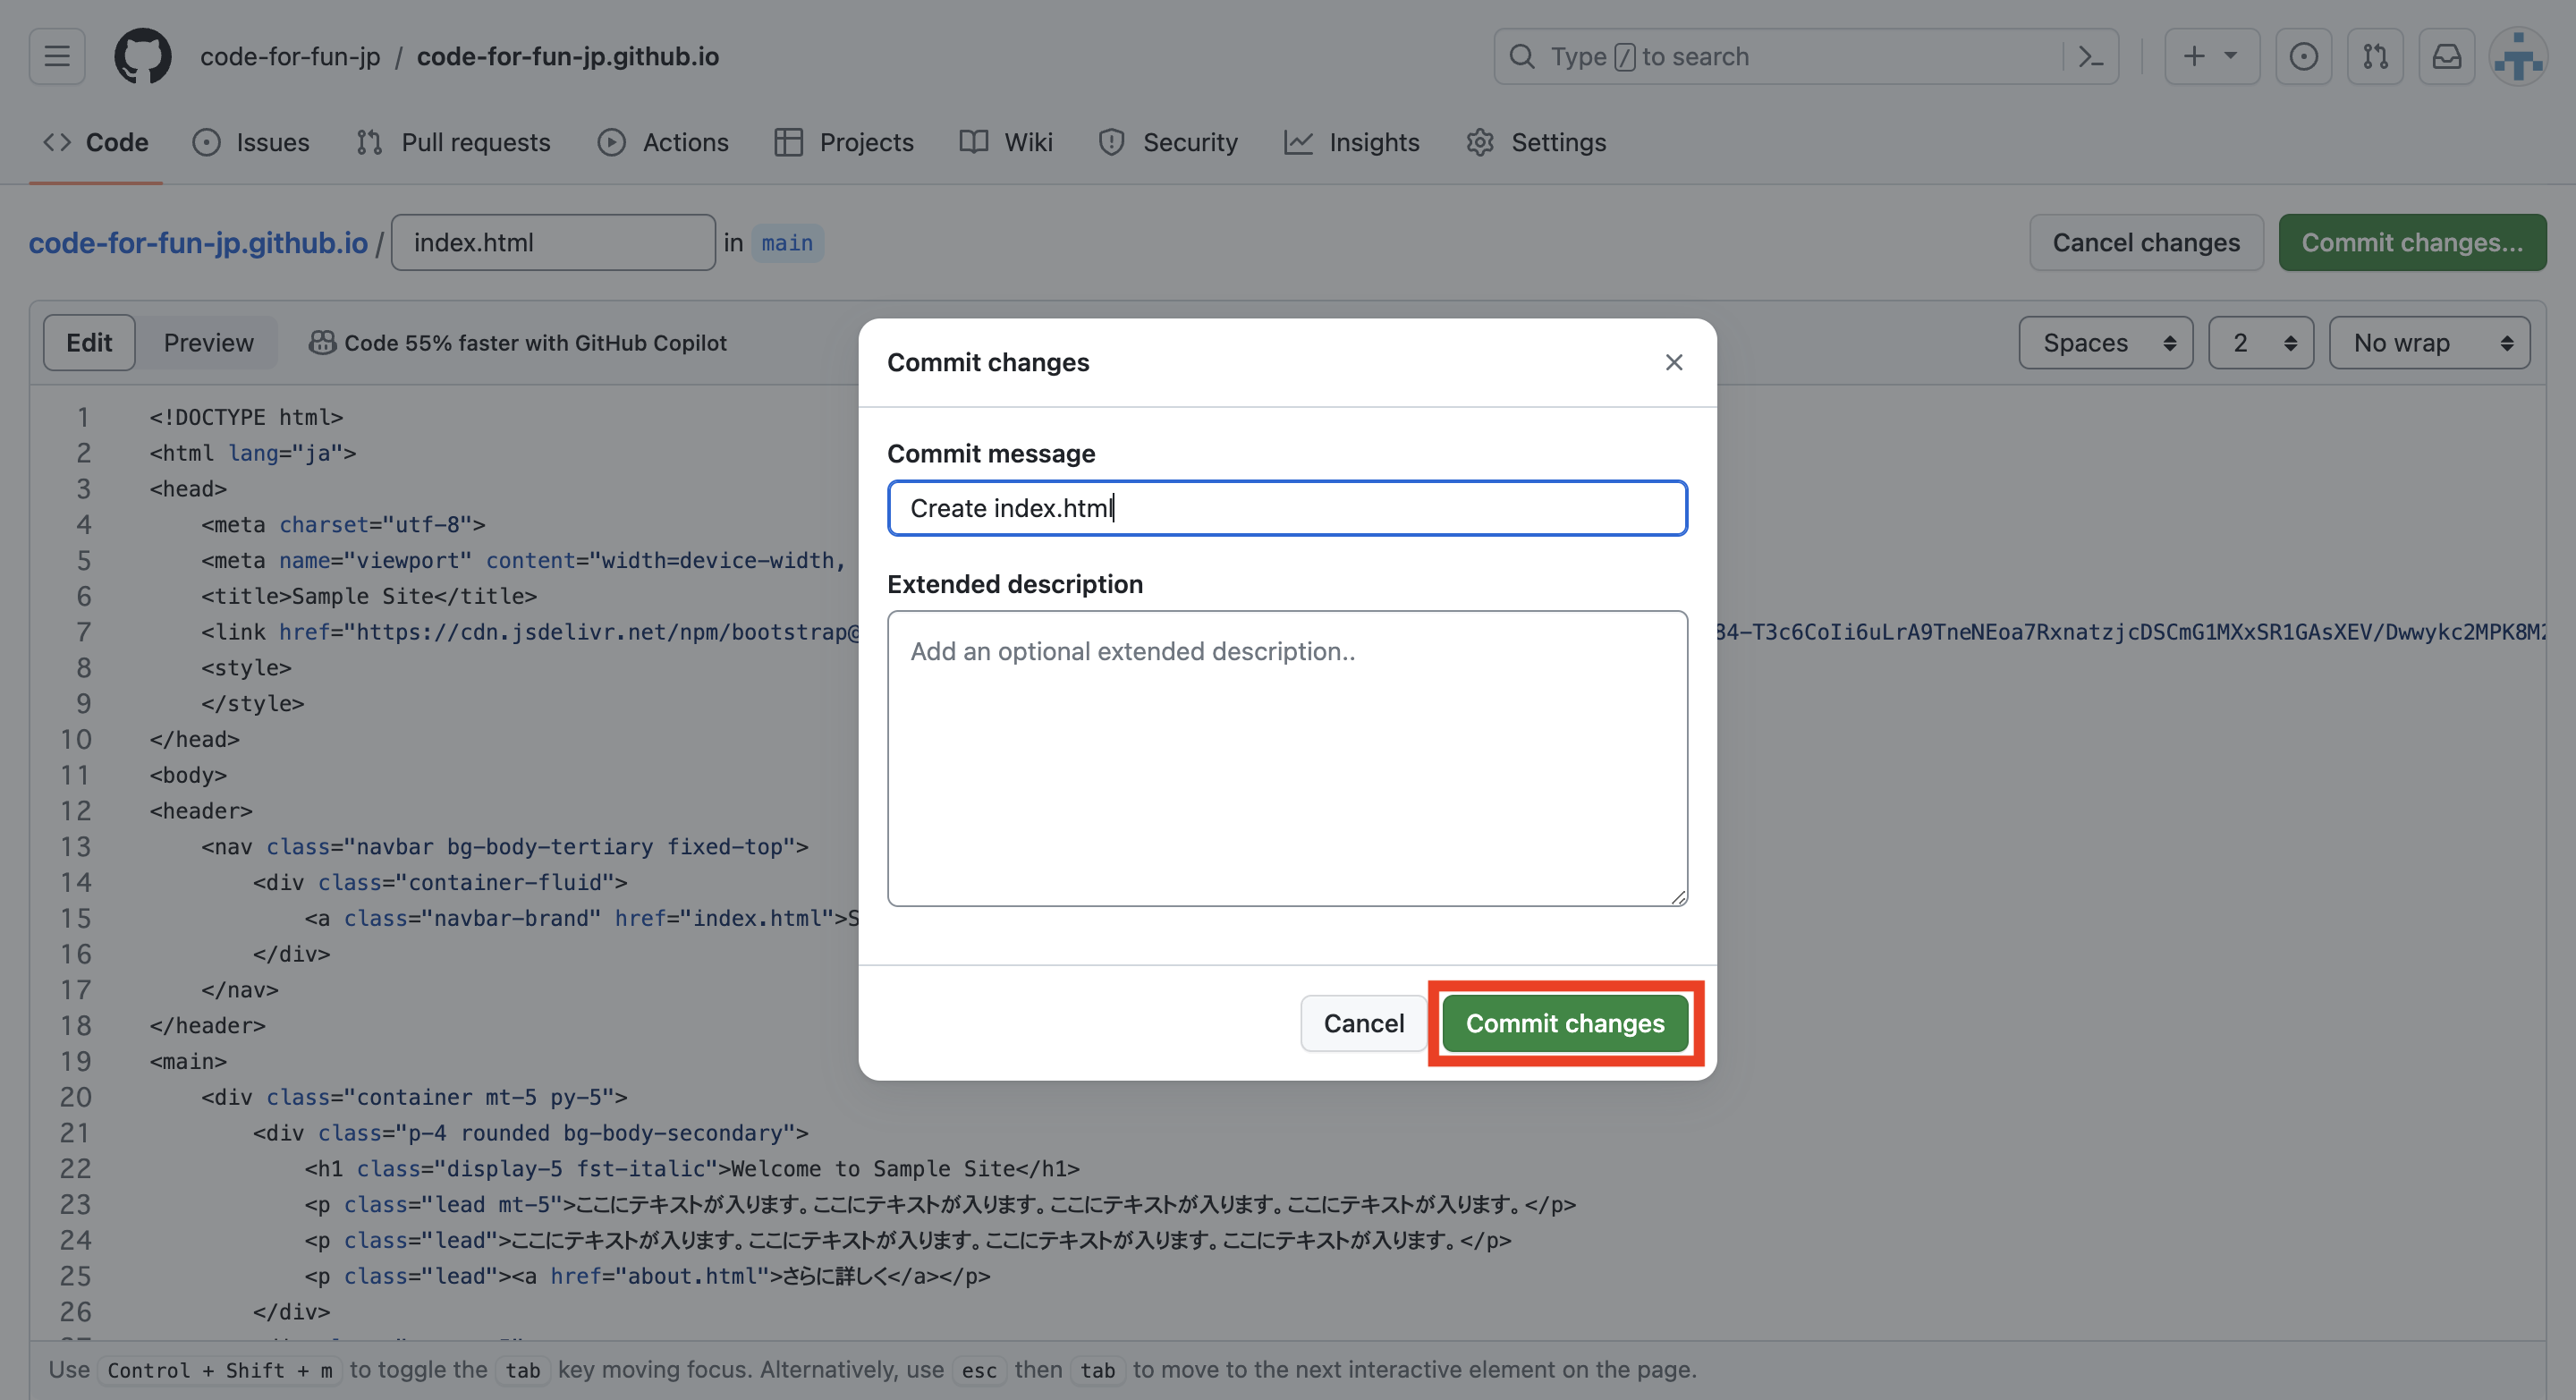
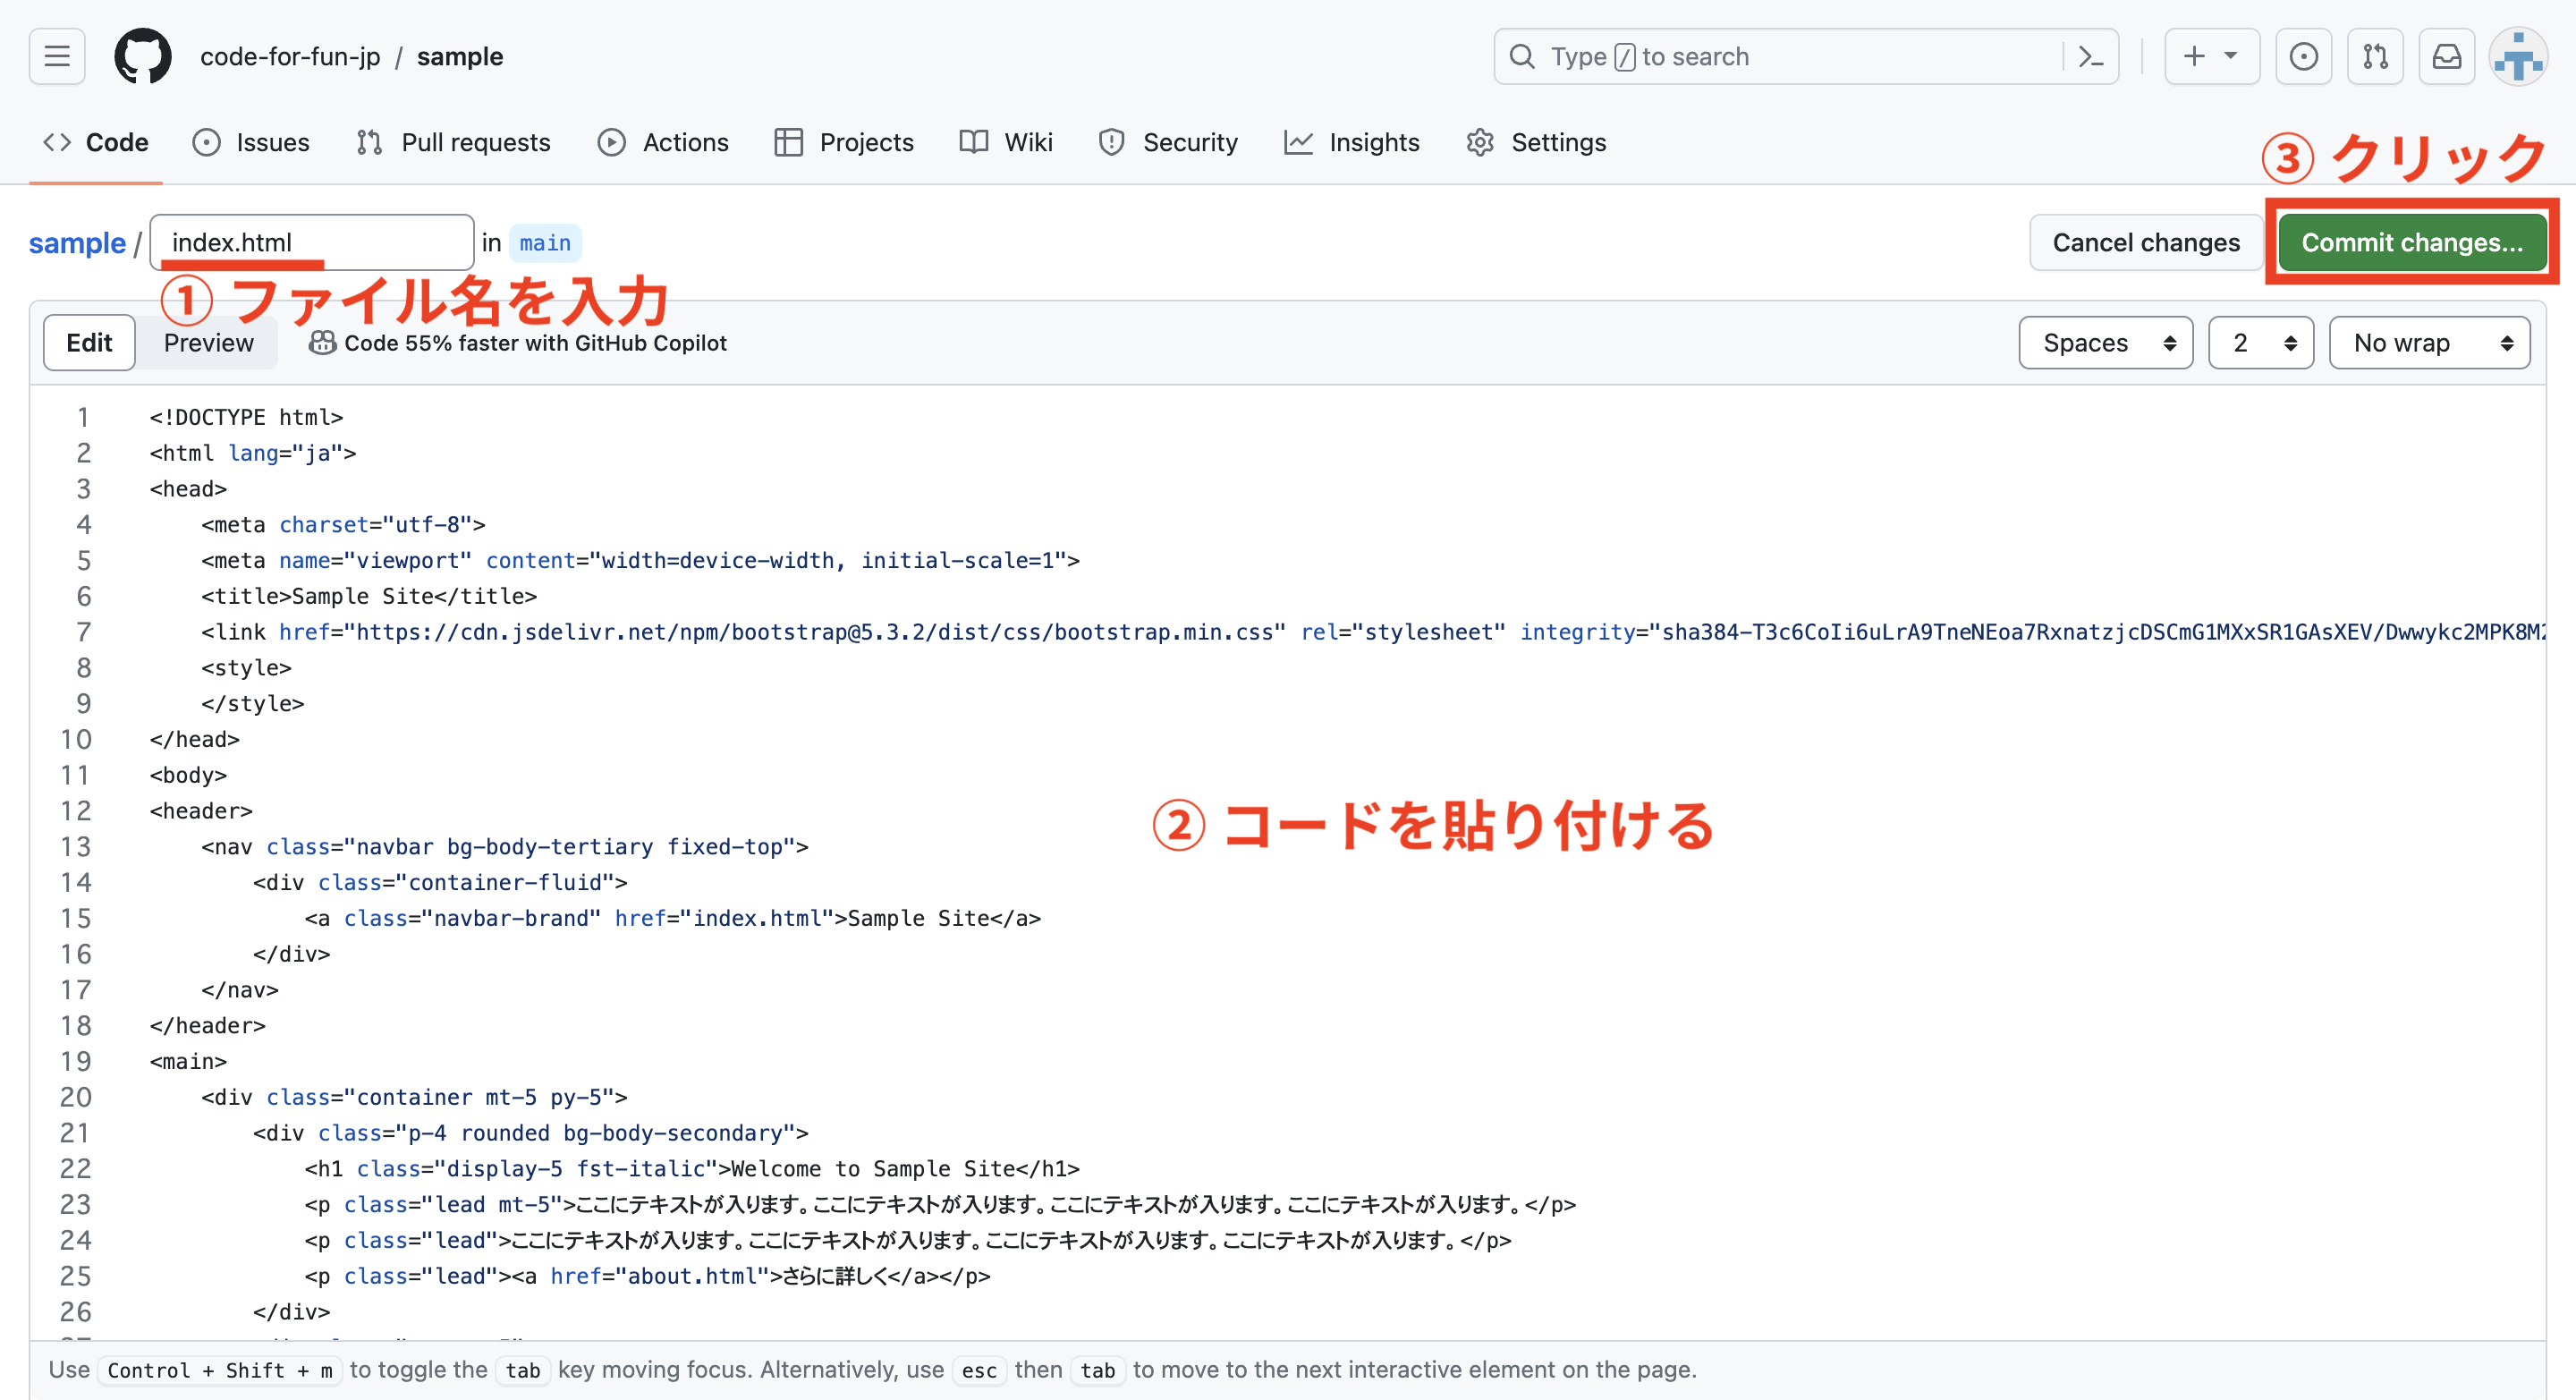
index.html を作成
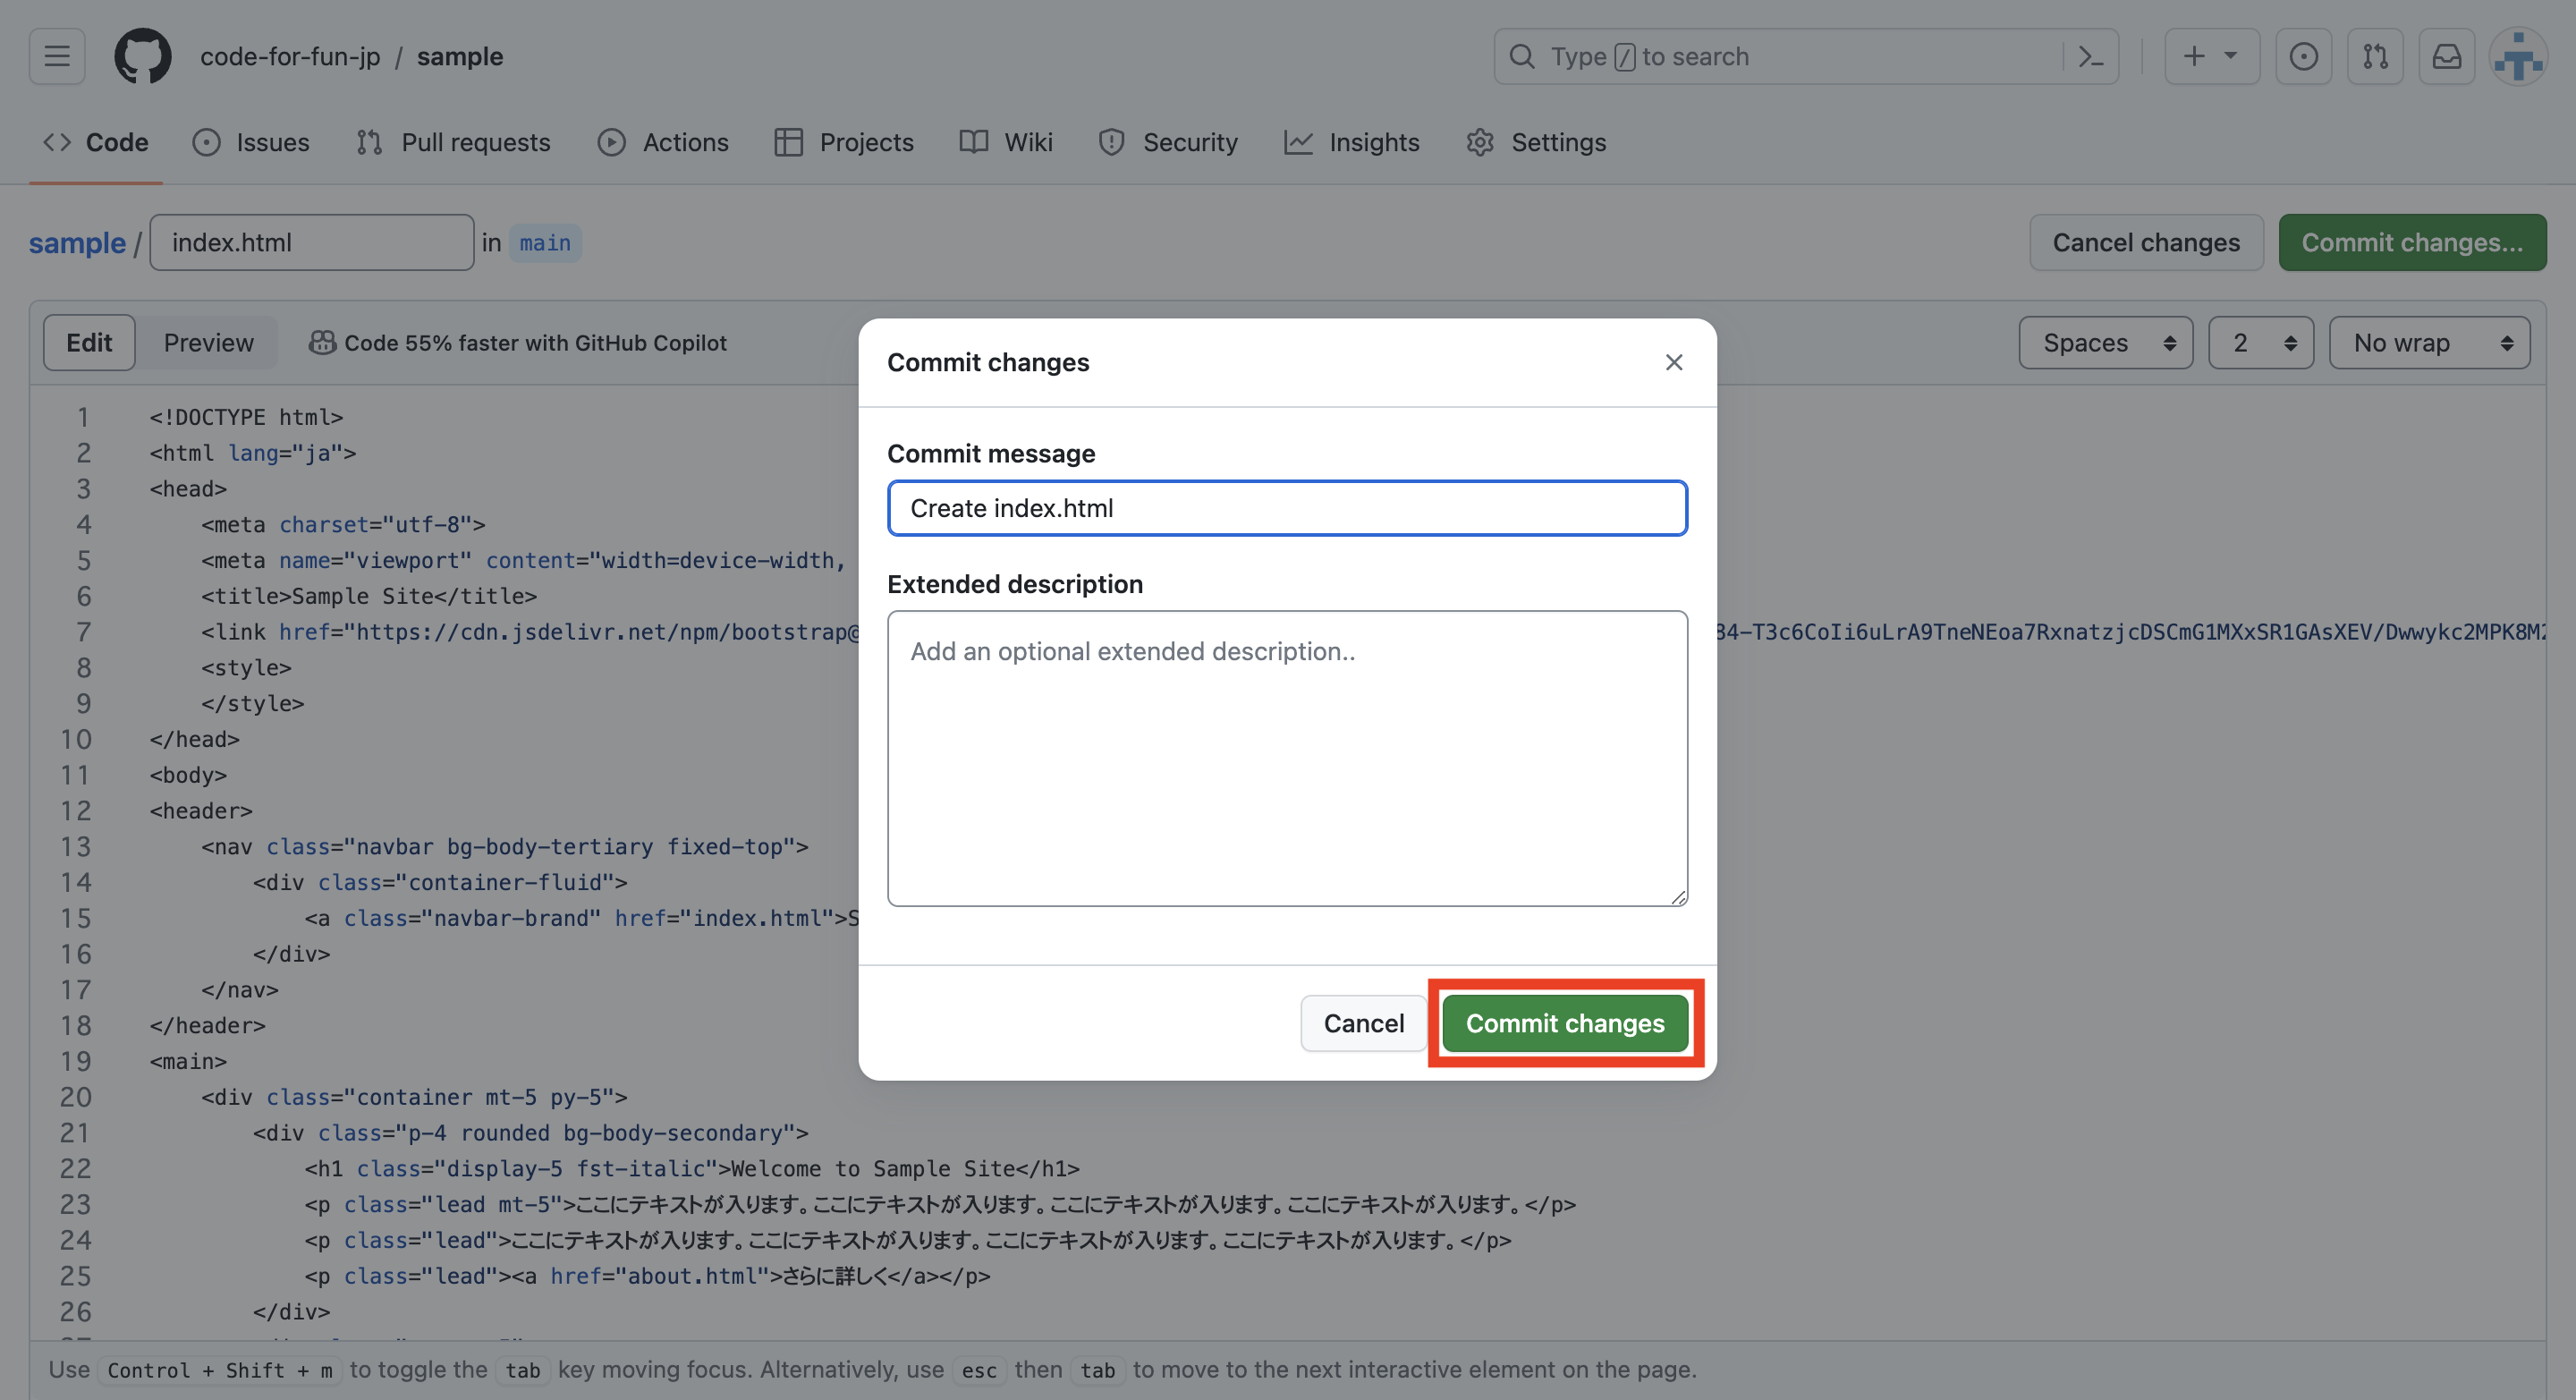
ファイル名に index.html と入力してコードを貼り付けたら、緑色の Commit changes… をクリックします。
- index.html のサンプルが必要な方はこちら
-
<!DOCTYPE > <html lang="ja"> <head> <meta charset="utf-8"> <meta name="viewport" content="width=device-width, initial-scale=1"> <title>Sample Site</title> <link href="https://cdn.jsdelivr.net/npm/bootstrap@5.3.2/dist/css/bootstrap.min.css" rel="stylesheet" integrity="sha384-T3c6CoIi6uLrA9TneNEoa7RxnatzjcDSCmG1MXxSR1GAsXEV/Dwwykc2MPK8M2HN" crossorigin="anonymous"> <style> </style> </head> <body> <header> <nav class="navbar bg-body-tertiary fixed-top"> <div class="container-fluid"> <a class="navbar-brand" href="index.html">Sample Site</a> </div> </nav> </header> <main> <div class="container mt-5 py-5"> <div class="p-4 rounded bg-body-secondary"> <h1 class="display-5 fst-italic">Welcome to Sample Site</h1> <p class="lead mt-5">ここにテキストが入ります。ここにテキストが入ります。ここにテキストが入ります。ここにテキストが入ります。</p> <p class="lead">ここにテキストが入ります。ここにテキストが入ります。ここにテキストが入ります。ここにテキストが入ります。</p> <p class="lead"><a href="about.html">さらに詳しく</a></p> </div> <div class="row my-5"> <h2>Contact</h2> <p>お問い合わせは <a href="#">sample@sample.com</a> にお送りください。</p> </div> </div> </main> <footer class="py-3 fixed-bottom bg-body-tertiary"> <div class="text-center"> <span class="text-body-secondary">© Sample Site</span> </div> </footer> </body> </html>
Commit changes をクリックします。
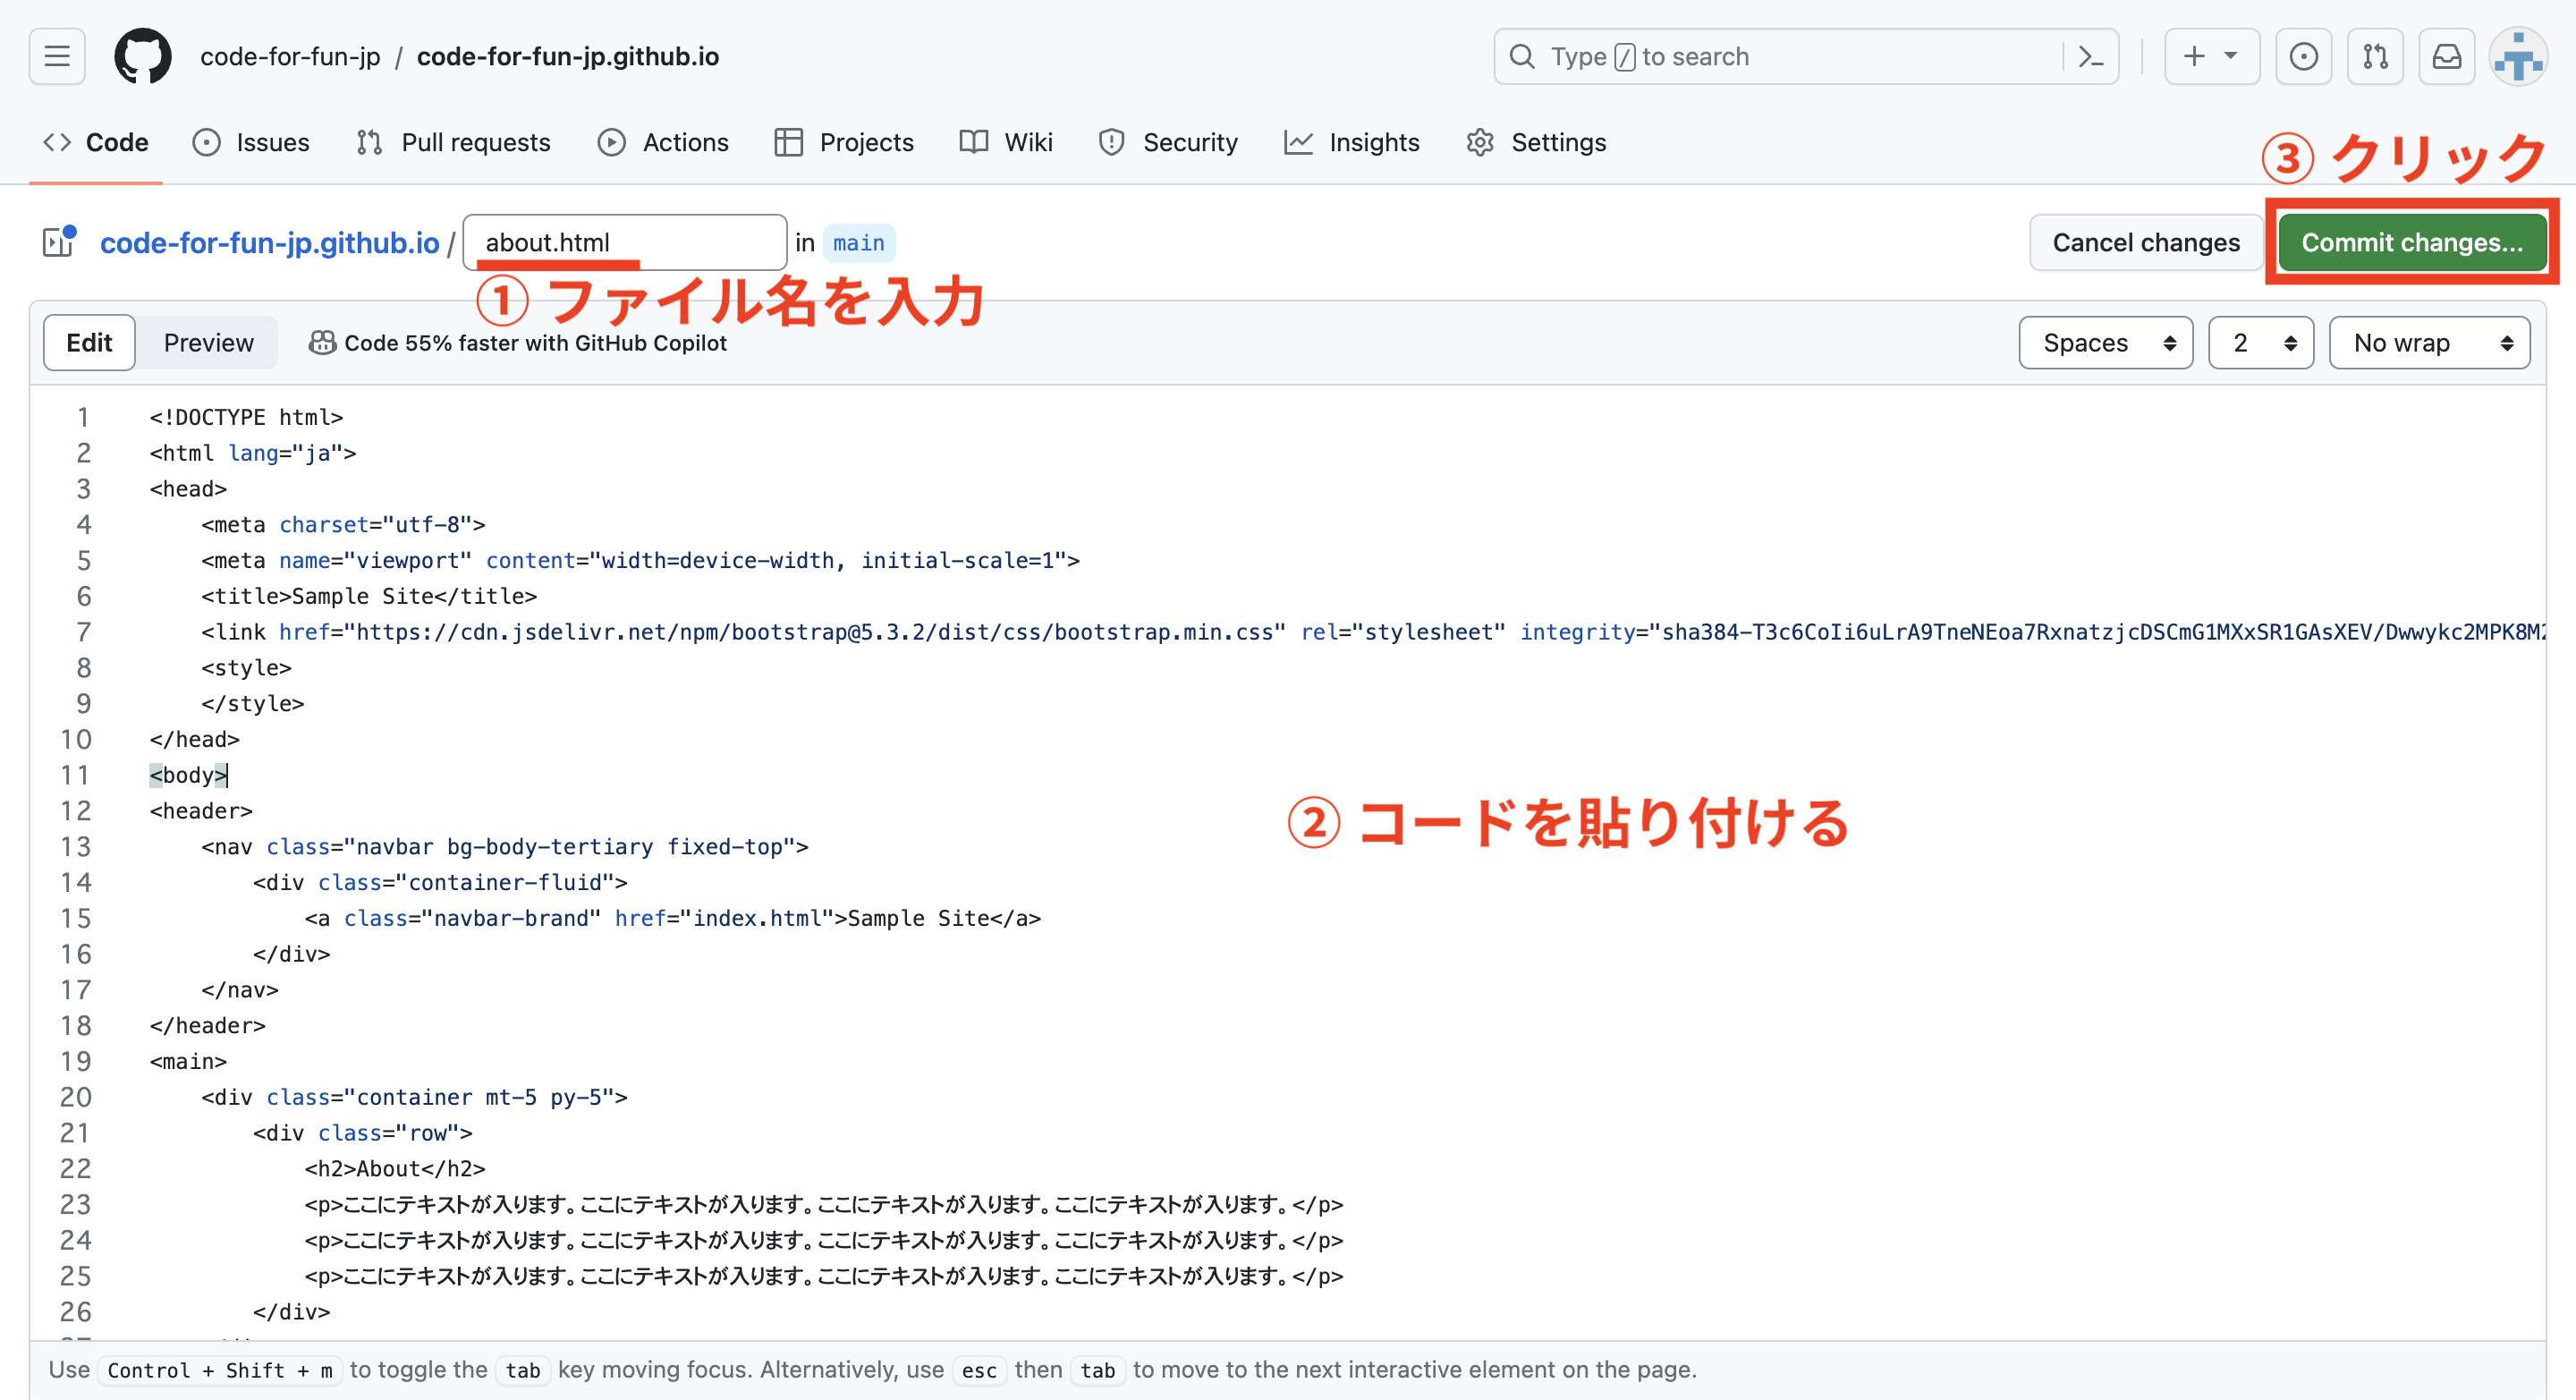
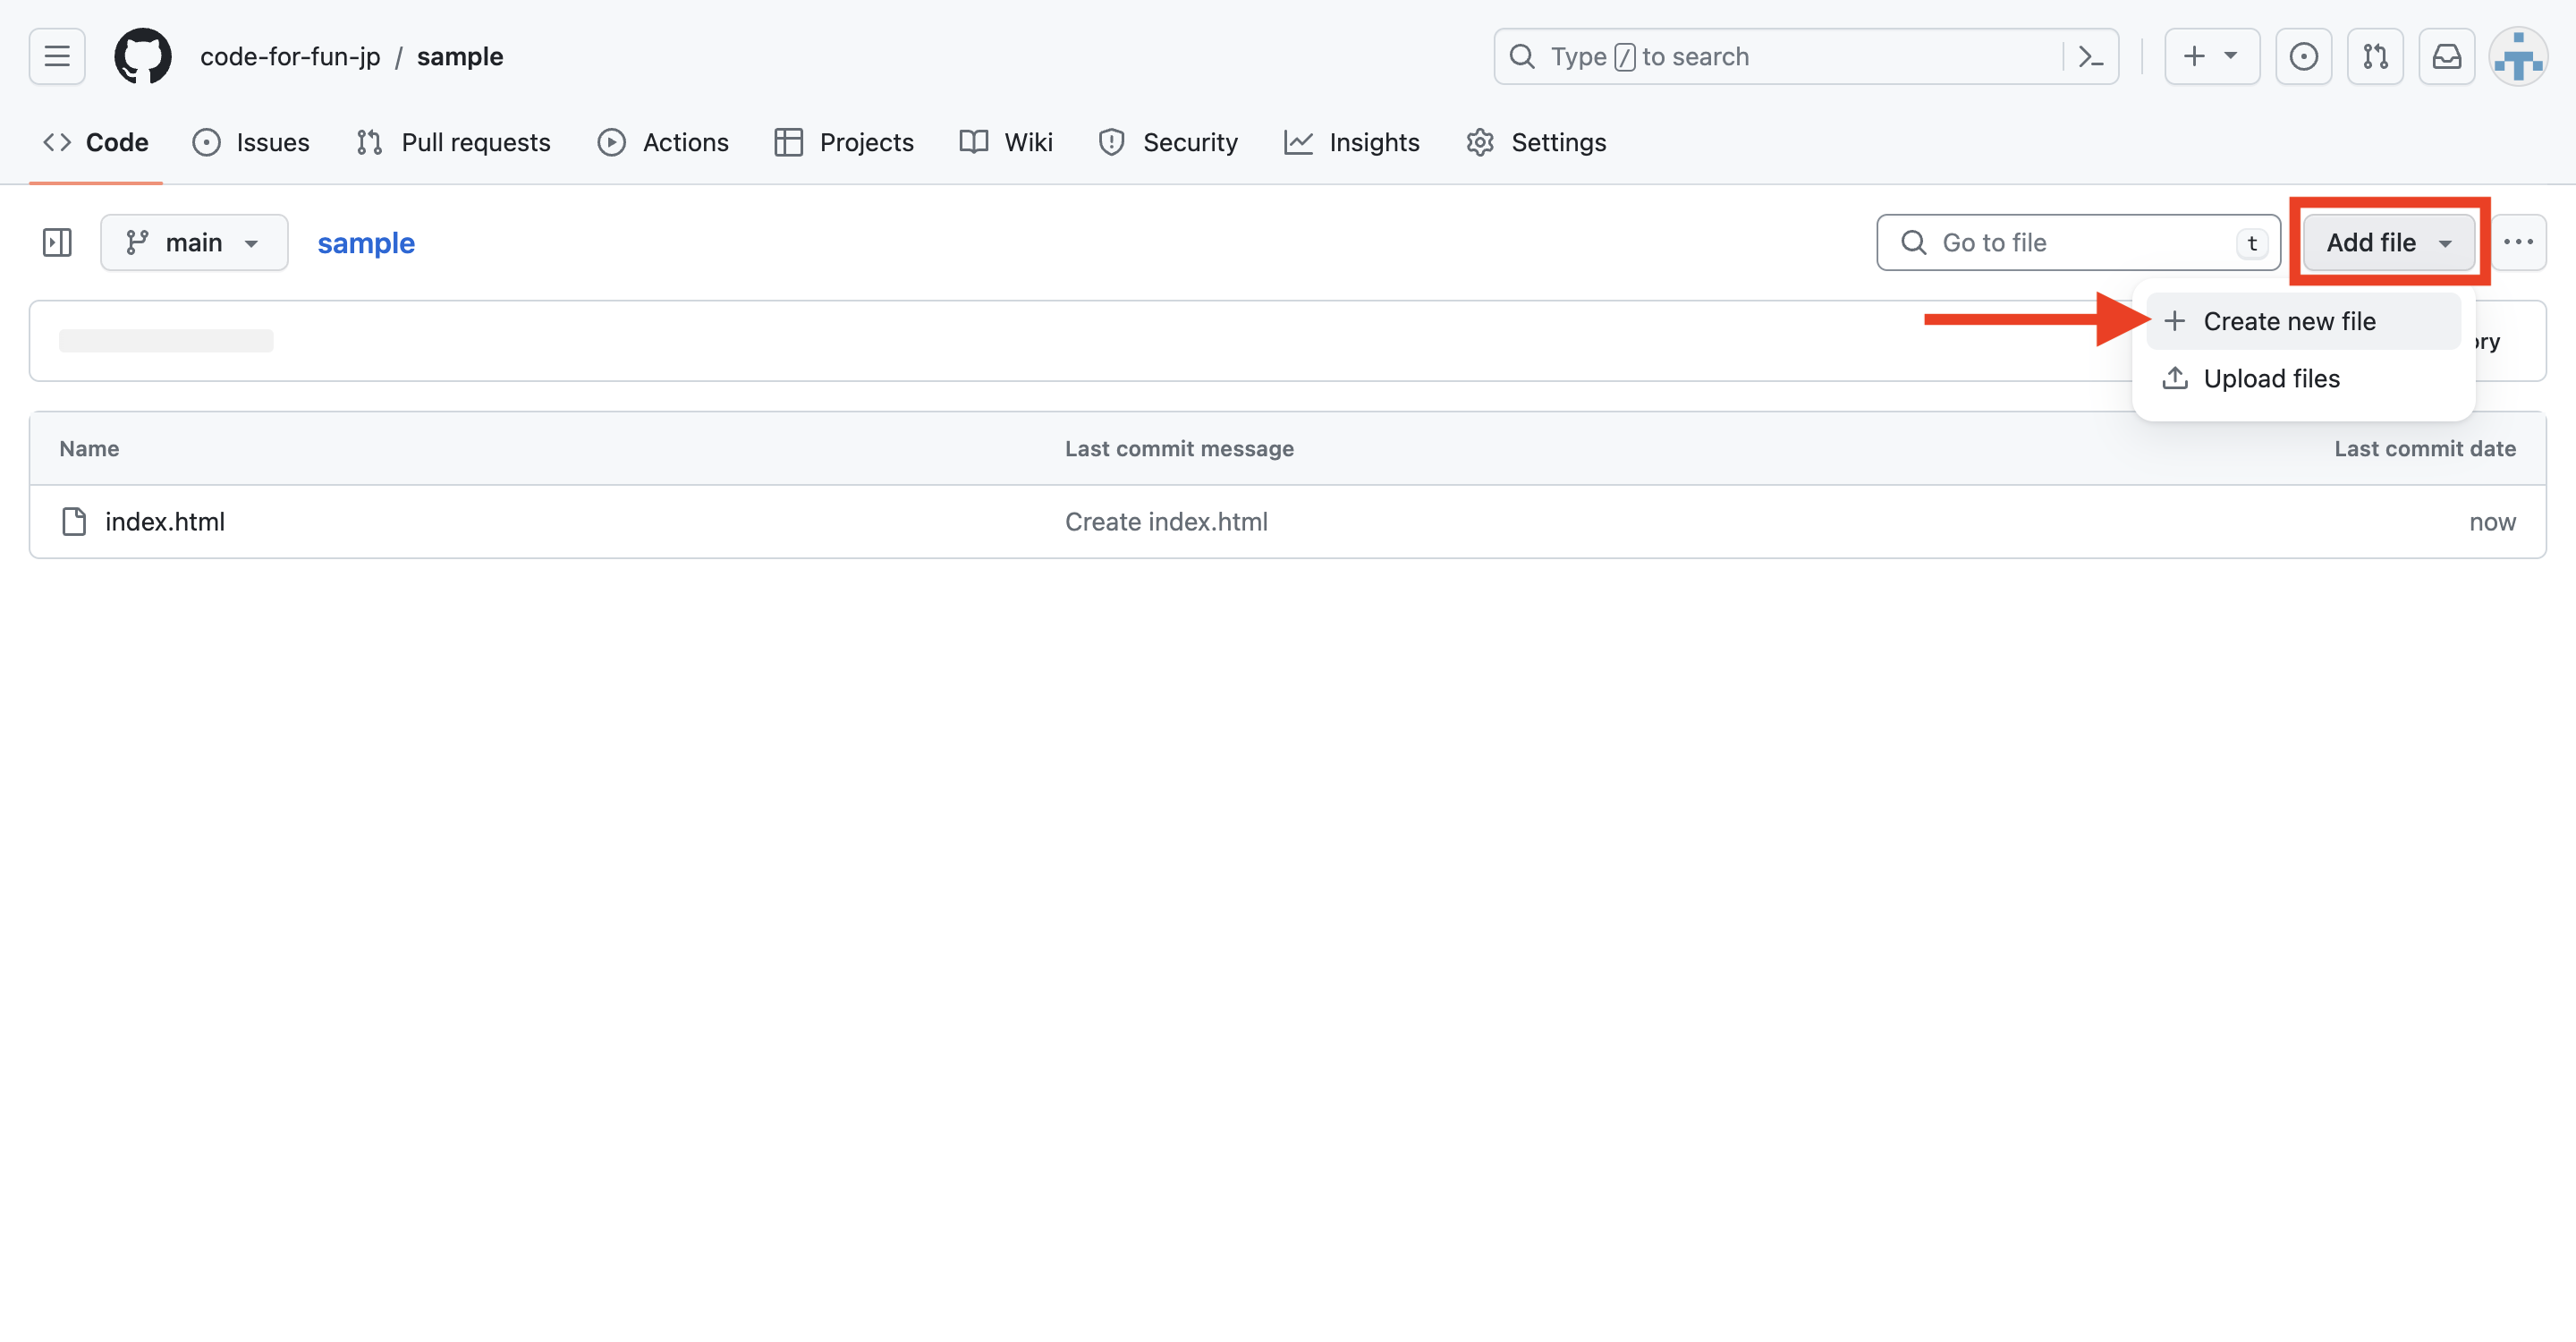
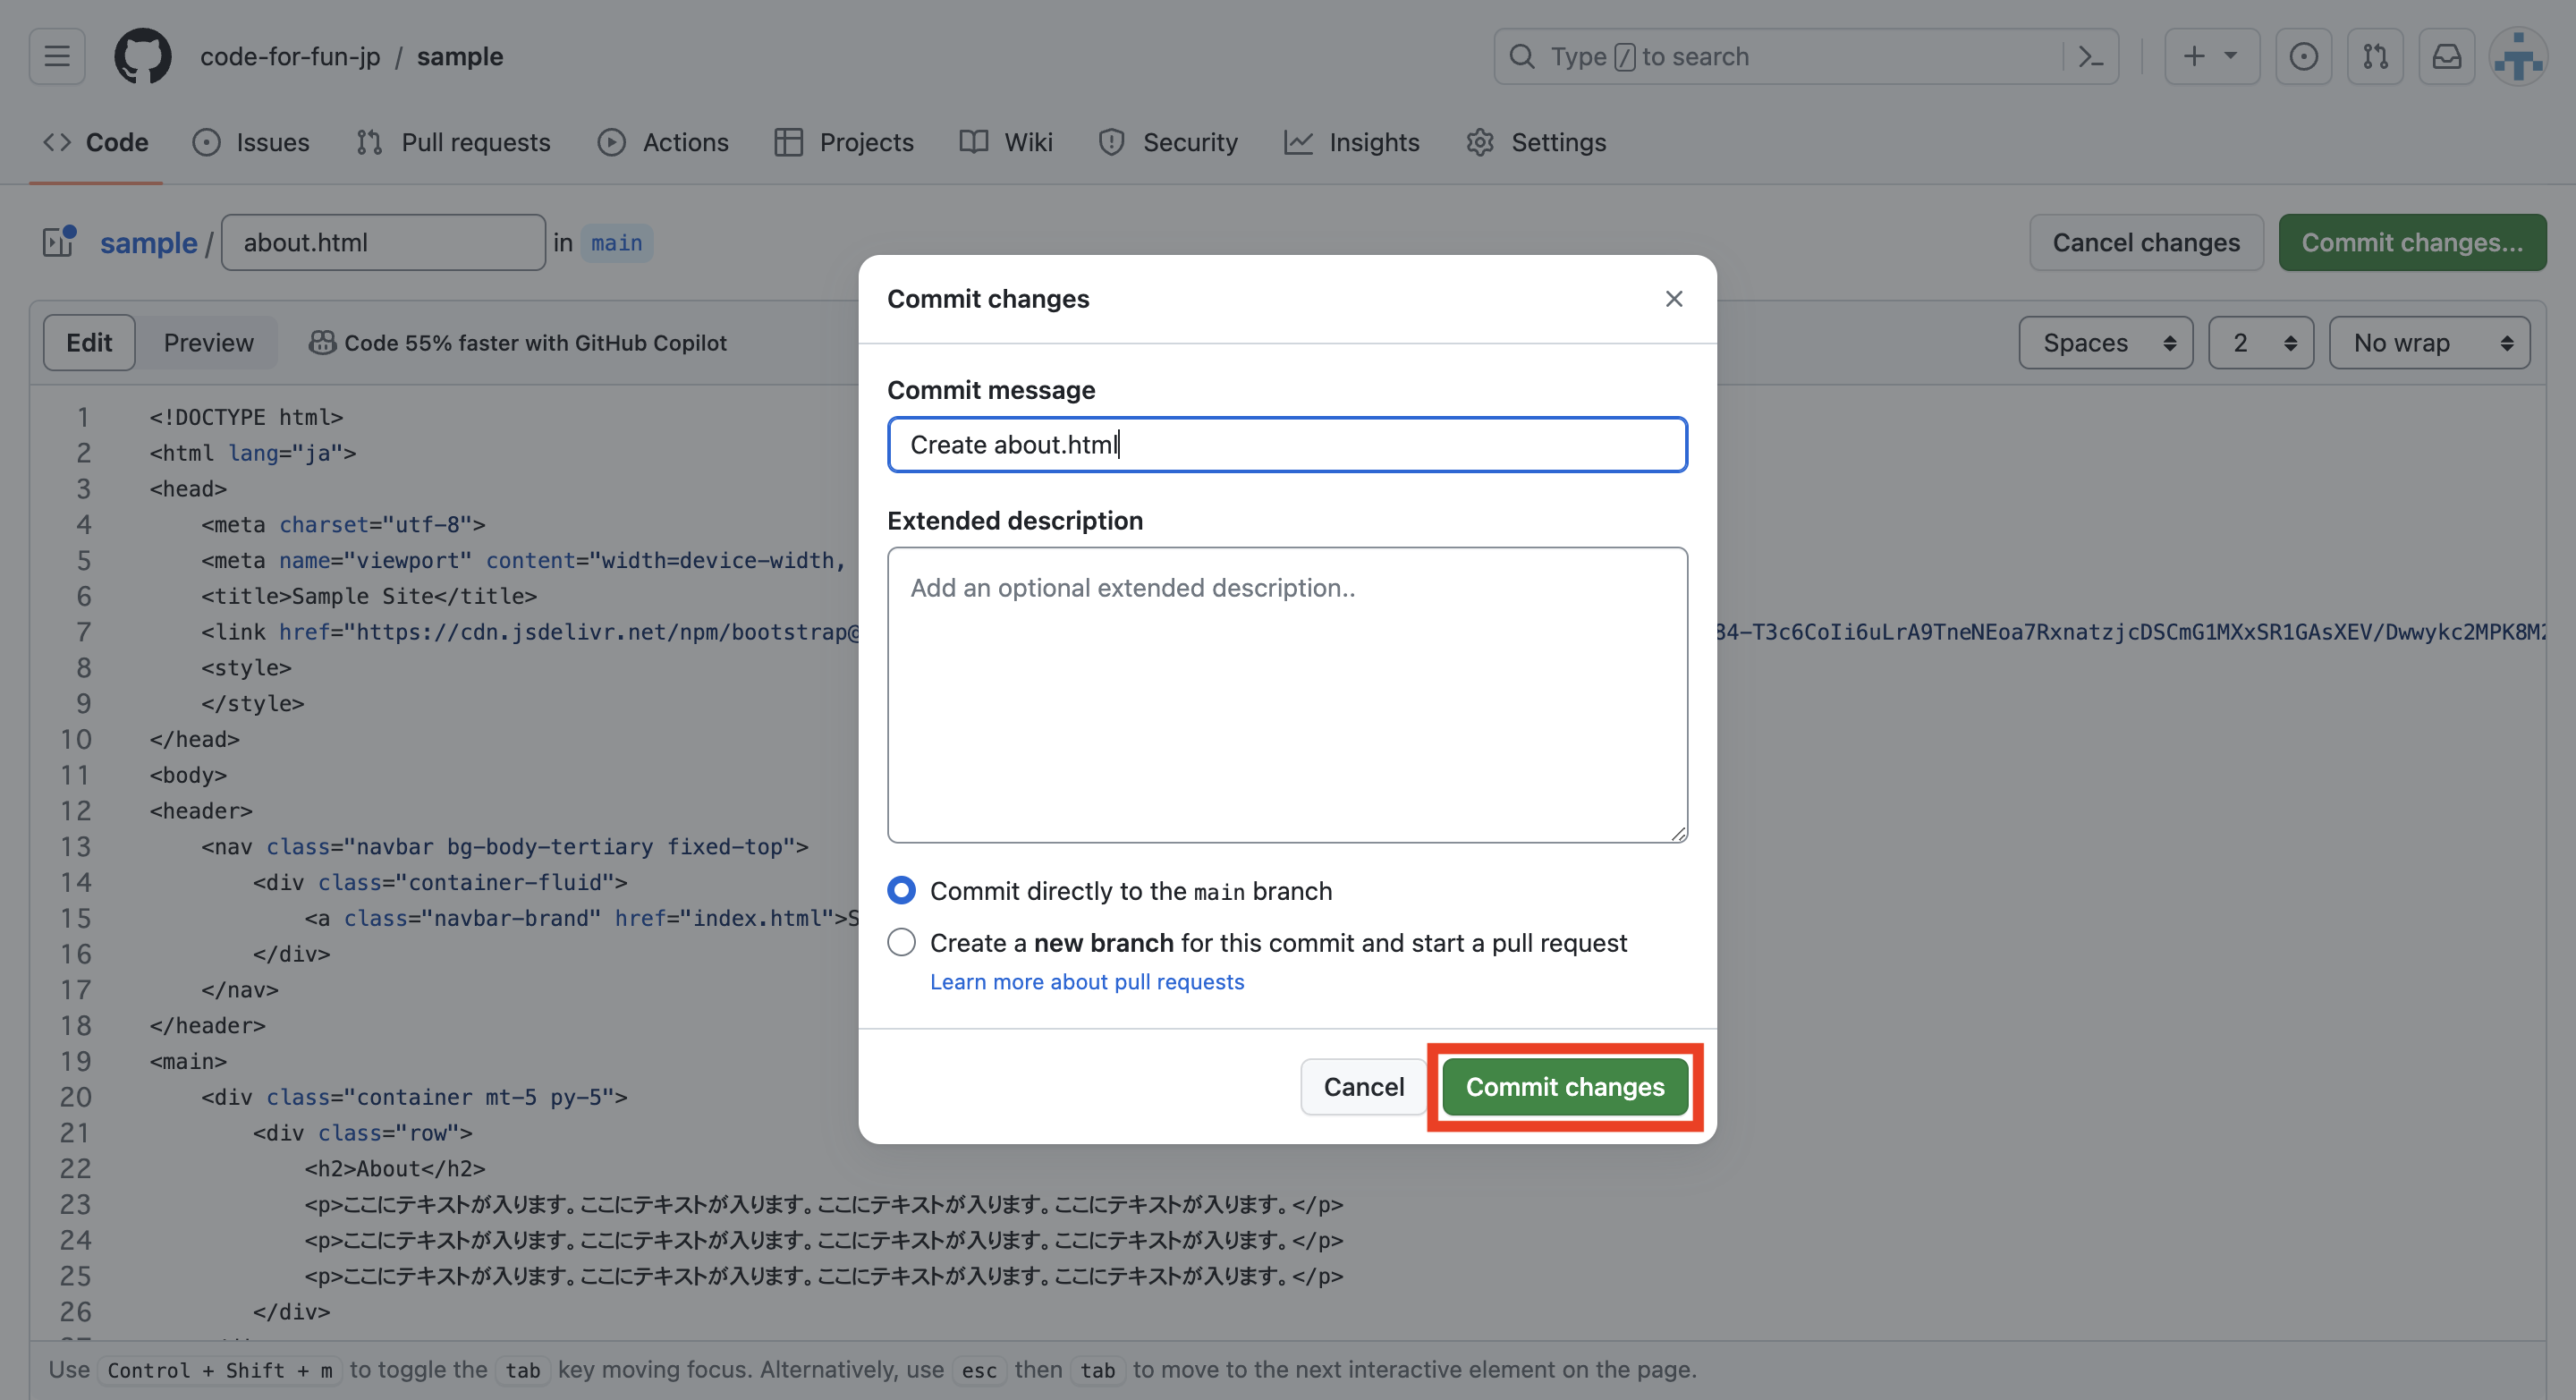
about.html を作成する
ファイルをもう1つ作成します。
Add file をクリックして Create new file を選択します。(Upload file をクリックすると HTML ファイルや画像などをアップロードすることもできます。)
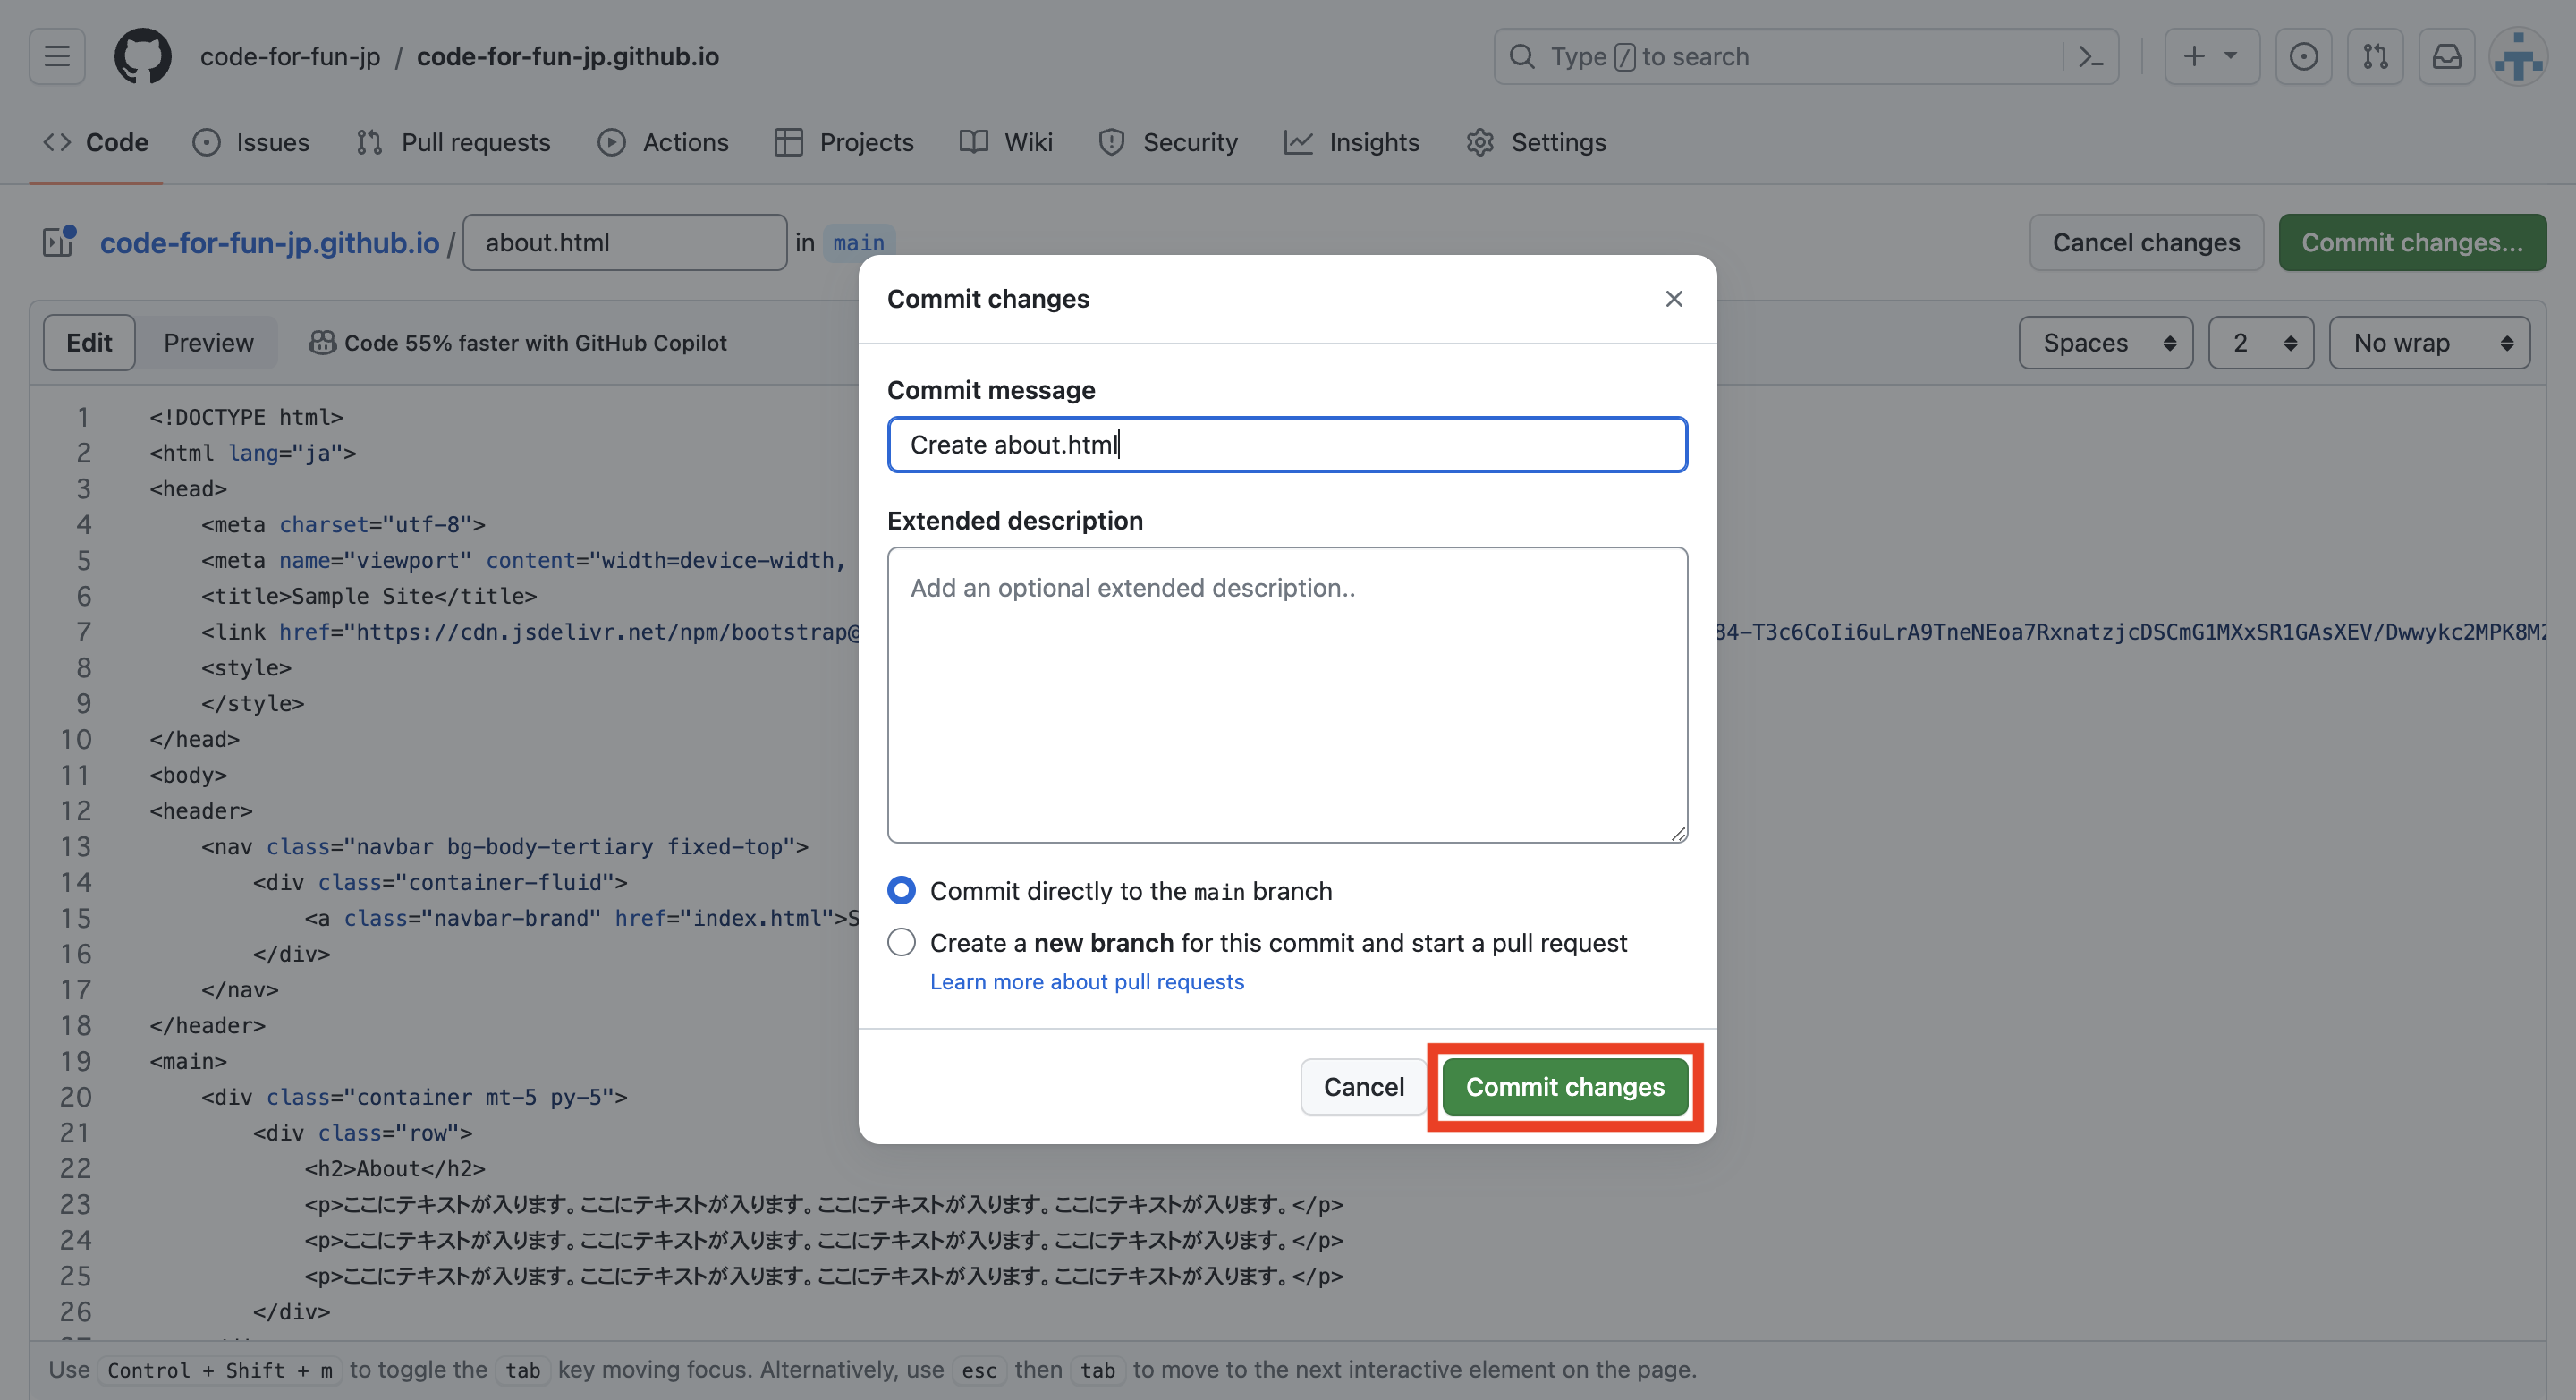
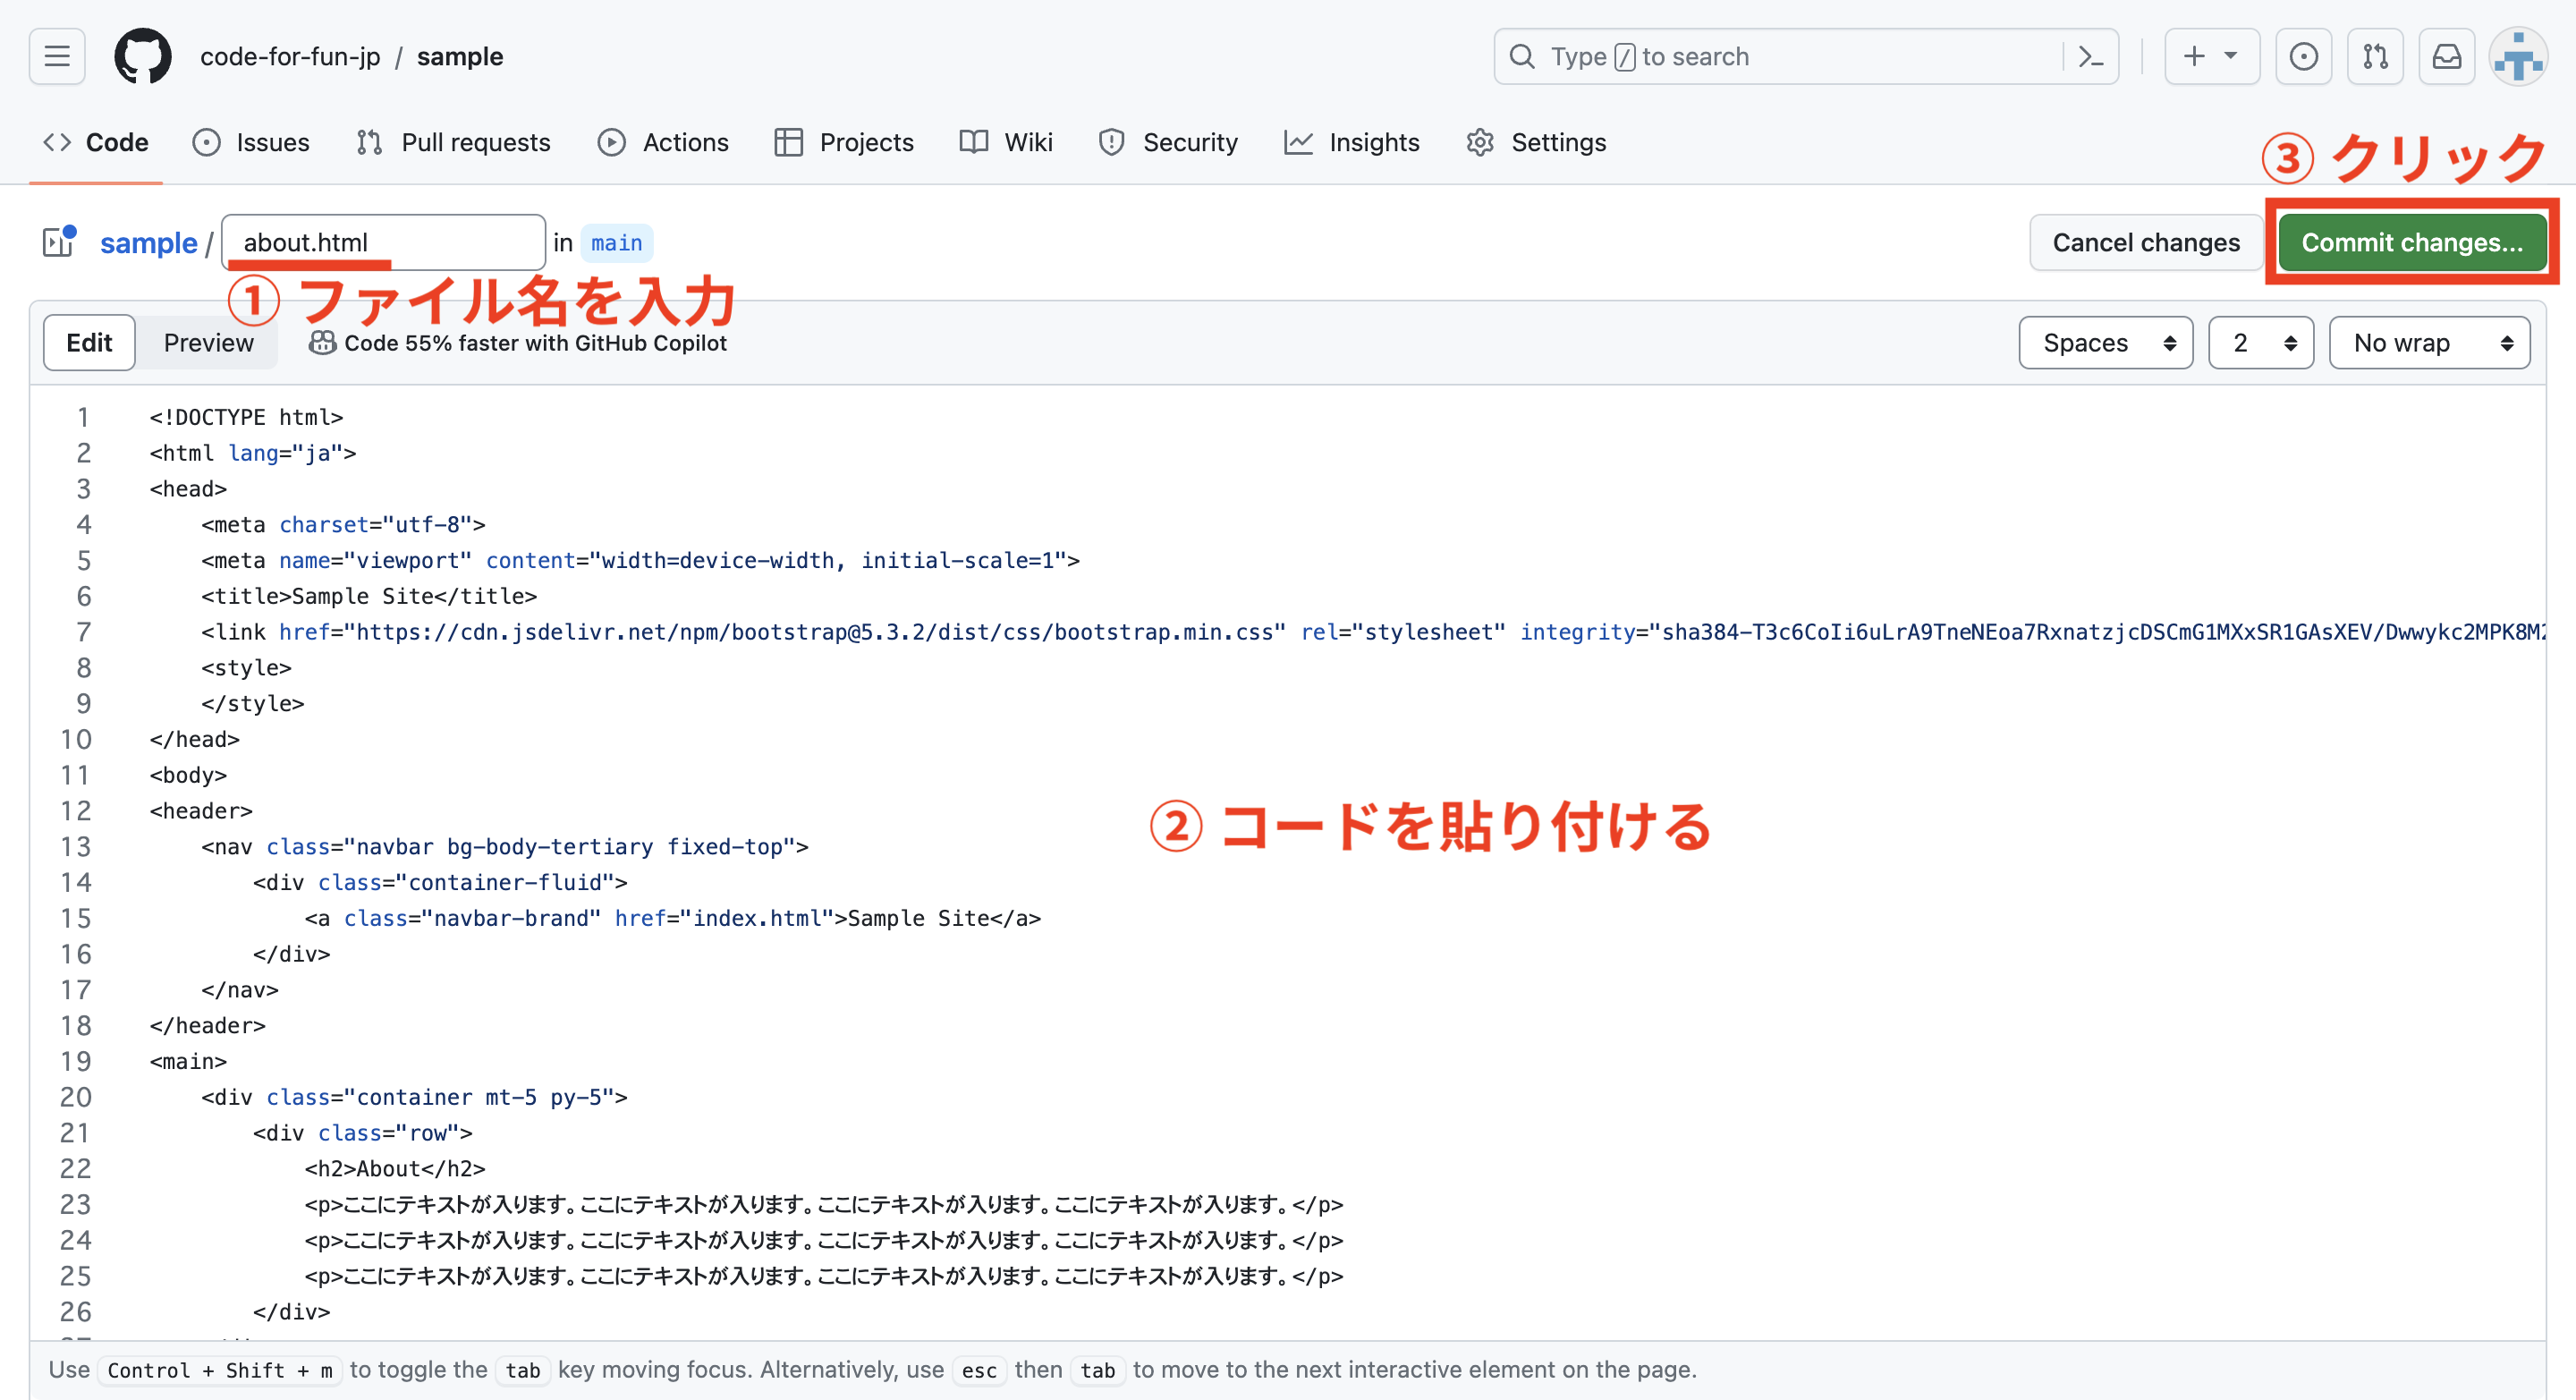
ファイル名に about.html と入力してコードを貼り付けたら、緑色の Commit changes… をクリックします。
- about.html のサンプルが必要な方はこちら
-
<!DOCTYPE > <html lang="ja"> <head> <meta charset="utf-8"> <meta name="viewport" content="width=device-width, initial-scale=1"> <title>Sample Site</title> <link href="https://cdn.jsdelivr.net/npm/bootstrap@5.3.2/dist/css/bootstrap.min.css" rel="stylesheet" integrity="sha384-T3c6CoIi6uLrA9TneNEoa7RxnatzjcDSCmG1MXxSR1GAsXEV/Dwwykc2MPK8M2HN" crossorigin="anonymous"> <style> </style> </head> <body> <header> <nav class="navbar bg-body-tertiary fixed-top"> <div class="container-fluid"> <a class="navbar-brand" href="index.html">Sample Site</a> </div> </nav> </header> <main> <div class="container mt-5 py-5"> <div class="row"> <h2>About</h2> <p>ここにテキストが入ります。ここにテキストが入ります。ここにテキストが入ります。ここにテキストが入ります。</p> <p>ここにテキストが入ります。ここにテキストが入ります。ここにテキストが入ります。ここにテキストが入ります。</p> <p>ここにテキストが入ります。ここにテキストが入ります。ここにテキストが入ります。ここにテキストが入ります。</p> </div> </div> </main> <footer class="py-3 fixed-bottom bg-body-tertiary"> <div class="text-center"> <span class="text-body-secondary">© Sample Site</span> </div> </footer> </body> </html>
Commit changes をクリックします。
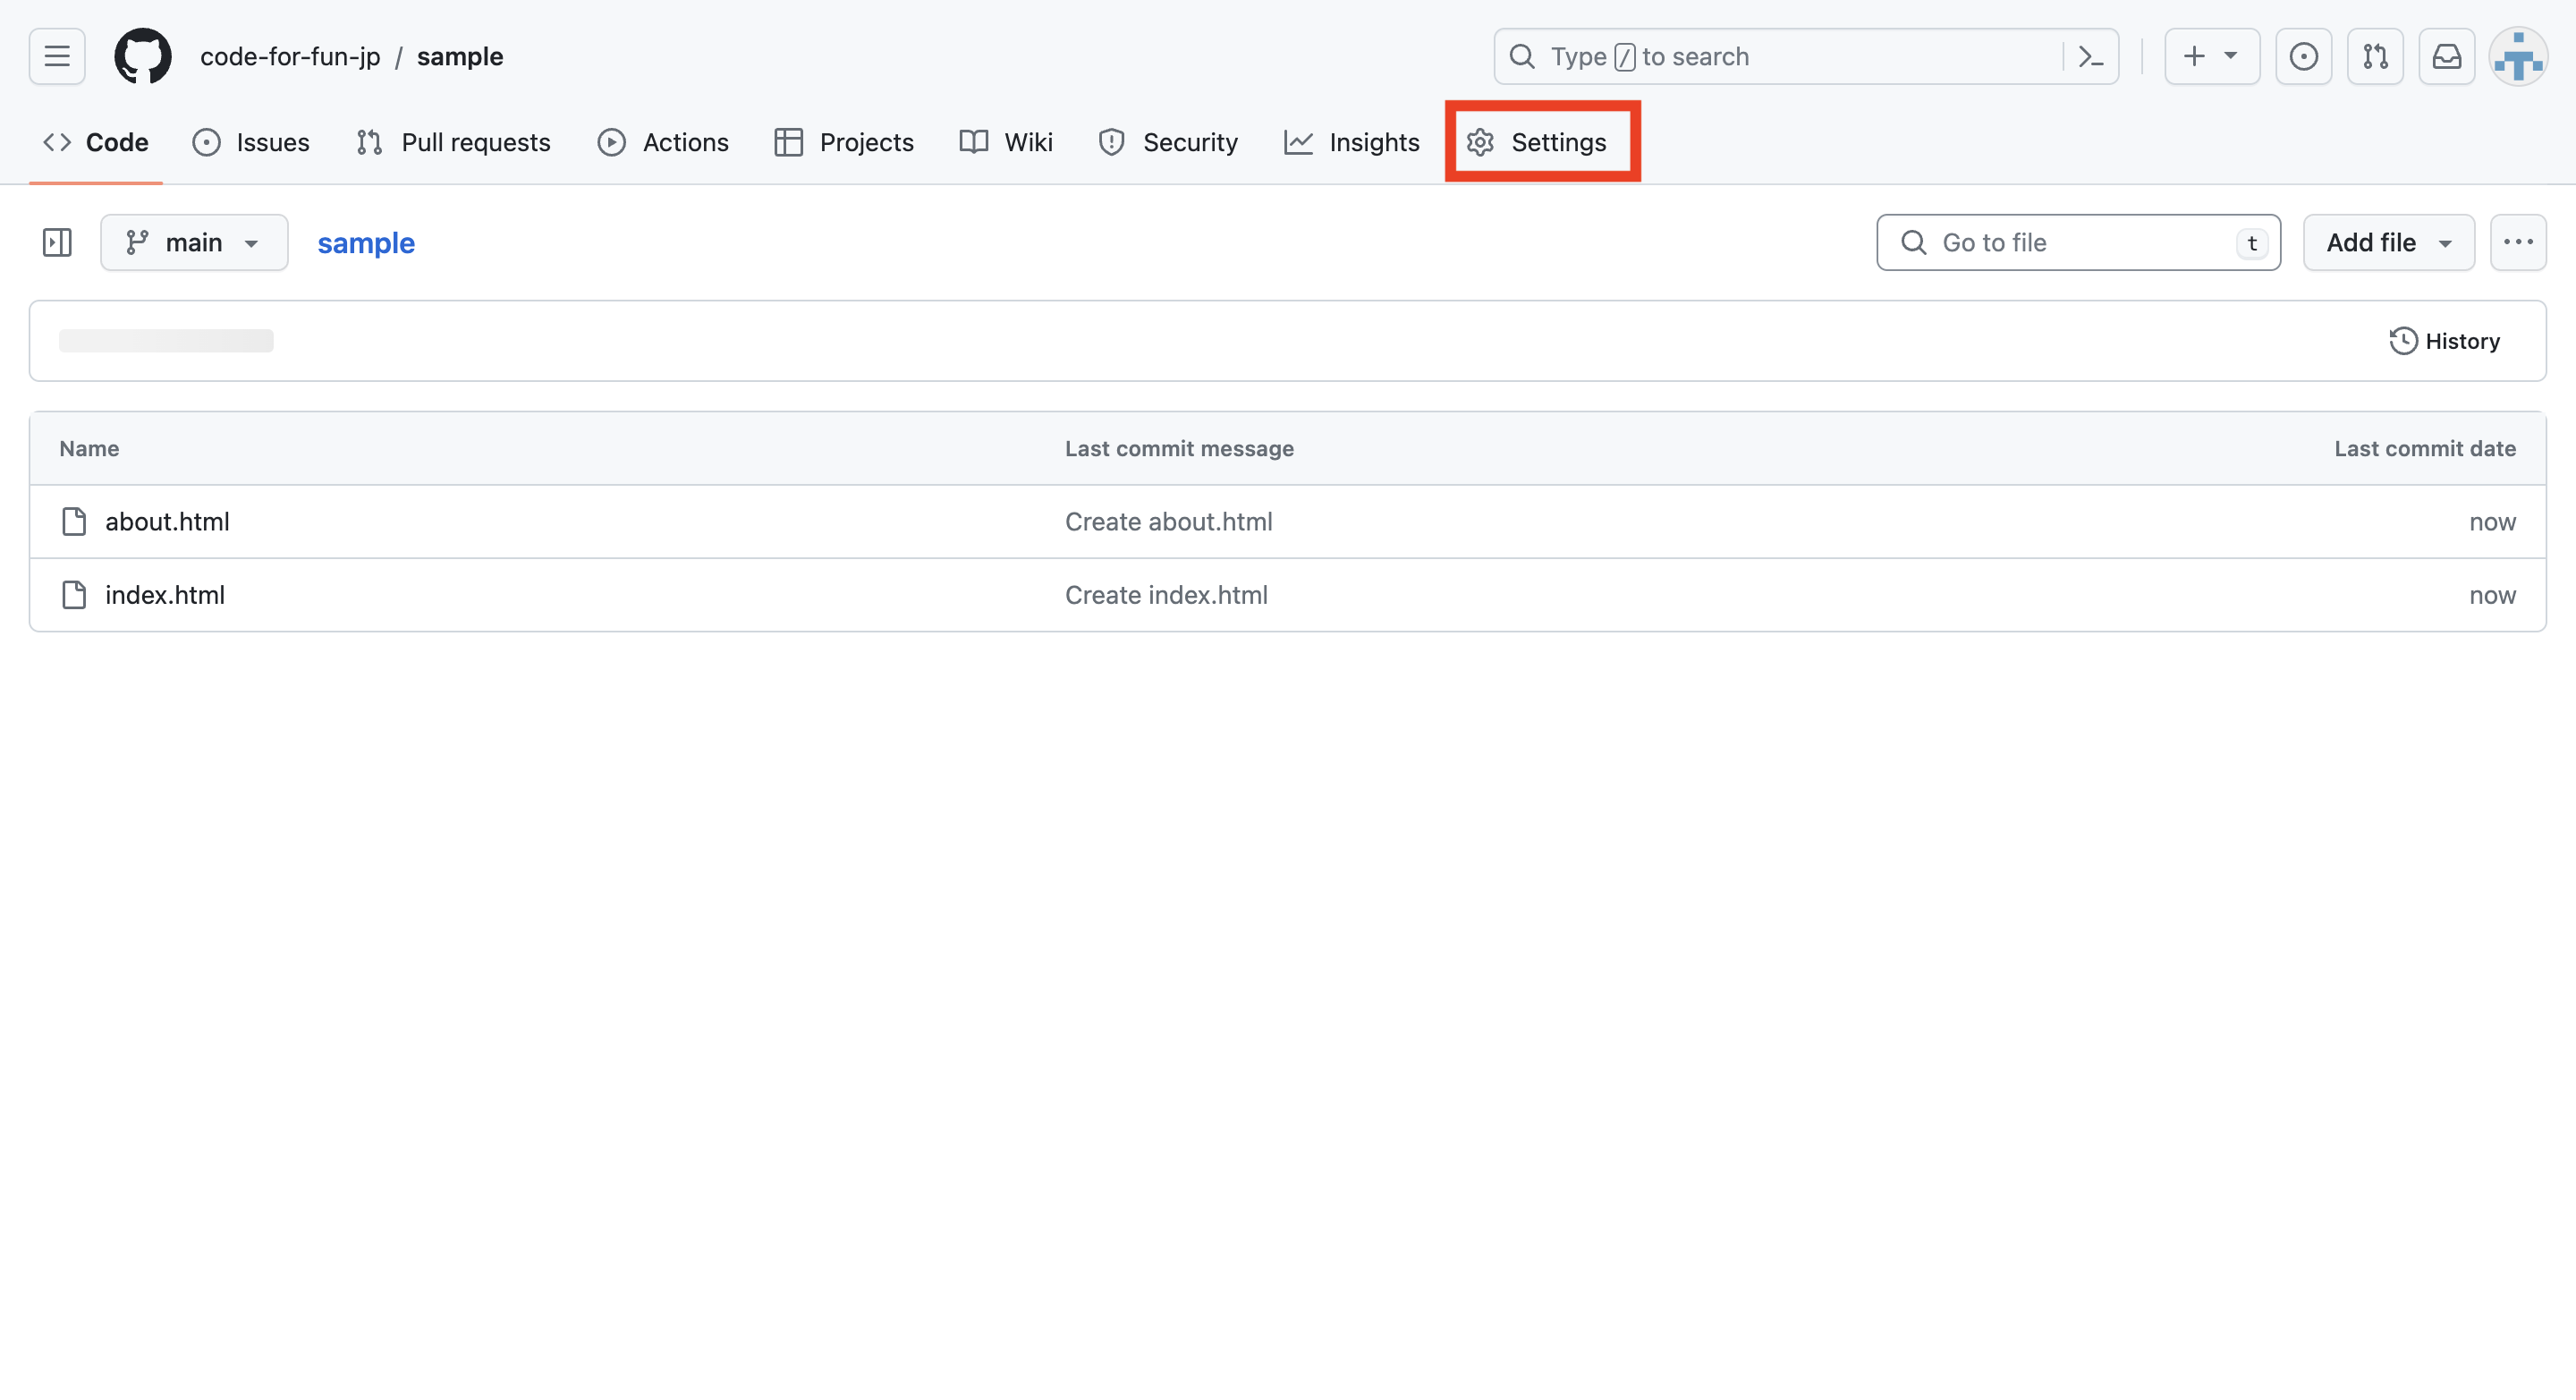
3. サイトを確認する
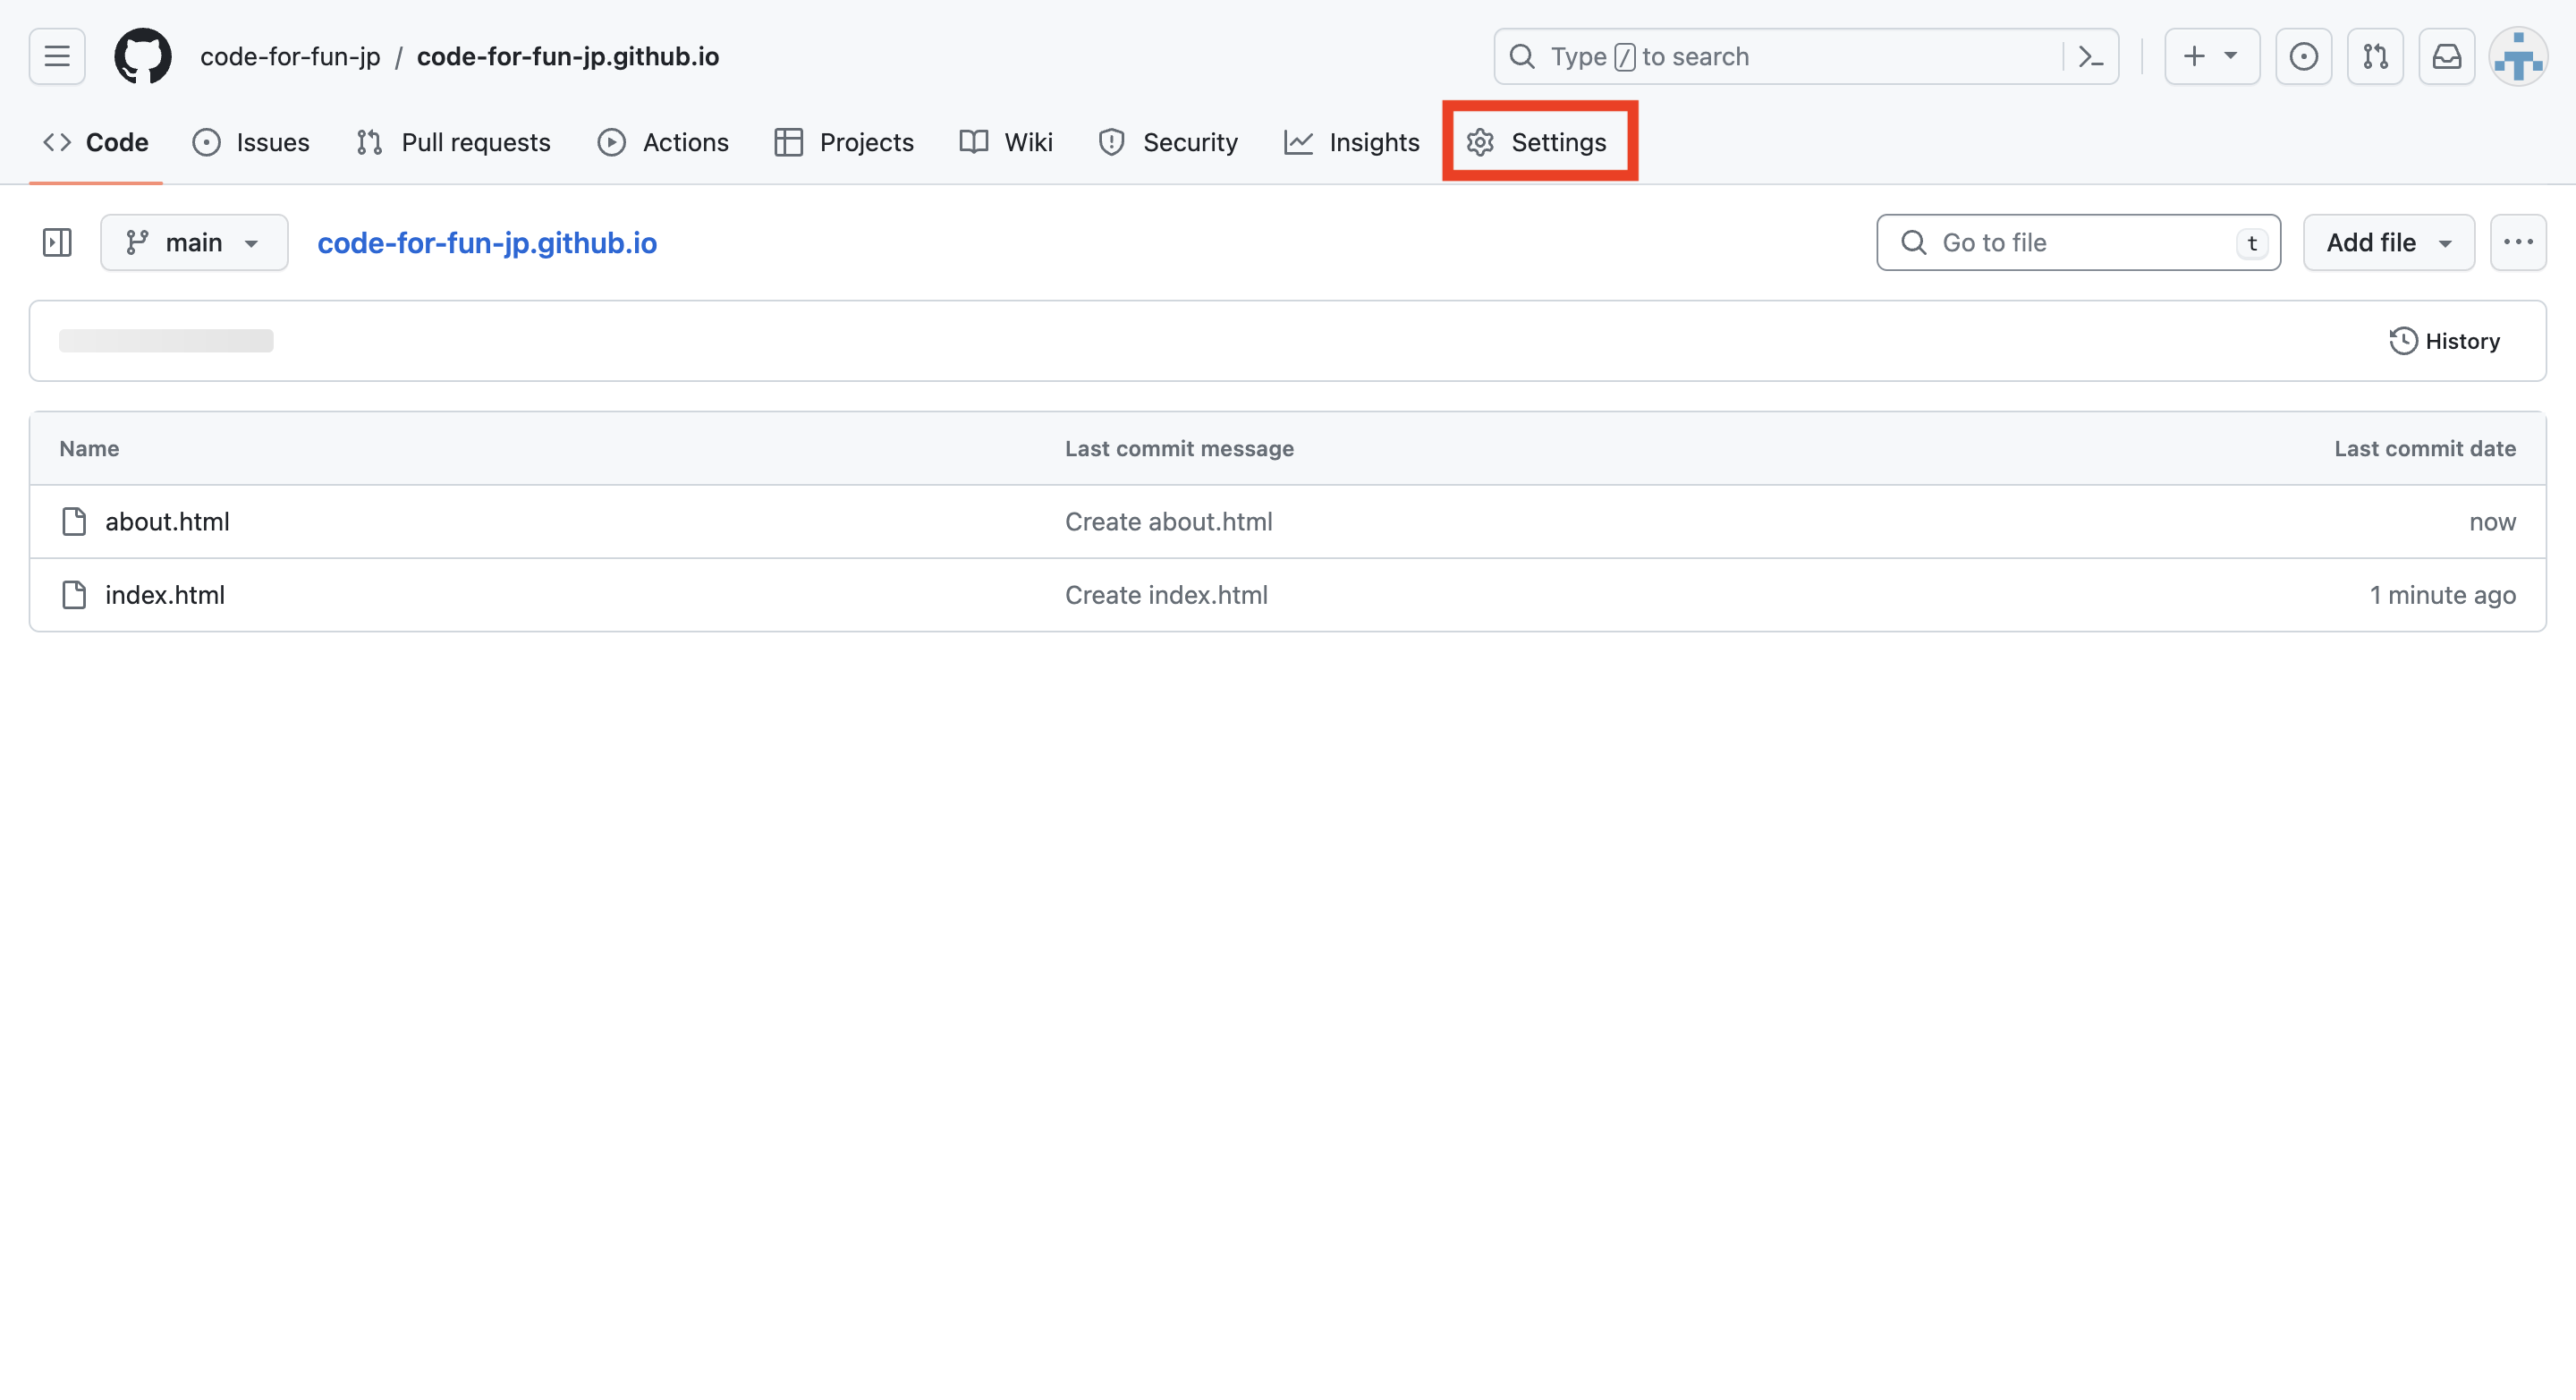
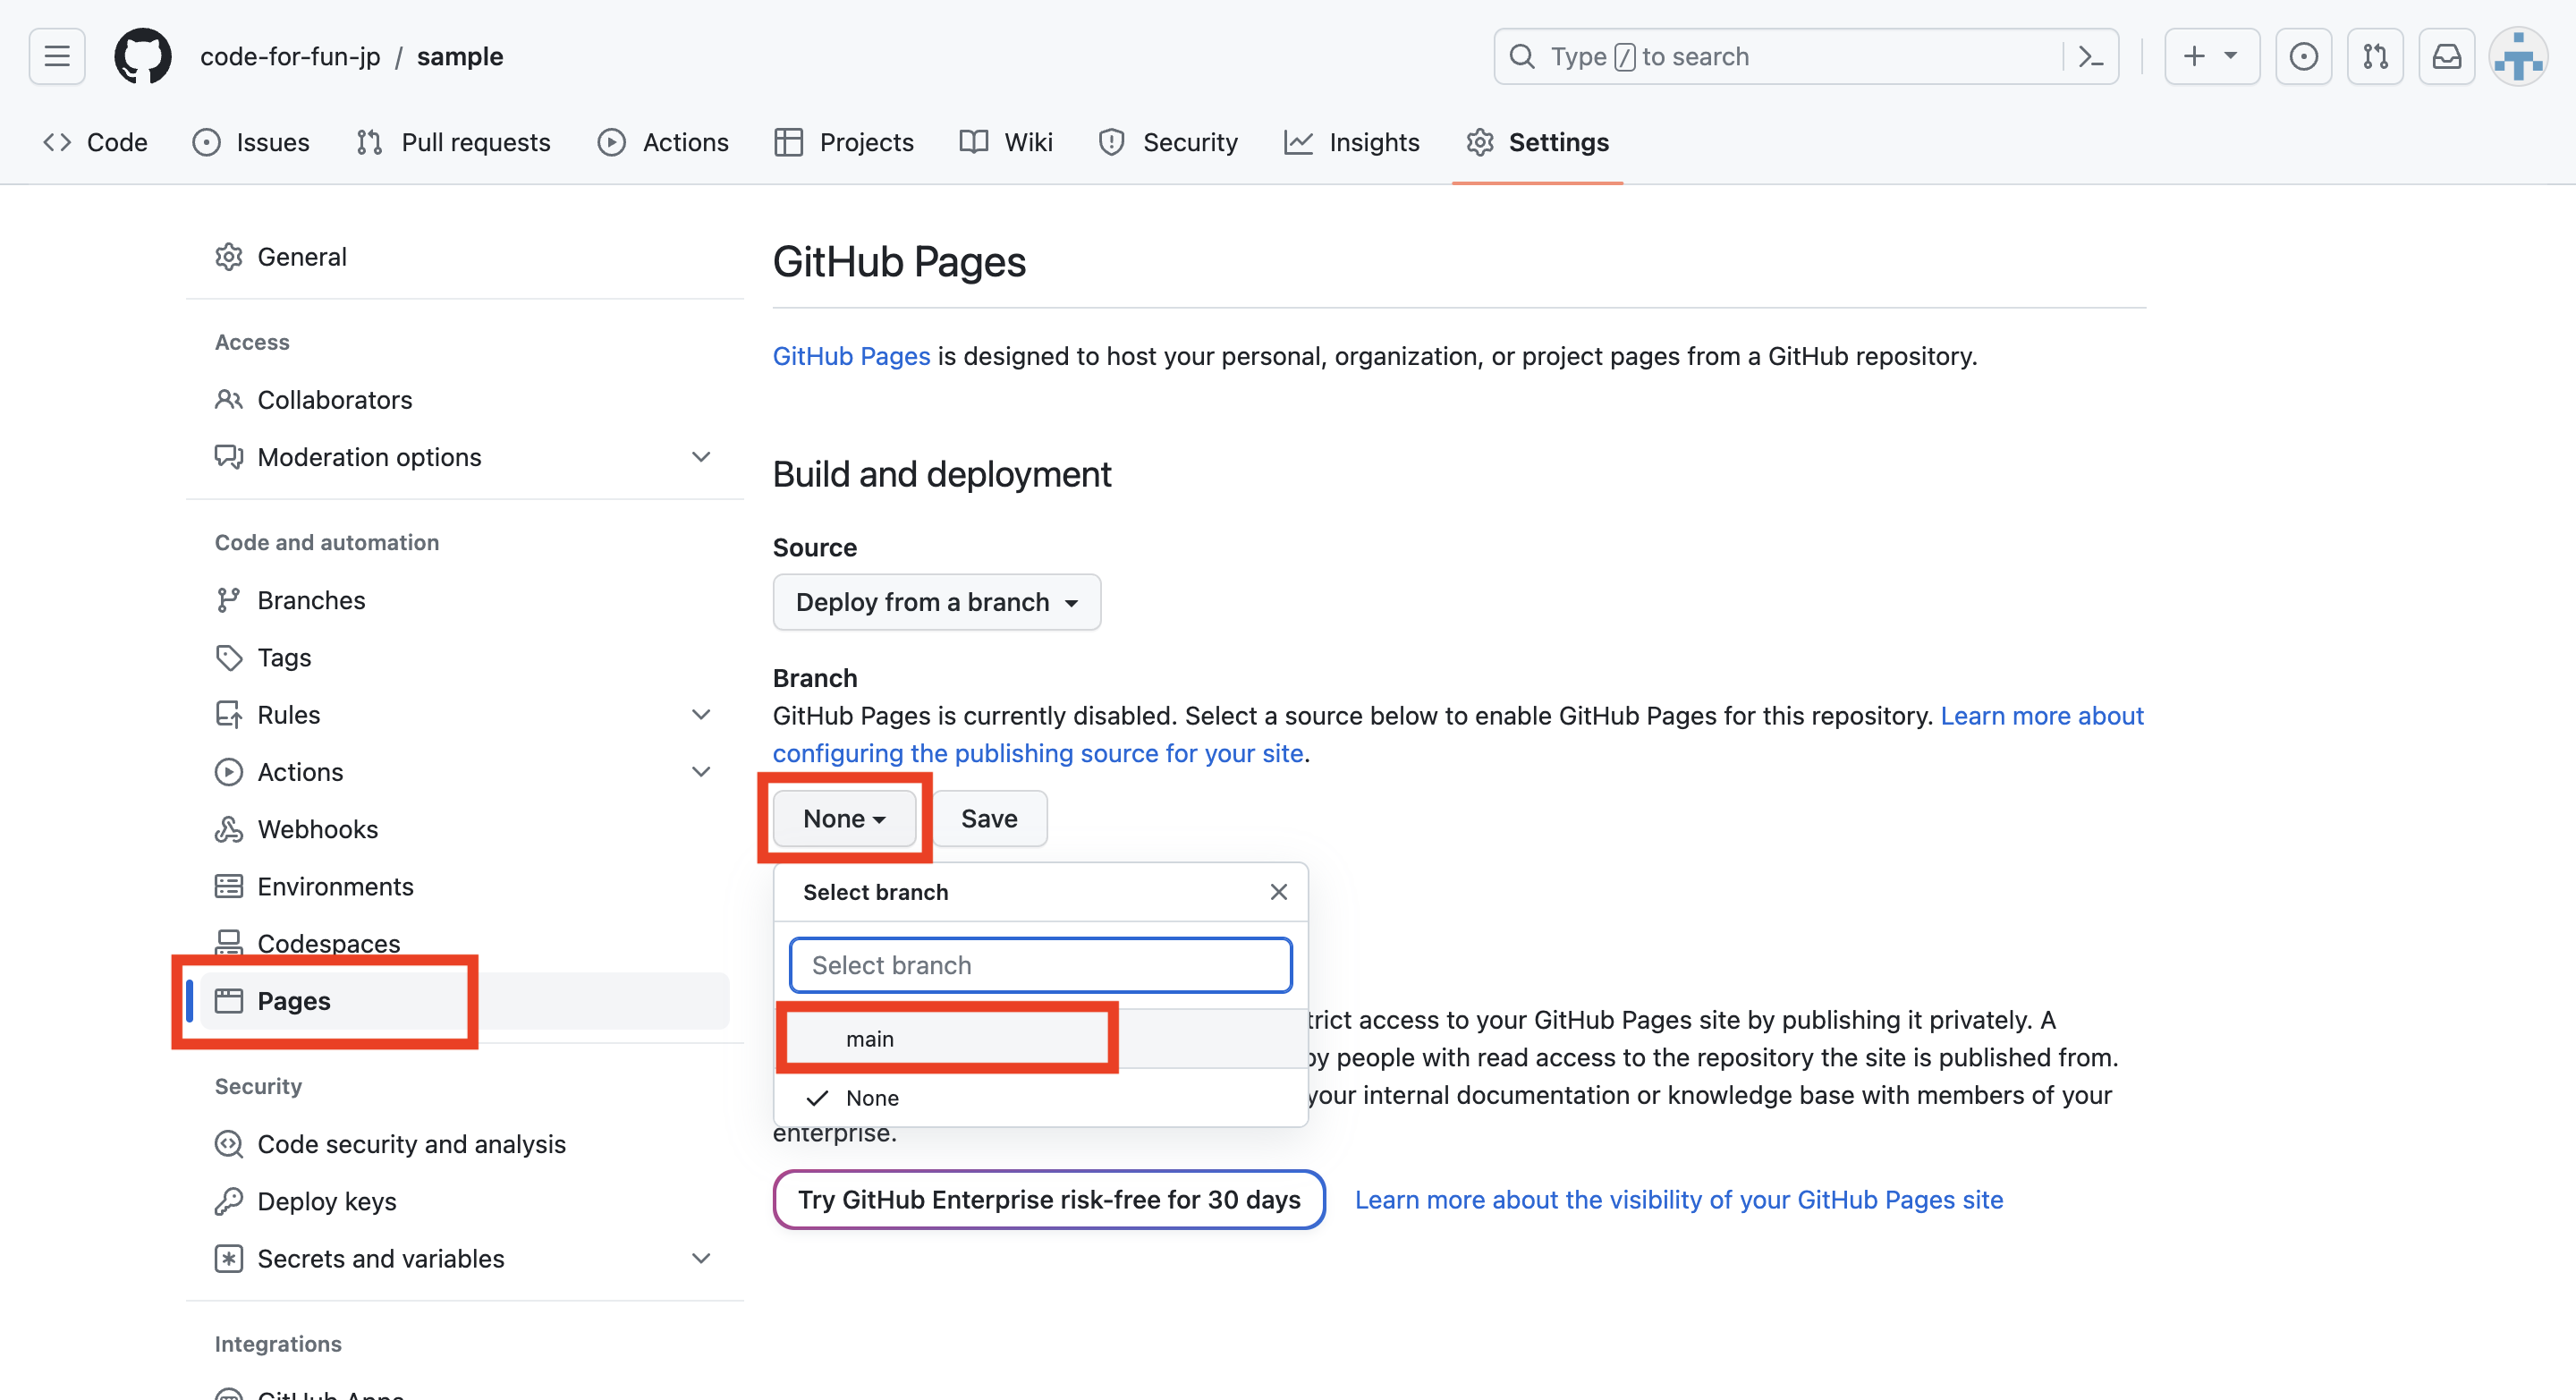
Setting をクリックします。
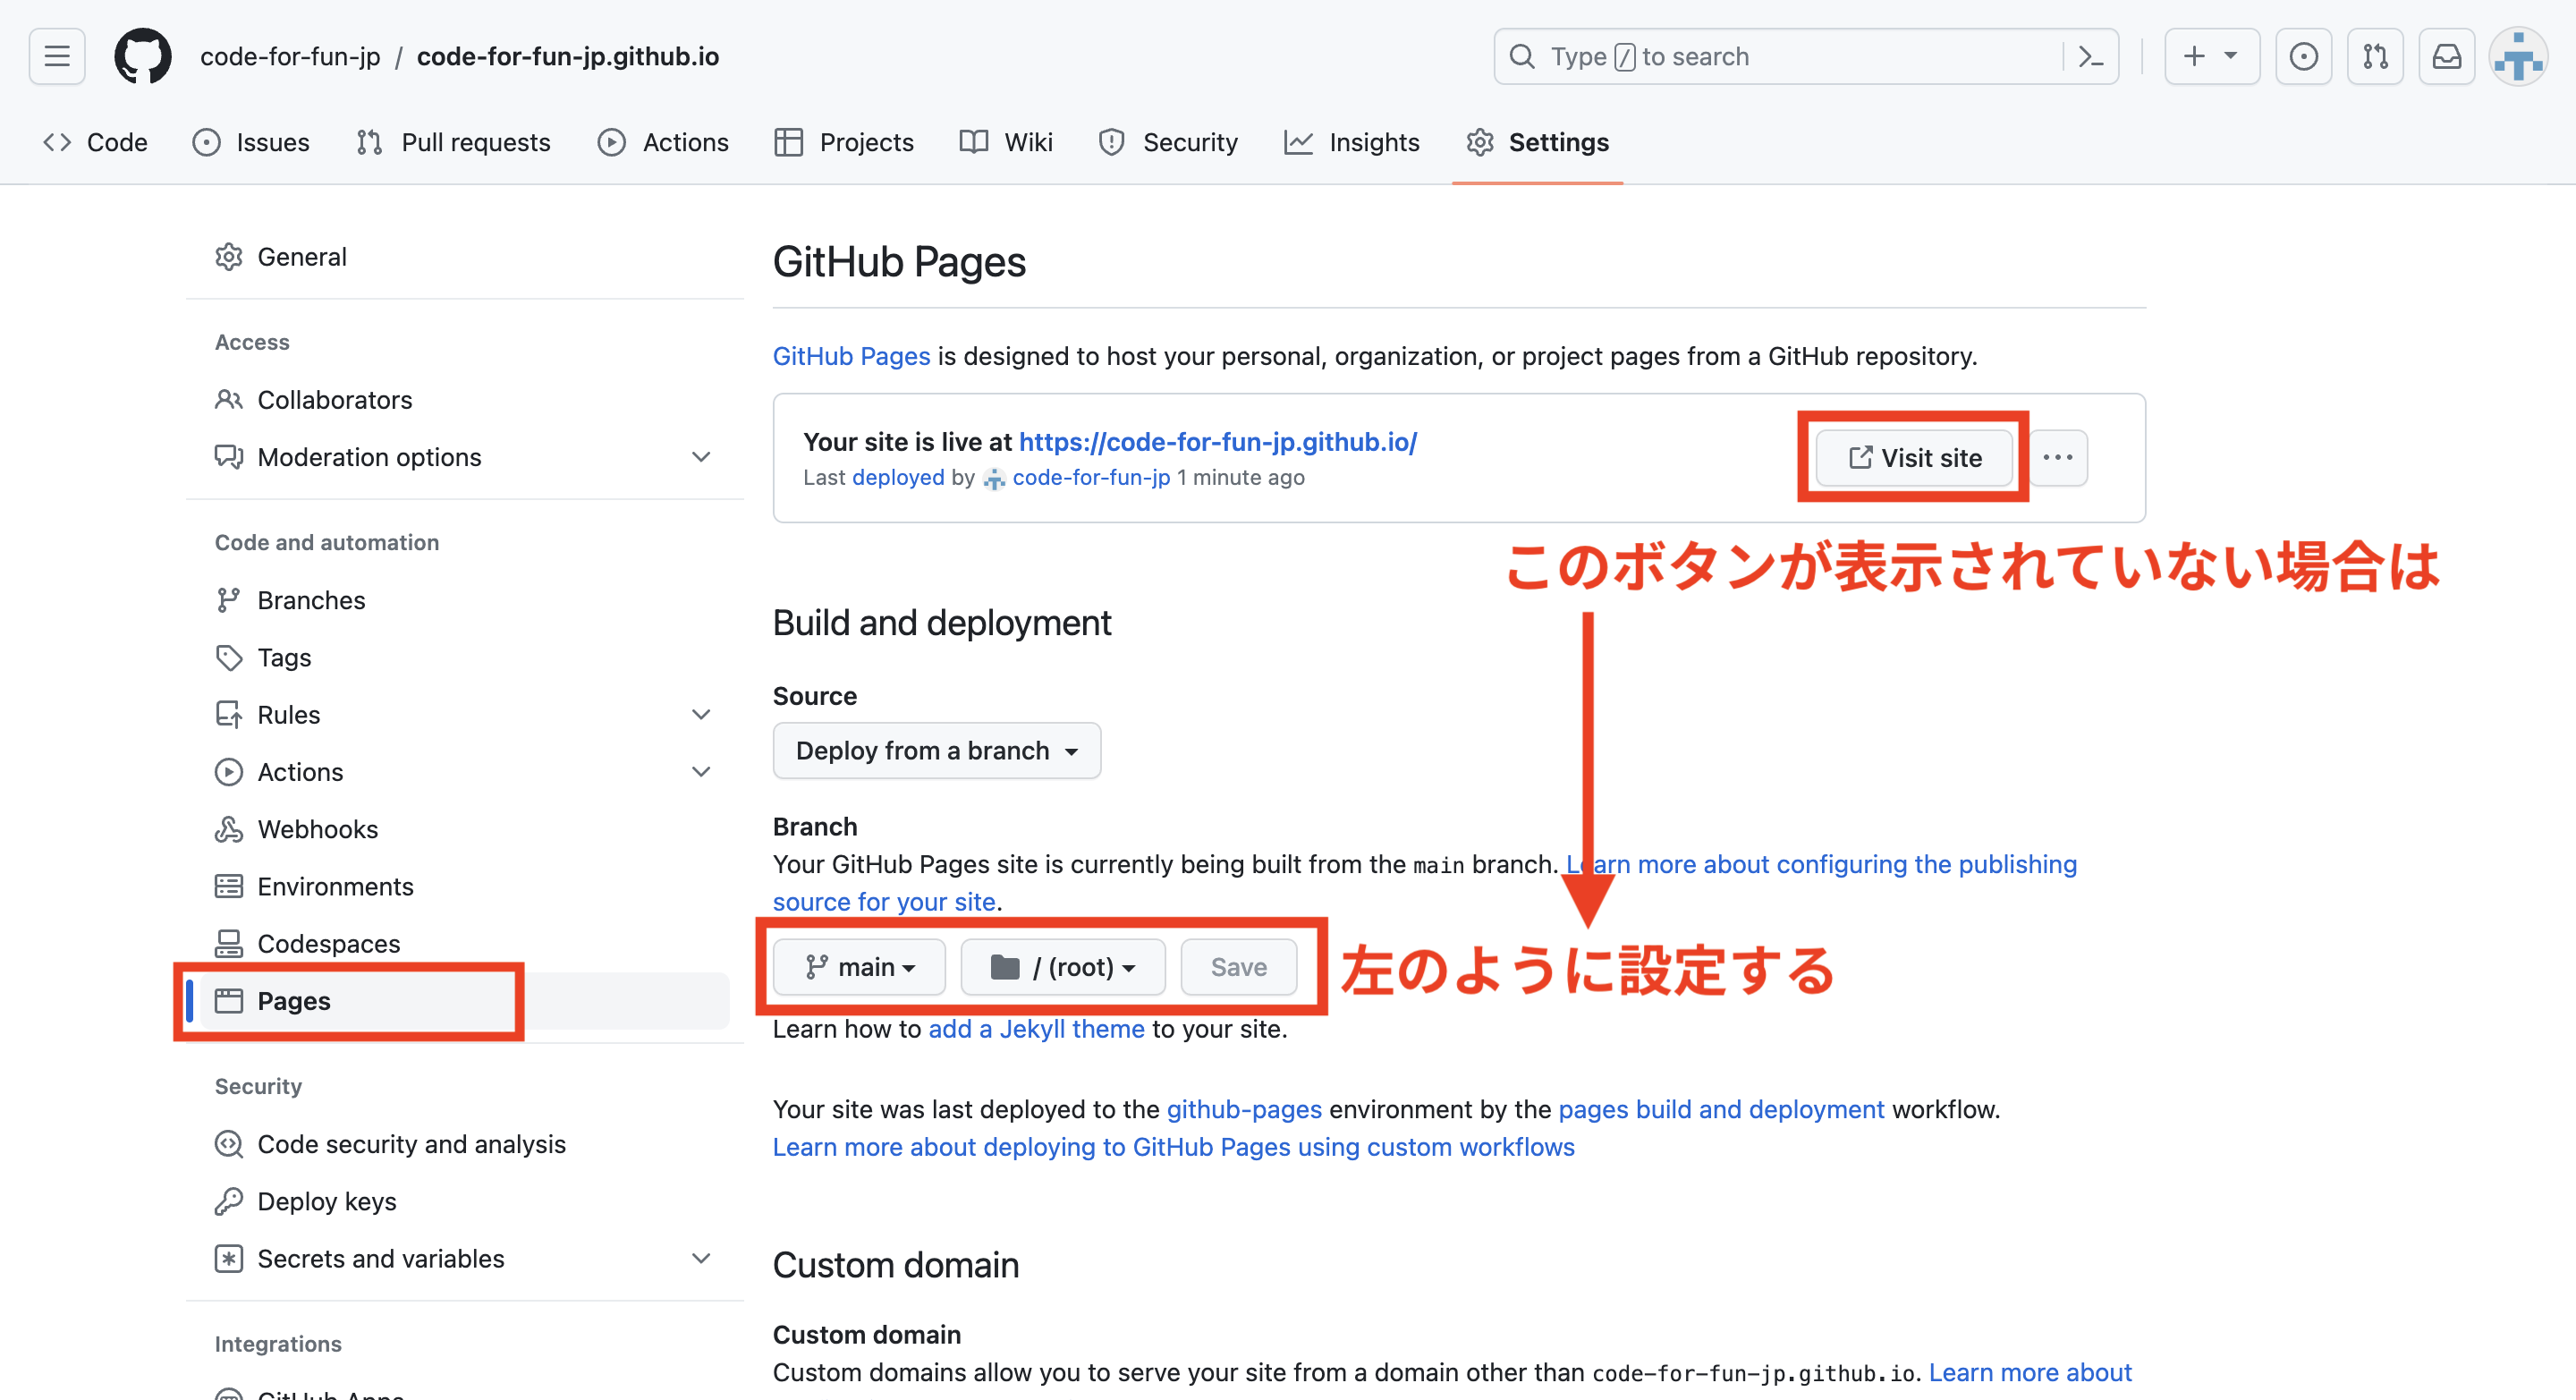
左側にあるメニューから Pages を開いて Visit site をクリックします。
Visit site ボタンが表示されていない場合は Branch の設定を画像のように変更してください。
ページが表示されたら成功です!404 エラーになる場合は数十秒待ってから画面を更新してみましょう。
index.html にある「さらに詳しく」をクリックすると about.html に遷移します。
index.html
about.html
② プロジェクトサイトを作成する
ここからは「プロジェクトサイト」形式のウェブページを作成します。
サイトの URL は https://ユーザー名.github.io/リポジトリ名/ になる決まりで、以下のように複数のサイトを作成することができます。
- https://ユーザー名.github.io/sample/
- https://ユーザー名.github.io/portfolio/
- https://ユーザー名.github.io/gallery/
ここからは以下2つのページを作成していきます。
- https://ユーザー名.github.io/sample/index.html
- https://ユーザー名.github.io/sample/about.html
1. リポジトリを作成する
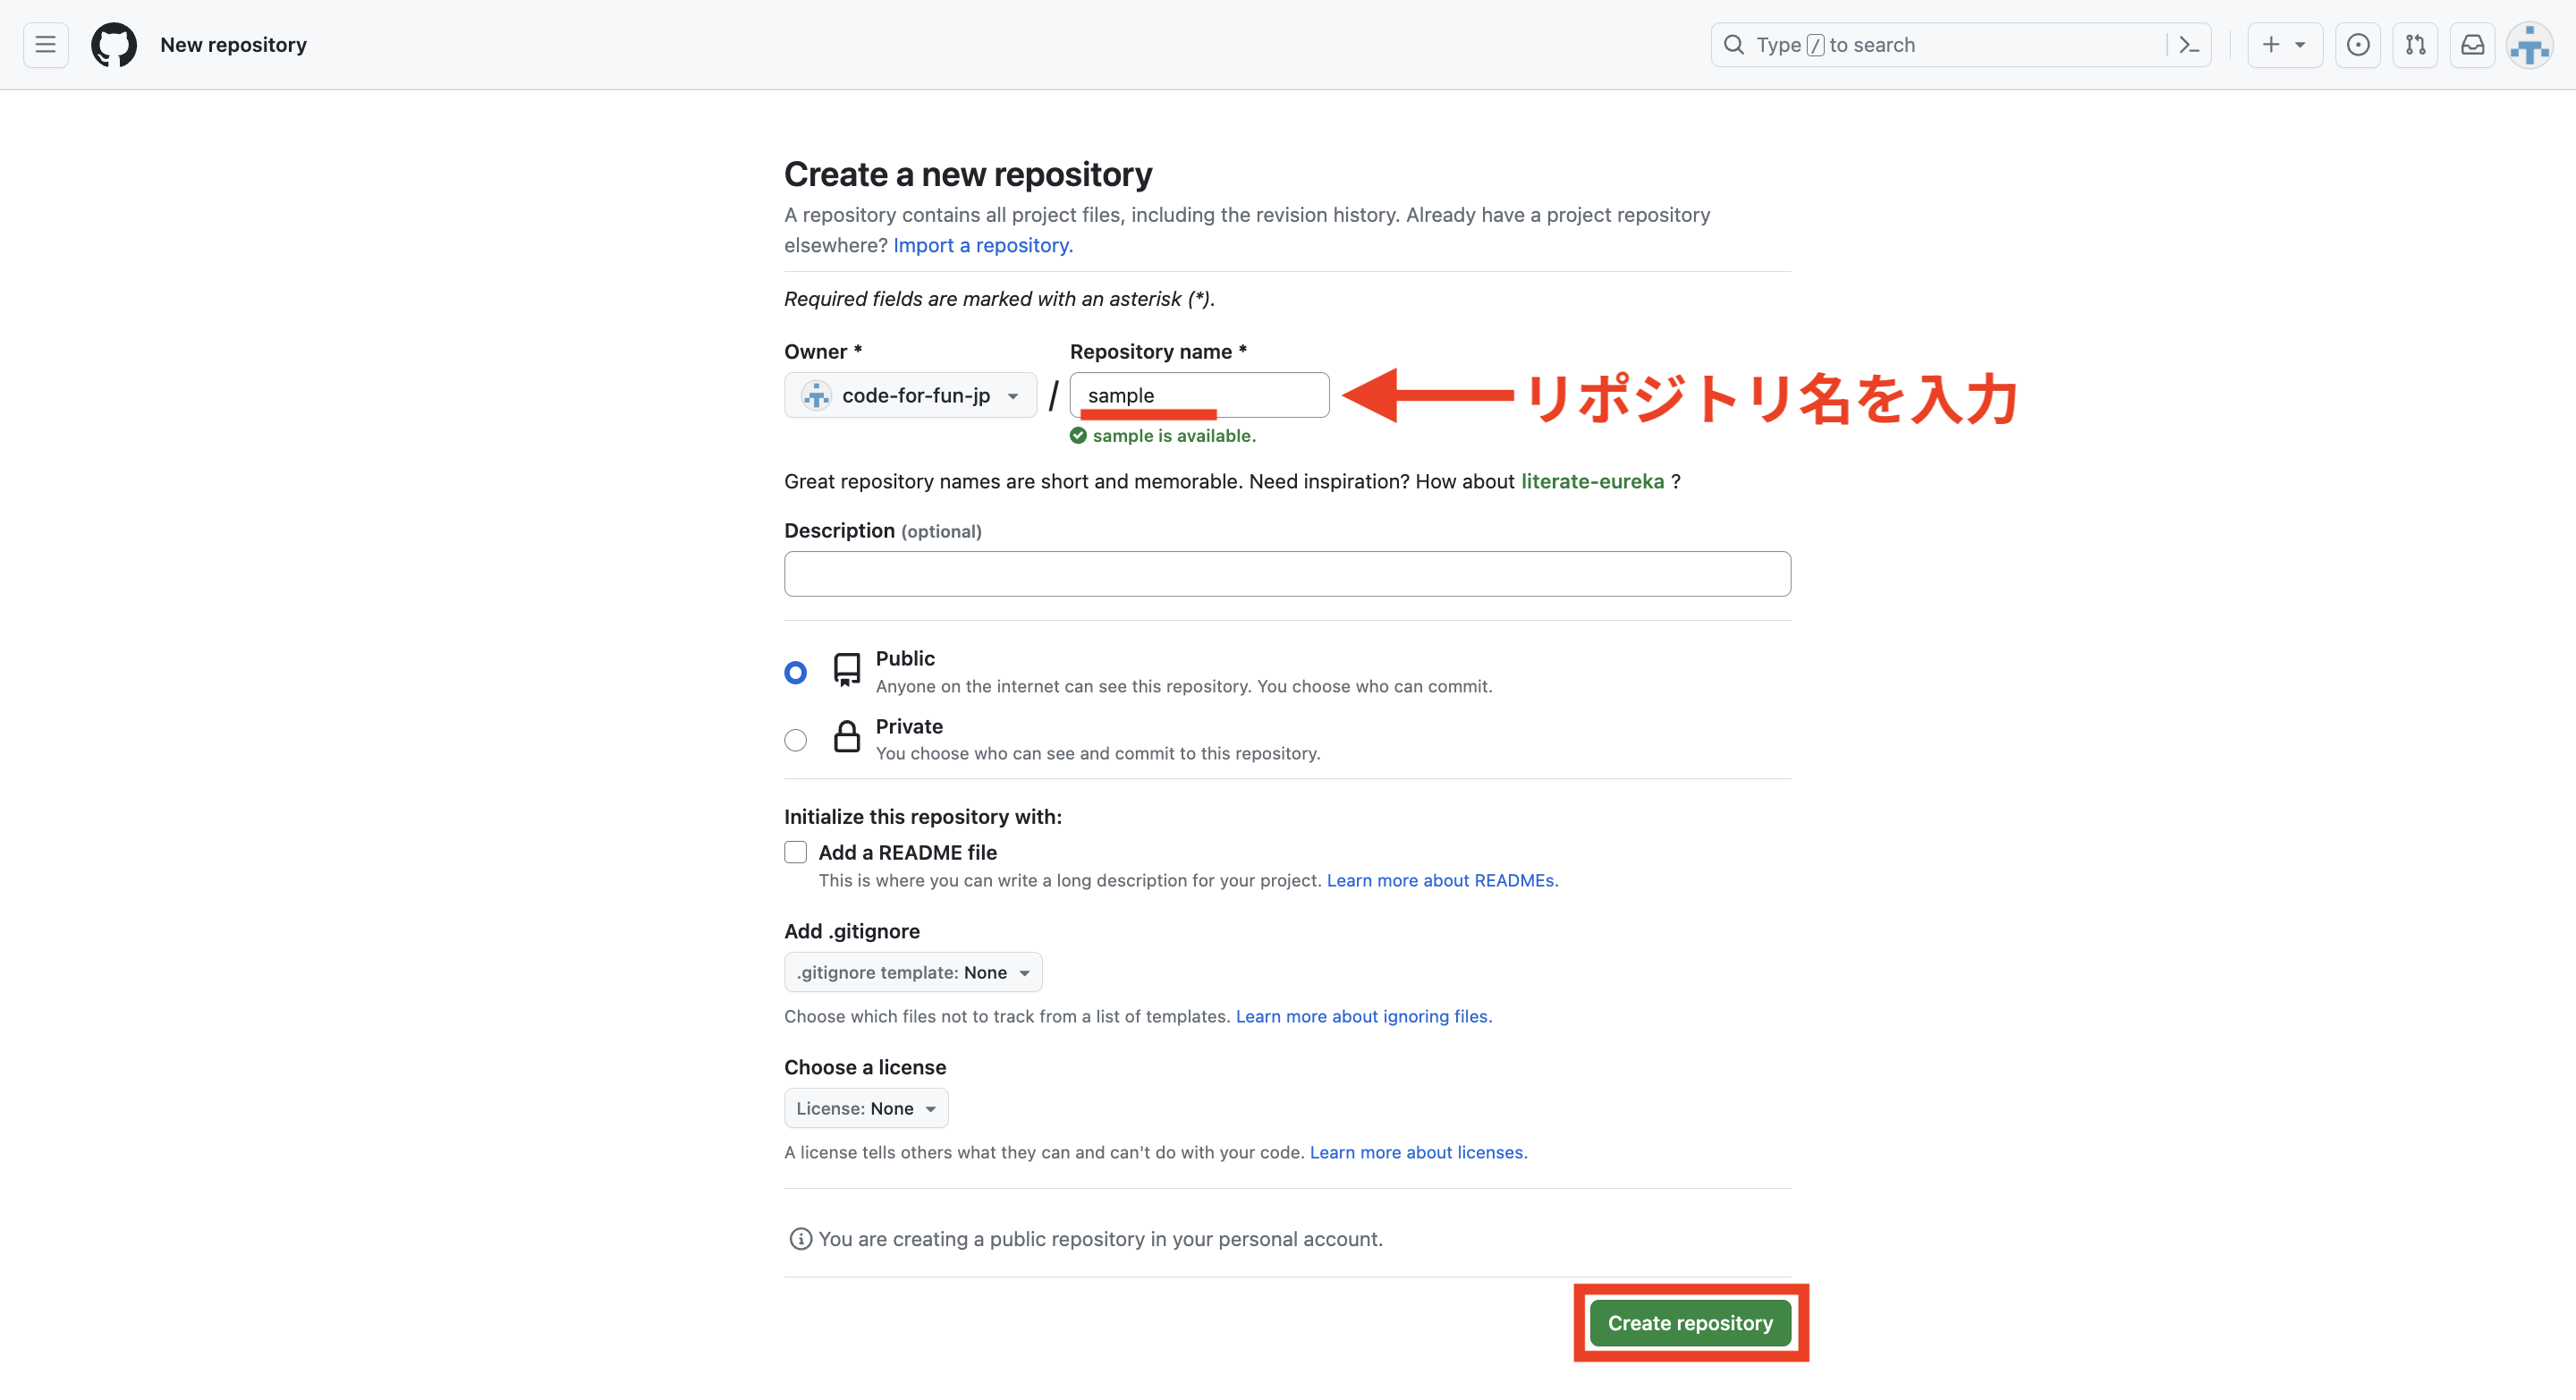
新しいリポジトリを作成します。

Repository name を入力して、右下にある Create repository をクリックします。
ここでは sample としました。
2. ファイルを作成する
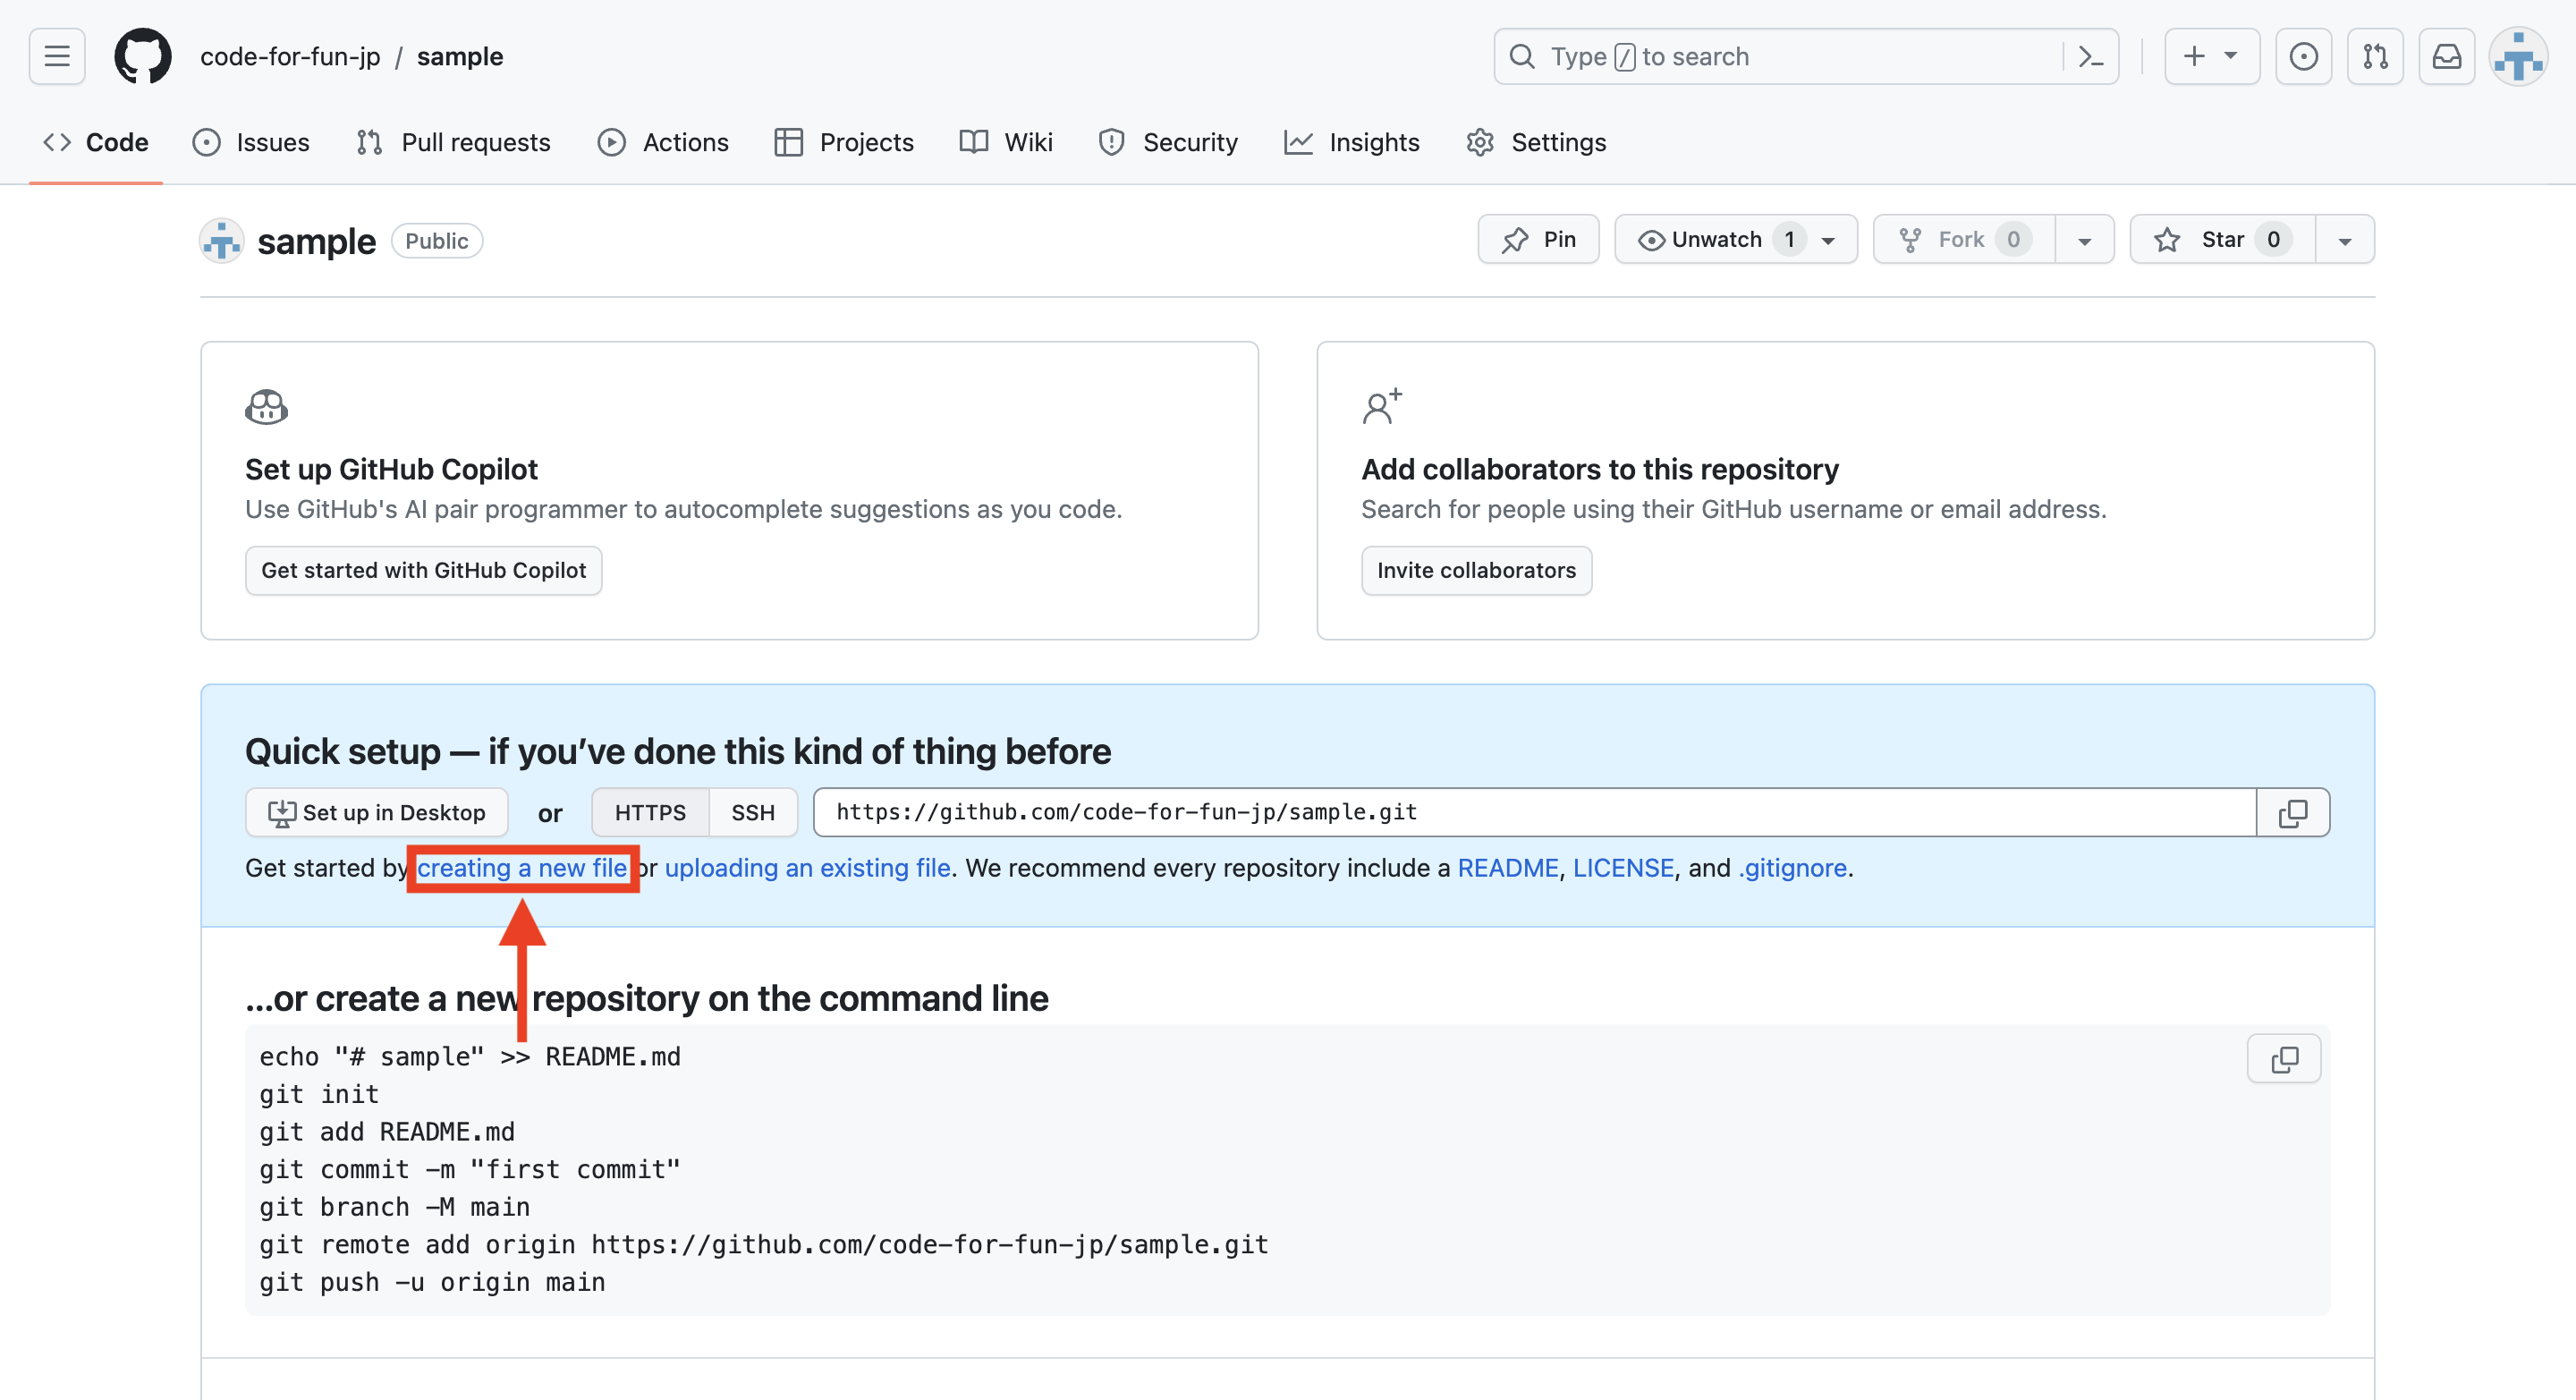
新しいファイルを追加していきます。
画面中央あたりにある creating a new file をクリックします。
index.html を作成
ファイル名に index.html と入力してコードを貼り付けたら、緑色の Commit changes… をクリックします。
- index.html のサンプルが必要な方はこちら
-
<!DOCTYPE > <html lang="ja"> <head> <meta charset="utf-8"> <meta name="viewport" content="width=device-width, initial-scale=1"> <title>Sample Site</title> <link href="https://cdn.jsdelivr.net/npm/bootstrap@5.3.2/dist/css/bootstrap.min.css" rel="stylesheet" integrity="sha384-T3c6CoIi6uLrA9TneNEoa7RxnatzjcDSCmG1MXxSR1GAsXEV/Dwwykc2MPK8M2HN" crossorigin="anonymous"> <style> </style> </head> <body> <header> <nav class="navbar bg-body-tertiary fixed-top"> <div class="container-fluid"> <a class="navbar-brand" href="index.html">Sample Site</a> </div> </nav> </header> <main> <div class="container mt-5 py-5"> <div class="p-4 rounded bg-body-secondary"> <h1 class="display-5 fst-italic">Welcome to Sample Site</h1> <p class="lead mt-5">ここにテキストが入ります。ここにテキストが入ります。ここにテキストが入ります。ここにテキストが入ります。</p> <p class="lead">ここにテキストが入ります。ここにテキストが入ります。ここにテキストが入ります。ここにテキストが入ります。</p> <p class="lead"><a href="about.html">さらに詳しく</a></p> </div> <div class="row my-5"> <h2>Contact</h2> <p>お問い合わせは <a href="#">sample@sample.com</a> にお送りください。</p> </div> </div> </main> <footer class="py-3 fixed-bottom bg-body-tertiary"> <div class="text-center"> <span class="text-body-secondary">© Sample Site</span> </div> </footer> </body> </html>
Commit changes をクリックします。
about.html を作成する
ファイルをもう1つ作成します。
Add file をクリックして Create new file を選択します。(Upload file をクリックすると HTML ファイルや画像などをアップロードすることもできます。)
ファイル名に about.html と入力してコードを貼り付けたら、緑色の Commit changes… をクリックします。
- about.html のサンプルが必要な方はこちら
-
<!DOCTYPE > <html lang="ja"> <head> <meta charset="utf-8"> <meta name="viewport" content="width=device-width, initial-scale=1"> <title>Sample Site</title> <link href="https://cdn.jsdelivr.net/npm/bootstrap@5.3.2/dist/css/bootstrap.min.css" rel="stylesheet" integrity="sha384-T3c6CoIi6uLrA9TneNEoa7RxnatzjcDSCmG1MXxSR1GAsXEV/Dwwykc2MPK8M2HN" crossorigin="anonymous"> <style> </style> </head> <body> <header> <nav class="navbar bg-body-tertiary fixed-top"> <div class="container-fluid"> <a class="navbar-brand" href="index.html">Sample Site</a> </div> </nav> </header> <main> <div class="container mt-5 py-5"> <div class="row"> <h2>About</h2> <p>ここにテキストが入ります。ここにテキストが入ります。ここにテキストが入ります。ここにテキストが入ります。</p> <p>ここにテキストが入ります。ここにテキストが入ります。ここにテキストが入ります。ここにテキストが入ります。</p> <p>ここにテキストが入ります。ここにテキストが入ります。ここにテキストが入ります。ここにテキストが入ります。</p> </div> </div> </main> <footer class="py-3 fixed-bottom bg-body-tertiary"> <div class="text-center"> <span class="text-body-secondary">© Sample Site</span> </div> </footer> </body> </html>
Commit changes をクリックします。
3. サイトを確認する
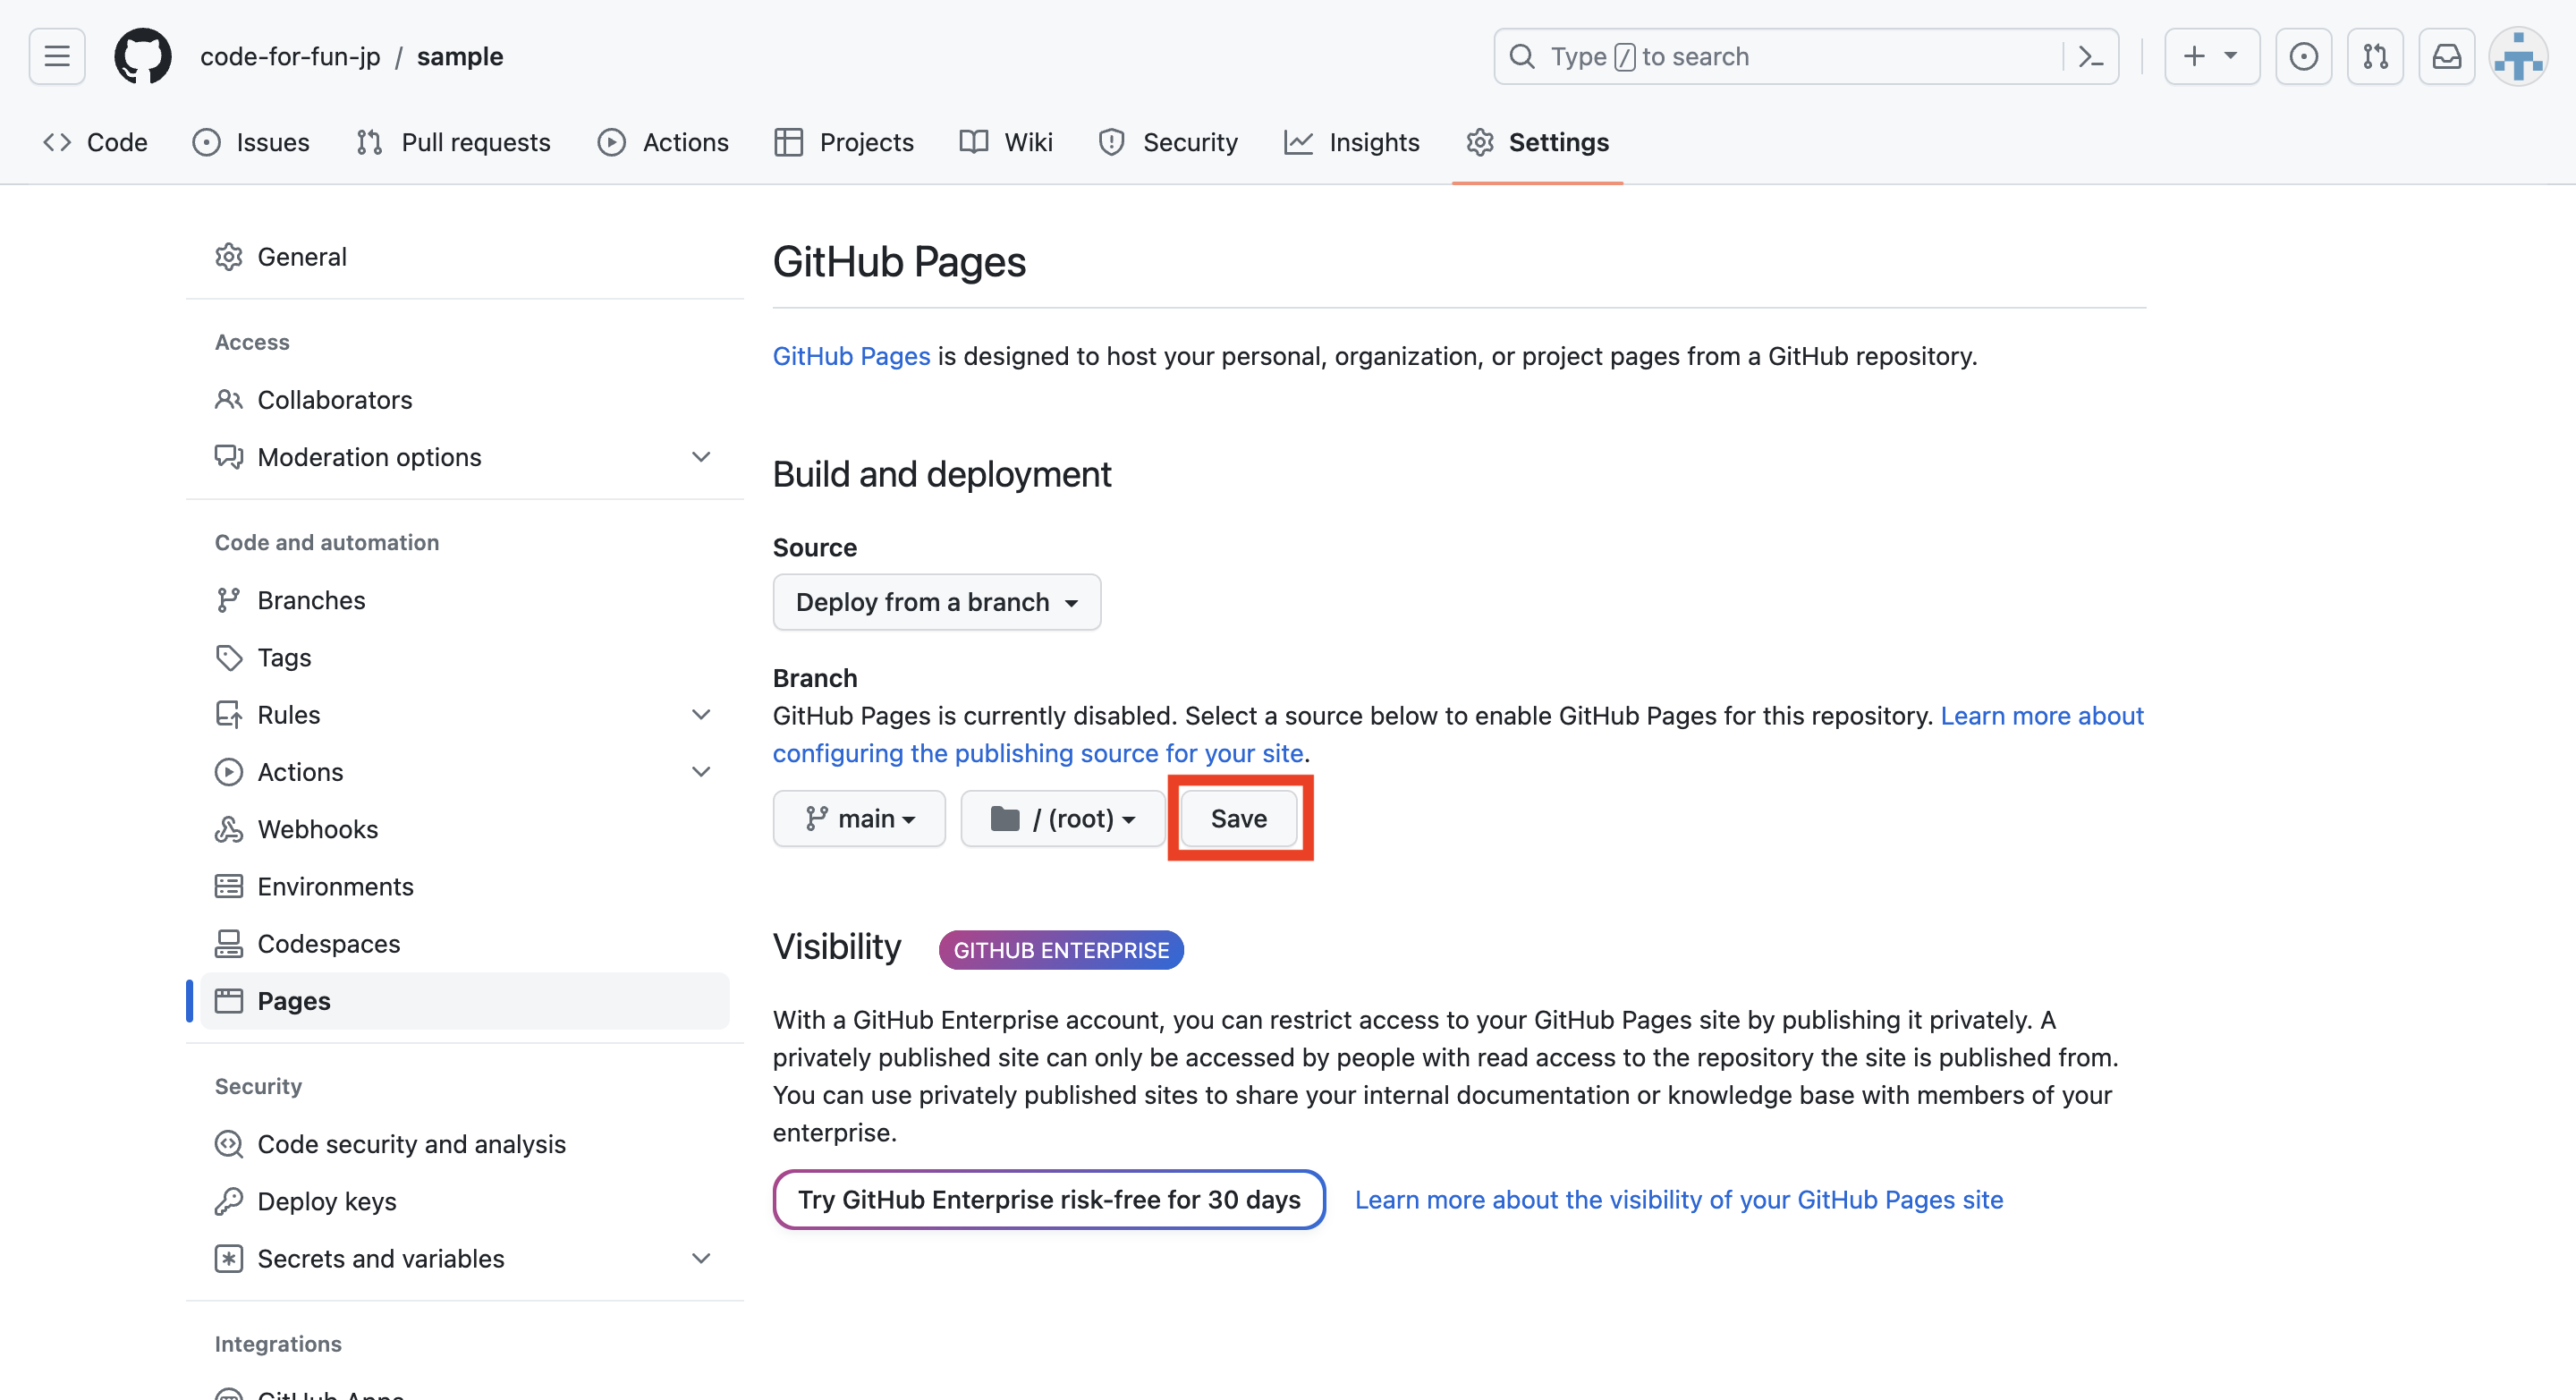
Setting をクリックします。
左側にあるメニューから Pages を開きます。
Branch 項目にある None をクリックして main を選択します。
Save をクリックします。
https://ユーザー名.github.io/リポジトリ名/ にアクセスしてページが表示されたら成功です!
404 エラーになる場合は数十秒待ってから画面を更新してみましょう。
index.html にある「さらに詳しく」をクリックすると about.html に遷移します。
index.html
about.html
完成
以上で完成です!
静的なウェブサイト(HTML, CSS, JavaScriptで作るサイト)しか作成できませんが、工夫すればポートフォリオサイトなども十分作成できると思います。
ぜひご自身のサイトにお役立てください。
- トップページ
- 作品紹介ページ
- 自己紹介ページ
- お問い合わせページ(SNSリンクやメールアドレスを表示)
参考サイト:https://docs.github.com/ja/pages/quickstart
独学でプログラミングを勉強をしている方、基礎は勉強したけれど次に何をすれば良いか分からない...という方のお役に立てるサイトを目指しています。
>> 詳しいプロフィールはこちら
主な使用言語:Kotlin / Swift / Java / PHP
その他運営サイト:請求書作成ツール