【Android】Jetpack Compose 入門講座 第16回「画像のグリッド表示」

はじめに
今回は簡単にグリッド表示を作成できる LazyGrid コンポーネントを使ってみましょう。
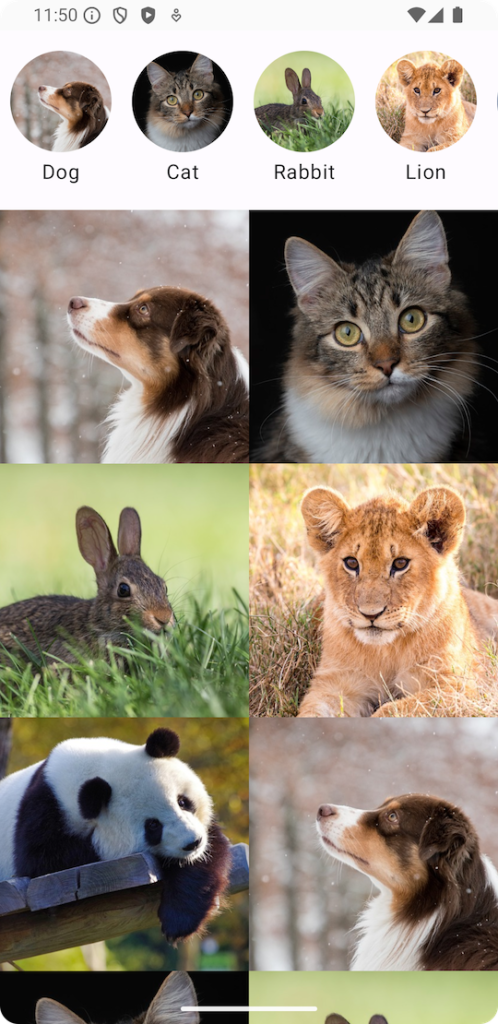
LazyGridコンポーネント
関数の作成
まずはレイアウトを作成する関数とプレビュー用の関数を用意します。
AnimalListRow 関数の下に AnimalListGrid 関数を追加します(6〜9行目)。
@Composable
fun AnimalListRow(modifier: Modifier = Modifier) {
    // 省略
}

@Composable
fun AnimalListGrid(modifier: Modifier = Modifier) {

}
AnimalListRowPreview 関数の下に AnimalListGridPreview 関数を追加します(7〜11行目)。
@Preview
@Composable
private fun AnimalListRowPreview() {
    AnimalListRow()
}

@Preview
@Composable
private fun AnimalListGridPreview() {
    AnimalListGrid()
}
AnimalListGrid 関数
AnimalListGrid 関数にコードを追加します。
@Composable
fun AnimalListGrid(modifier: Modifier = Modifier) {
    LazyVerticalGrid(
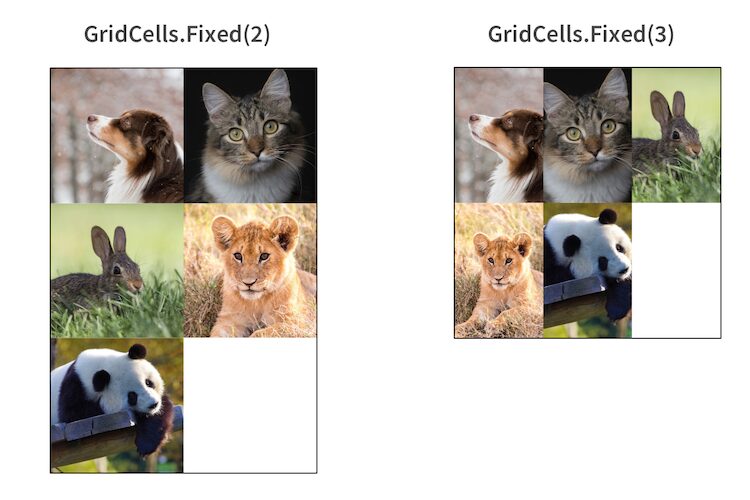
        columns = GridCells.Fixed(2)
    ) {
        items(animalList) {
            Image(
                painter = painterResource(id = it.drawable),
                contentDescription = null,
                contentScale = ContentScale.Crop,
                modifier = Modifier.size(200.dp)
            )
        }
    }
}
4行目で1列に表示するセル数を設定しています。
仕上げ
AnimalListRow の下に AnimalListGrid を表示して、このような画面を作ってみましょう。
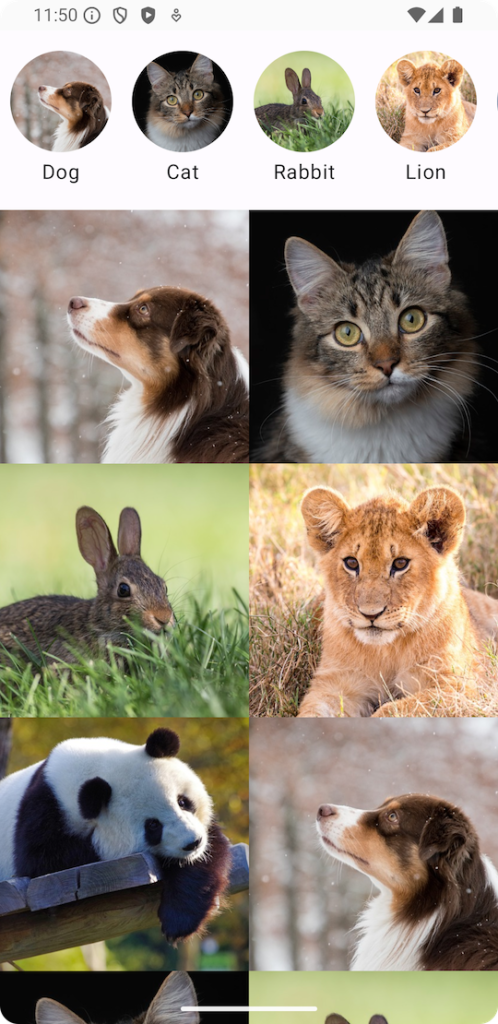
MyApp 関数のコードを9〜12行目のように変更します。
@Composable
fun MyApp(modifier: Modifier = Modifier) {
    MyApplicationTheme {
        Surface(
            // 省略
        ) {
            Column {
                AnimalListRow()
                AnimalListGrid()
            }
        }
    }
}
このような画面になりました。
AnimalListRow と AnimalListGrid の間に余白を入れましょう。
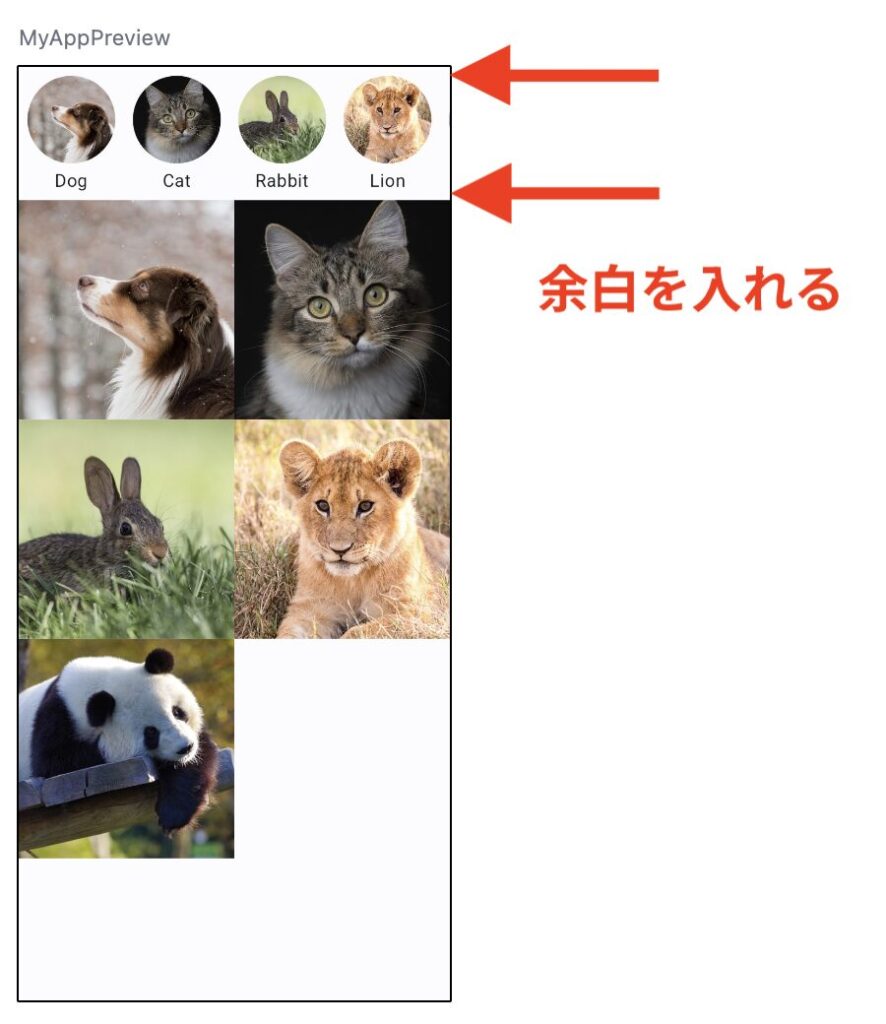
余白の追加は padding の他にも Spacer コンポーネントを使うことができます。
@Composable
fun MyApp(modifier: Modifier = Modifier) {
    MyApplicationTheme {
        Surface(
            // 省略
        ) {
            Column {
                Spacer(modifier = modifier.size(8.dp))
                AnimalListRow()
                Spacer(modifier = modifier.size(12.dp))
                AnimalListGrid()
            }
        }
    }
}
動作確認
最後にアプリを実行してみましょう。
画像をたくさん表示したい場合は animalList のデータを増やしておきます。
private data class Animal(val drawable: Int, val text: String)
private val animalList = listOf(
    Animal(R.drawable.dog, "Dog"),
    Animal(R.drawable.cat, "Cat"),
    Animal(R.drawable.rabbit, "Rabbit"),
    Animal(R.drawable.lion, "Lion"),
    Animal(R.drawable.panda, "Panda"),
    Animal(R.drawable.dog, "Dog"),
    Animal(R.drawable.cat, "Cat"),
    Animal(R.drawable.rabbit, "Rabbit"),
    Animal(R.drawable.lion, "Lion"),
    Animal(R.drawable.panda, "Panda")
)
アプリを実行してみましょう。
次に行うこと
次回からはボタンを使ったアプリを作っていきましょう。
第17回「ボタンの使い方」に進む
ここまでのコード
package com.example.myapplication

import android.os.Bundle
import androidx.activity.ComponentActivity
import androidx.activity.compose.setContent
import androidx.activity.enableEdgeToEdge
import androidx.annotation.DrawableRes
import androidx.compose.foundation.Image
import androidx.compose.foundation.layout.Column
import androidx.compose.foundation.layout.Spacer
import androidx.compose.foundation.layout.fillMaxSize
import androidx.compose.foundation.layout.padding
import androidx.compose.foundation.layout.size
import androidx.compose.foundation.layout.statusBarsPadding
import androidx.compose.foundation.lazy.LazyRow
import androidx.compose.foundation.lazy.grid.GridCells
import androidx.compose.foundation.lazy.grid.LazyVerticalGrid
import androidx.compose.foundation.lazy.grid.items
import androidx.compose.foundation.lazy.items
import androidx.compose.foundation.shape.CircleShape
import androidx.compose.material3.Surface
import androidx.compose.material3.Text
import androidx.compose.runtime.Composable
import androidx.compose.ui.Alignment
import androidx.compose.ui.Modifier
import androidx.compose.ui.draw.clip
import androidx.compose.ui.layout.ContentScale
import androidx.compose.ui.res.painterResource
import androidx.compose.ui.tooling.preview.Preview
import androidx.compose.ui.unit.dp
import com.example.myapplication.ui.theme.MyApplicationTheme

class MainActivity : ComponentActivity() {
    override fun onCreate(savedInstanceState: Bundle?) {
        super.onCreate(savedInstanceState)
        enableEdgeToEdge()
        setContent {
            MyApp()
        }
    }
}

@Composable
fun MyApp(modifier: Modifier = Modifier) {
    MyApplicationTheme {
        Surface(
            modifier = modifier
                .fillMaxSize()
                .statusBarsPadding()
        ) {
            Column {
                Spacer(modifier = modifier.size(8.dp))
                AnimalListRow()
                Spacer(modifier = modifier.size(12.dp))
                AnimalListGrid()
            }
        }
    }
}

@Composable
fun AnimalListElement(
    @DrawableRes drawable: Int,
    text: String,
    modifier: Modifier = Modifier
) {
    Column(
        horizontalAlignment = Alignment.CenterHorizontally,
        modifier = modifier.padding(8.dp)
    ) {
        Image(
            painter = painterResource(id = drawable),
            contentDescription = text,
            contentScale = ContentScale.Crop,
            modifier = modifier
                .size(80.dp)
                .clip(CircleShape)
        )
        Text(
            text = text,
            modifier = modifier.padding(top = 4.dp)
        )
    }
}

private data class Animal(val drawable: Int, val text: String)
private val animalList = listOf(
    Animal(R.drawable.dog, "Dog"),
    Animal(R.drawable.cat, "Cat"),
    Animal(R.drawable.rabbit, "Rabbit"),
    Animal(R.drawable.lion, "Lion"),
    Animal(R.drawable.panda, "Panda"),
    Animal(R.drawable.dog, "Dog"),
    Animal(R.drawable.cat, "Cat"),
    Animal(R.drawable.rabbit, "Rabbit"),
    Animal(R.drawable.lion, "Lion"),
    Animal(R.drawable.panda, "Panda")
)

@Composable
fun AnimalListRow(modifier: Modifier = Modifier) {
    LazyRow {
        items(animalList) {
            AnimalListElement(drawable = it.drawable, text = it.text)
        }
    }
}

@Composable
fun AnimalListGrid(modifier: Modifier = Modifier) {
    LazyVerticalGrid(
        columns = GridCells.Fixed(3)
    ) {
        items(animalList) {
            Image(
                painter = painterResource(id = it.drawable),
                contentDescription = null,
                contentScale = ContentScale.Crop,
                modifier = Modifier.size(200.dp)
            )
        }
    }
}

@Preview
@Composable
private fun AnimalListElementPreview() {
    AnimalListElement(drawable = R.drawable.dog, text = "Dog")
}

@Preview
@Composable
private fun AnimalListRowPreview() {
    AnimalListRow()
}

@Preview
@Composable
private fun AnimalListGridPreview() {
    AnimalListGrid()
}

@Preview
@Composable
private fun MyAppPreview() {
    MyApp()
}
